The FreeNAS Nextcloud plugin installation works great with automatic configuration thanks to a recent pull request. But, you don’t get SSL enabled by default. This is critical, especially for a system exposed to the internet.
In this post you’ll see how to:
- Install the Nextcloud plugin in a FreeNAS BSD jail
- Add an extra NAT port for SSL to the jail
- Configure NGINX inside the jail by adding a customised configuration with SSL enabled
- Apply a free SSL certificate using Lets Encrypt and DNS-01 challenge validation
- Look at some options for setting up home networking for public access
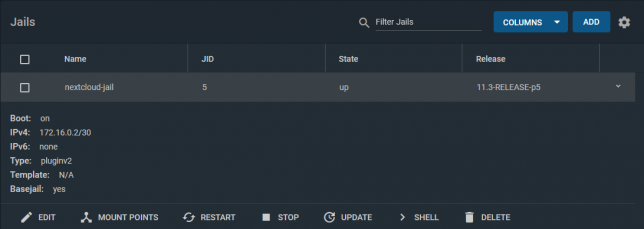
Start off by Installing the Nextcloud Plugin in a jail. Choose NAT for networking mode. It defaults to port 8282:80 (http).
Stop the jail once it’s running and edit it. Add another NAT rule to point 8443 to 443 for SSL.

The reason for selecting port 8443 for Nextcloud is because the FreeNAS web UI listens on port 443 for SSL too.
An alternative could be to use DHCP instead of NAT for the jail. I chose NAT for my setup as I prefer using one internal IP address for everything I run on the FreeNAS server.
Shell into the Nextcloud jail, and rename the default nginx configuration.
mv /usr/local/etc/nginx/conf.d/nextcloud.conf /usr/local/etc/nginx/conf.d/nextcloud.conf.old
NGINX will load all .conf files in this directory. Hence the reason you’ll create a new configuration for your SSL setup here.
ee /usr/local/etc/nginx/conf.d/nextcloud-ssl.conf
Populate it with the contents of the gist below, but replace server_name, ssl_certificate, and ssl_certificate_key with your own hostname.
Generate a free SSL certificate with Lets Encrypt
To configure the Nextcloud plugin on FreeNAS with SSL you don’t need to break the bank on SSL certificate costs from traditional CAs. Lets Encrypt it free, but you’ll need to renew your certificate every three months.
DNS-01 challenge certificate generation for Lets Encrypt is a great way to get SSL certificates without a public web server.
It entails creating a TXT/SPF record on the domain you own, with a value set to a code that certbot gives you during the certbot request process.
Install certbot if you don’t already have it installed. On a debian based system:
sudo apt-get install certbot
Request a certificate for your desired hostname using certbot with dns as the preferred challenge.
sudo certbot -d yournextcloud.example.net --manual --preferred-challenges dns certonly
Follow the prompts until you receive a code to setup your own TXT record with. Go to your DNS provider control panel and create it with the code you’re given as the value.
After creating the record, finish the certificate request. Lets Encrypt will confirm the DNS TXT record and issue you a certificate. You’ll get a chain file called fullchain.pem, along with a private key file called privkey.pem.
Upload the SSL certificate files to Nextcloud
Upload both to your Nextcloud Jail. Use SCP to copy them up, renaming them as follows:
- /etc/ssl/nginx/yournextcloud.example.net.crt (certificate chain file)
- /etc/ssl/nginx/yournextcloud.example.net.key (private key file)
Rename them as per your chosen hostname to keep things organised, and so that they match your nextcloud-ssl.conf file entries.
Port forwarding / NAT setup
This is the part that comes down to your own network setup. I use a double NAT setup, so I NAT traffic from my external router interface, through to another internal router.
From my internal router, I port forward / NAT from the internal router interface through to my FreeNAS box on port 8443.
From there, the Nextcloud jail does NAT to take the TCP traffic from 8443 to 443 inside the jail (where NGINX is listening on 443).
This is how my NAT and port forwarding chain looks:
Public_IP:29123 (WAN interface) -> Internal_IP:29123 (Internal router LAN interface) -> Internal_IP:8443 (FreeNAS LAN interface) -> Internal_IP:443 (Nextcloud Jail)
If you’re lucky enough to have a static IP address then you can point your DNS host record to your static IP. Otherwise you’ll neee to use some form of dynamic DNS service.
At this point you should have everything in place.
Final steps
Using a shell in the Nextcloud jail, restart nginx with service nginx restart. If all goes well you’ll see nginx started in the output of that command.
If not, you’re likely to have an NGINX configuration syntax error.
The logs are usually good about pinpointing these, so read them to see where you might have missed something obvious in the nextcloud-ssl.conf file. Adjust any errors and restart again.
The default credentials that for Nextcloud are in the home directory of the jail (/root). To retrieve them:
cat /root/ncuser
cat /root/ncpassword
Test logging in, and get started with personalising your Nextcloud system and adding some users.
Now you can enjoy the Nextcloud plugin on FreeNAS with SSL enabled.
Thanks for this, finally I’ve got ssl sorted. one thing to be noted, I powered down the server – Truenas – and on powering backup nextcloud didnt respond to any browser request. trouble shooting Nginx hadn’t started with a report mentioning the first line of nextcloud.conf as the problem. it had created a new nextcloud.conf – I think as an emergency response to the power down. on power up it had a new nextcloud.conf and nextcloud-ssl.conf to deal with hence the fail. renamed the new nextcloud.conf to old and all was well (apart from my nerves!) I guess to prevent this happening again it might be better to use the nextcloud.conf name only
Why can’t this be plug and play with SSL? That would be a great feature that installing nextcloud on freenas will give you semlessly an SSL enabled website.
Maybe in a future update?
Hey Zach, what error do you get via HTTPS? Have you checked that your certbot issued certificate files are in place? Try `cat` them out make sure you have both the private key and the certificate chain. Double check your nginx config is referencing the exact absolute paths to the two certificate files too. That is the `ssl_certificate` and `ssl_certificate_key` paths.
Make sure your `server_name` value matches the hostname you issued the lets encrypt certificate for too.
Have you got the listen directives set for 443 / https? Just double check those too.
Another thing to check is your nginx log files – try tail them after starting nginx to make sure there were no errors or warnings.
Hey Sean,
Followed this guide to a T except I used a different certbot command. The whole NGINX start up was fine and now when I try and log into nextcloud I get a 404 error when connecting through HTTP and a site can’t be reached error through HTTPS. I know this guide is a year old but I was hoping you could help me
Thanks Kevin, I’ve fixed that typo! Cheers
Thank you for the write up!
There is however one typo that took me a few minutes to figure out.
“ee /usr/local/etc/nginx/conf.d/nextcloud.conf /usr/local/etc/nginx/conf.d/nextcloud-ssl.conf”
should be- ->
“ee /usr/local/etc/nginx/conf.d/nextcloud-ssl.conf”
Hey ! Juste a little mistake in the article, SSL is deprecated and not used anymore.
Now, it’s TLS : https://en.wikipedia.org/wiki/Transport_Layer_Security
Hi Rob,
In my case I did the certbot certificate request and retrieval using a debian based system on the side, then copied the certs over to the FreeBSD Jail for Nextcloud.
I’m just way more familiar with the tooling on Linux/Debian, so for me personally it made sense to do it this way.
It looks like you can get the two python-based version variants of certbot via pkg.
Python 2.7:
pkg install py27-certbot
Python 3.7:
pkg install py37-certbot
Have a quick search around and I’m pretty sure you’ll find some BSD-specific guidance on using certbot.
Hope that helps.
You initially say, “Install the Nextcloud plugin in a FreeNAS BSD jail” – A BSD unix OS.
Then, later to install certbot, you say this, “Install certbot if you don’t already have it installed. On a debian based system: sudo apt-get install certbot”
But, it’s not a debian based system, it’s BSD, which has the pkg package manager and there isn’t any package named ‘certbot’.
How do you install certbot using the pkg package manager?
Hey Alex, no worries, sometimes its easy to miss the obvious stuff, especially if you’ve been at the screen for a while! 🙂 Glad you have it sorted.
Hi Sean,
yeah, I was trying to connect with http instead of https… I feel quite stupid, now 😀
Thanks for your answer!
Alex
Hey Alex,
Are you trying to use port 80? If so, I don’t think that’ll work for SSL, as it is widely used as the standard, non-HTTPS port, and should only be used for unencrypted web traffic. Try changing the port you use for SSL and you should come right.
Sean
Hi,
thanks for your guide. I was following along just fine until the end, when it came to restarting the nginx service. I get this error:
nginx: the configuration file /usr/local/etc/nginx/nginx.conf syntax is ok
nginx: [emerg] socket() [::]:80 failed (43: Protocol not supported)
nginx: configuration file /usr/local/etc/nginx/nginx.conf test failed
Now, no matter how hard I look, no one seems to have experienced error 43 before me… I copied the nextcloud-ssl.conf file from here, only removing these two lines:
listen [::]:8443 ssl http2;
listen 8443 ssl http2;
because I do not use that port on my system.
Do you have any idea what it might be?
Thank you
Hi Denis,
What about some of the above that path? How about ‘/usr/local/etc/nginx’? If that exists, then you could try and create the conf.d directory and then create the nginx ‘nextcloud-ssl.conf’ file and go from there. I checked the nextcloud freenas Github plugin repo and there don’t seem to be any major changes recently relating to nginx, so it is a bit odd that you’re in this state with a new install of the plugin.
Hey Anna,
Sometimes DNS records can take some time to propagate. Usually you won’t be able to create the record and go straight from there. Sometimes it is necessary to wait even up to 48 hours. If you set the DNS TXT record once, then come back a few hours later and try again that is usually enough time and your DNS-01 validation should succeed. If not, try the next day.
Hi. I am following the guide, however, when I shell into the jail I don’t see the ngix’s conf.d directory …
root@NextCloud:/usr/local/etc/nginx # cd /usr/local/etc/nginx/conf.d/
/usr/local/etc/nginx/conf.d/: No such file or directory.
I’m on Release: 11.3-RELEASE-p7, the plugin is installed via the GUI
About 10 times add key to dns txt record and got error
“Press Enter to Continue
Waiting for verification…
Challenge failed for domain mydomain
dns-01 challenge for mydomain
Cleaning up challenges
Some challenges have failed.
IMPORTANT NOTES:
– The following errors were reported by the server:
Domain: estaf.org
Type: dns
Detail: DNS problem: NXDOMAIN looking up TXT for
_acme-challenge.mydomain – check that a DNS record exists for this
domain
had drop it and buy a normal certificate by some provider. generally a free/opensource one can’t be a normal product, as I understood.
Hey Kevin,
Yes that should work fine. As long as the user running the nginx service has read access to the files in the letsencrypt live / output directory then that should be just fine.
Nice idea!
Sean
Hi Sean,
Thanks for the tutorial. I am actually trying to do the same thing with my Freenas server. I still haven’t test it but can we just point the cert file location in nextcloud-ssl.conf to certbot’s output folder? The crontab can newnew and restart the web server when it is time to renew.
https://certbot.eff.org/lets-encrypt/freebsd-nginx (click wildcard to see this part)
echo “0 0,12 * * * root python -c ‘import random; import time; time.sleep(random.random() * 3600)’ && certbot renew -q –pre-hook ‘service nginx stop’ –post-hook ‘service nginx start'” | sudo tee -a /etc/crontab > /dev/null
I guess it should work?
Best
Kevin
Thanks J,
This is actually something I would like to tackle next. My plan up till now was to just manually renew, but certbot is definitely going to ease the pain of SSL renewal.
I’ve found this scripted install – it might be useful to you (you could pull out the lets encrypt parts): https://github.com/danb35/freenas-iocage-nextcloud
One thing I like about DNS-01 challenge is that I don’t have to rely on opening the jail to the internet and configuring the webserver to serve up the validation token as you do with HTTP-01 challenges.
Another option might be to setup a web server somewhere for the sole purpose of gathering the SSL certs with cerbot. You could then have a cronjob that periodically copies the cert(s) across to the systems you need them on, for example the Nextcloud jail, overwriting the older cert. If that were run once a month it should do the trick.
Good post. Was following your instructions and wanted to ask. If we setup SSL via Let’s Encrypt with the instructions you provided, would it allow me to use the auto renew by CertBot or is there another auto renew script that can be attached to what you have so gracefully implemented?
Thanks
J