Specifically, at any one point in time, this site is powered by one of a bunch of different ARM Cortex-A72 processors. In other words, it runs across a bunch of Raspberry Pi 4 devices.
There is a long history of where this blog has been hosted. Back in 2008 it was running in a virtual machine on a Dell OptiPlex PC.
Since then I’ve moved it to various hosting services, cloud services and such, until recently when I spun down my Digital Ocean Kubernetes cluster and migrated this site to my own personal Raspberry Pi Kubernetes cluster.
I don’t need anything powerful to run Shogan.tech. Most of my web traffic comes in steadily over the working week during typical working hours.
I have done some basic load testing though and the setup I have is capable of handling a few tens of clients per second, or as in this particular test, around 500 clients over 1 minute.
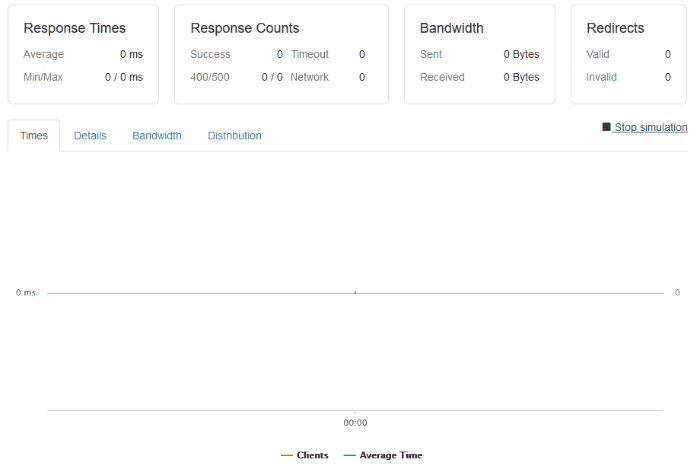
The response times may not be brilliant, but they’re OK. Especially considering the route a typical request/response takes:
- A request hits my ‘outer’ router from the internet and goes through some firewall rules.
- Then, the request enters my ‘inner’ network router and is routed over a WiFi link to a Raspberry Pi device running a bunch of iptables rules.
- This Raspberry Pi ‘router’ directs the request through another physical network interface into my dedicated Raspberry Pi cluster.
- The request hits an IP address being used as a software Load Balancer (Metal LB) where Kubernetes directs it to the backing NGINX ingress service (and hence pod).
- The Ingress Controller figures out which pod to direct the request to and sends it there.
- Finally the request hits the actual container running this site, and the software serves the response back to the requesting client.
- Not to forget there is also a request to the database container that the web container makes too!
ARM technology for me personally has been great. I’ve been able to play with cheap hardware and come up with interesting use cases for it.
I’ve enjoyed hacking away on Raspberry Pi devices since 2013. I’ve used them for fun electronics projects, hosting bespoke servers for friends, playing Minecraft multiplayer with my kids, and more.
The future of computing with ARM
When I look back at this request/response lifecycle, I’m always impressed that a tiny Raspberry Pi board the size of a credit card is responsible for doing this.
To me, ARM architecture has seemingly been slowly changing the computing landscape over the last 5 years, accelerating in pace in the last year or so.
Let’s take a look at some notable cases of this:
Fugaku (Super computer)
Earlier this week’s big news in the super computing space was that Fugaku, a super computer built in Japan is now online.
This supercomputer is built with the Fujitsu A64FX microprocessor (which is based on ARM architecture).
Even though its not yet fully online, it leads the way with a peak performance of 0.54 exaFLOPS rated in the TOP500.
Microsoft Surface hardware
Microsoft have been making big moves within the ARM processor space. Here are some notable points:
- Surface Hardware released over the recent year(s)
- Windows 10 on ARM
- Surface Pro X and the 3GHz Microsoft SQ1 (ARM) processor
Amazon AWS EC2 instances powered by ARM
AWS have started ramping up their own processor production with their Graviton chips.
These power newer generation EC2 instances and have allowed AWS to focus down on improvements that they know their customers will benefit from.
In a competitive cloud space, this gives AWS an advantage where they can design their own processors to deliver faster performance in key areas like compression, video encoding, machine learning, and more.
Another key advantage here is if you think about the plethora of recent Intel vulnerabilities that have been patched out and resulted in slower processor performance across various providers.
AWS can design their new chips with multi-tenancy and security as first class considerations. (Always-on 256-bit DRAM encryption etc…)
Apple macOS on ARM
Of course the big news the last couple of weeks has been Apple announcing they will be moving their Mac hardware over to ARM too.
In addition to longer term benefits they can realize with their own chip designs, this also allows them to unify their mobile and desktop ecosystem.
Soon users will be able to run their iOS and macOS apps on the same hardware.
It remains to be seen how the transition goes, but there is no doubt they’ll be breaking out Rosetta v2 to help support existing software on the new platform and ease the move from Intel to ARM for their customers.
Thoughts
Considering these examples of massive investments into ARM technology, I think there is certainly a big change coming to the CPU landscape in the near future.
For us consumers, more competition means better prices and more options. Cloud pricing will continue to reduce. But how will the software landscape change?
Software houses will certainly need to be on the ball and get their existing apps ready for ARM if they’re not already on it.
What about the future of x86? I personally can’t see the PC gaming market changing very soon. I love my Steam library collection of games. Those won’t work on ARM any time soon. The same goes for a lot of enterprise software.
So with cheaper hardware, decreasing power requirements, processors that are designed for specific workloads, and more competition across the board on the horizon, I have one closing thought.
As long as we don’t pay the price in performance loss for power efficiency, and we don’t end up with a massive chasm for software compatibility, I’ll be happy.
This is post #2 in my effort towards 100DaysToOffload.

