Vim Cheatsheet

vim cheatsheet feature

A quick vim cheatsheet for those of us who enjoy using vim, but don’t use it often enough to have the command sequences committed to memory.

Starting with the simplest operations, and then moving on to a few more complex and difficult to remember ones.

Remember that you always start in normal/visual mode. To enter insert mode to start entering text, you can use i or I.

  • Quit without saving: :q!
  • Quit and write changes: :wq
  • Enter insert mode at beginning or end of current line: I
  • Enter insert mode at the current position of the cursor: i
  • Escape current mode: Esc
  • Search forward for text pattern: /text
  • Search backward for text pattern: ?text
  • Go to bottom of page: G
  • Go to top of page: gg

Copy/paste style vim operations:

  • Copy and line (yank): yy
  • Paste a ‘yanked’ line: p (after) or P (before) cursor.
  • Delete character before cursor: X and after cursor: x
  • Delete current line: dd
  • Delete current line and start insert mode: cc

Deleting

  • Delete all lines in file: ddgD

Sorting

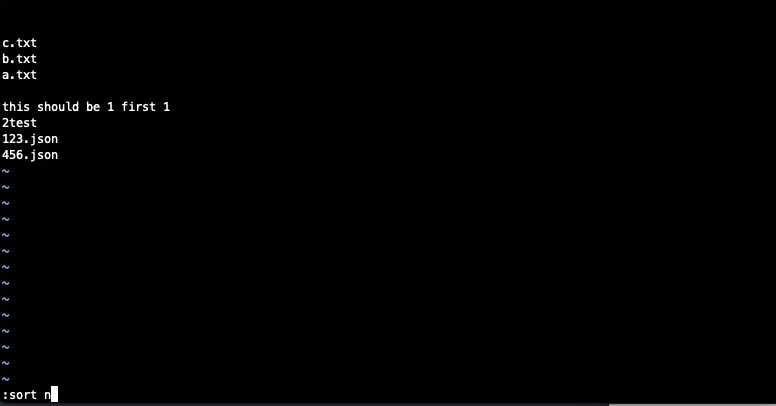
  • Sort all lines (no range): :sort
  • Sort all lines (no range, reversed): :sort!
  • Add options to the sort command:
    • i – ignore case
    • n – sort based on the first decimal on the line
    • f – sort based on the first float on the line

Some useful, yet more arcane vim operations:

  • Clear all lines in a file (1 is the first line, $ is the last line, and d is delete): :1,$d
  • Insert the result of Vimscript expressions into your file:
    • Enter Vim’s command line: Enter INSERT mode, and type CTRL + R =
    • Type a Vimscript expression, for example system("ls") and press ENTER
    • The output of the command ls will be inserted into the buffer.

Example of the above vimscript expression register result insert:

This of course only scratches the surface of the surface of what can be done. It’s just a quick little vim cheatsheet that I’ll refer back to when I get a little rusty.

The advanced or more arcane commands are the useful ones that I tend to forget when I’m not using them on a daily basis. I’ll certainly be recalling this post and updating those with new ones that I find useful in the future.
Installing and registering Balsamiq Mockups for a Terminal Server (Remote Desktop Server) environment


A bit of a specialised how-to here, but this is the process I did to allow this Adobe Air application to run on a Terminal Server (now known as Remote Desktop Session Host Server) environment for multiple users. The issue with just installing it for all users to start with, is that the licensing information that you register does not apply to all users. This is because license information is stored in each single user’s local profile / Documents (therefore is not applicable to all users). Here is the process I did to install the software and allow all users with access to the software to run it in licensed mode. (As well as a quick section on creating a security group to restrict access to the software based on group membership).


1. Install Mockups using terminal services install mode from the command line.

change user /install

MockupsForDesktop.exe -silent -desktopShortcut -programMenu -location "C:\Program files" -allowDownload

– Run the application from the start menu, then exit. Now use the command line to set the server back to execute mode.

change user /execute

2. Navigate to C:\Program Files\Balsamiq Mockups

– Create a new batch file (for example RegisterStartBalsamiqMockups.bat) in this folder and enter the following as content:

"Balsamiq Mockups.exe" register "Your registered company name" yourlonglicensekeynumber

– Save this batch file and close it.

– Now open the Local Profiles Folder for the terminal server, and navigate to \All Users\Start Menu\Programs

– Right click and drag your batch file into your \All Users\Start Menu\Programs folder and select to create a new shortcut.

– Right click your shortcut and change the icon to use the Icon from the Balsamiq Mockups.exe if you wish to make it look better.

– Also change the “Run” parameter to “Minimized” in the shortcut properties window and then OK this.

– Rename the shortcut to something user friendly, then remove the actual Balsamiq Mockups shortcut that the silent installer put in there earlier.


Now login with a normal Terminal Server user, and they should have the new shortcut file available in the start menu. Ensure they use this to start the application. It will register the license key each time they start the application, but it at least provides a way to automatically register the application for any user running the software.

Finally, ensure you set up a security group in Active Directory called “Balsamiq Mockups Users” and add only the users that are licensed for the software to this security group as members. Right-click the executable in C:\Program Files\Balsamiq Mockups for the application, go to properties, security, then remove the “Domain Users” or “All Users” groups from this executable (Effectively preventing them from running it). Add the “Balsamiq Mockups Users” security group in the place of the domain users group, and allow Read and Read & Execute permissions.

Now only the members of this security group (licensed for the software) will be able to run the software.

Hope that helps those of you looking to get this done. While this may not be a very general instruction set or how-to, some of the above principles can be used elsewhere – for example the security group method can be used to restrict access to certain applications within your organization for specific users.