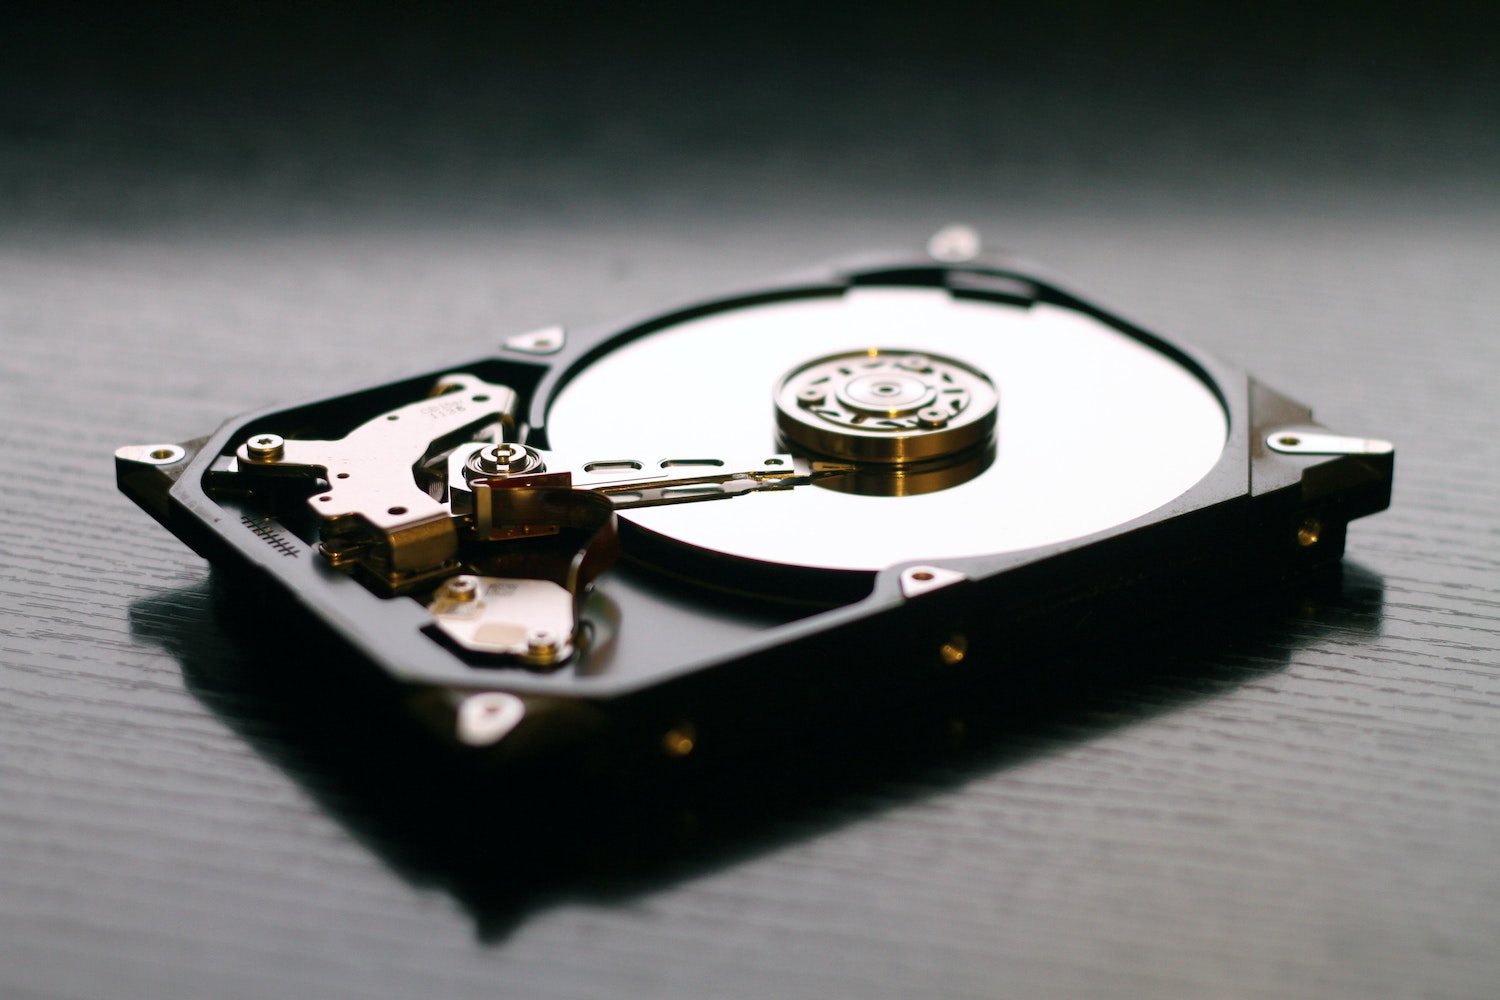
A while ago I posted my home storage server build which at the time was setup to run FreeNAS. Things have moved on in that space and FreeNAS has been replaced with TrueNAS Core. I thought I would post my FreeNAS to TrueNAS upgrade experience.
First off the recommendation is to ensure you’re on the latest FreeNAS version (the last official release, which was FreeNAS 11.3-U5). I had already been running this version for a while so I was set there.
FreeNAS to TrueNAS Upgrade Process
I started off by creating a full, manual backup of all my storage pools to an external disk. I verified a bunch of files in various locations on the backup disk to be extra sure they looked good.
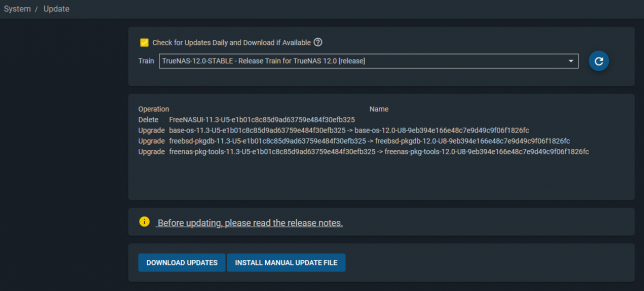
Next was to switch release trains to TrueNAS-12.0-STABLE. At the time of posting, the current release is TrueNAS-12.0-U8.
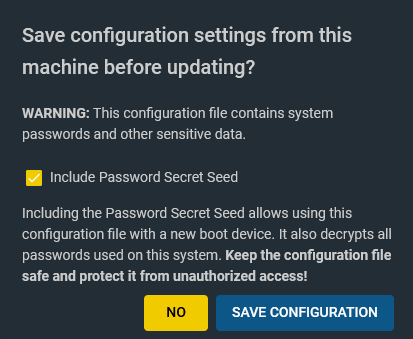
Clicking Download Updates started the download and upgrade process. Before starting you’re offered the chance to download your configuration backup. Definitely do this. It contains all your configuration as well as an optional password secret seed. This is important if you need to re-install the OS or change to a new boot device.
Once the upgrade completes the UI should reconnect after reboot, showing off the shiny new dashboard.
Updating ZFS Feature Flags
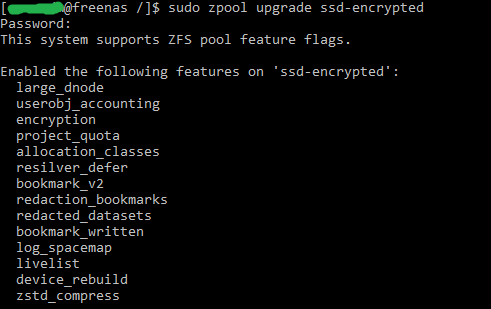
After verifying I could still access my SMB shares and that my NFS provisioner for my Kubernetes cluster was still working as expected I decided to lock in TrueNAS 12.0 by updating my ZFS pool feature flags across all zpools.
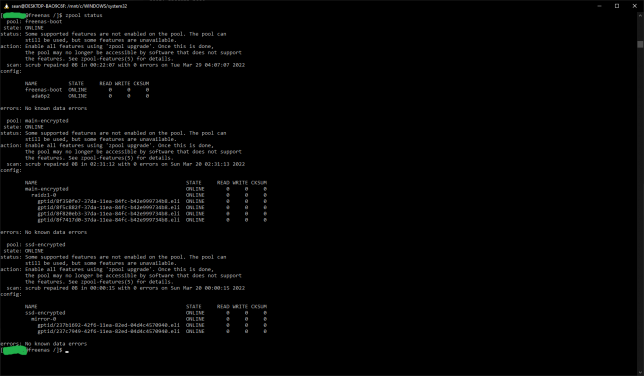
In a shell, I ran zpool status to take a look. Each pool is listed and should shows that some new features are not yet enabled. By leaving them as is, you retain the ability to roll back to your old FreeNAS version. Updating them locks you into the ZFS version that they were introduced with.
Updating to use the latest feature flags is something you should personally decide on. Do you need the newer feature flags?
According to this post, TrueNAS 12.0supports the Feature Flags listed below. (Bold are read-only backwards compatible, and italicized flags are very easy to return to the enabled state):
Allocation Classes
Bookmarks v2
Bookmark written
Sequential Rebuilds [device_rebuild]
Encryption
Large dnodes
Livelist
Log Spacemap
Project Quota
Redacted datasets
Redaction bookmarks
Resilver defer
Userobj accounting
zstd compression
Updating ZFS feature flags is then as simple as running the zpool upgrade command.
E.g. sudo zpool upgrade my-pool
The last step is to upgrade any jails you might be running. Use the iocage upgrade command to get going with.
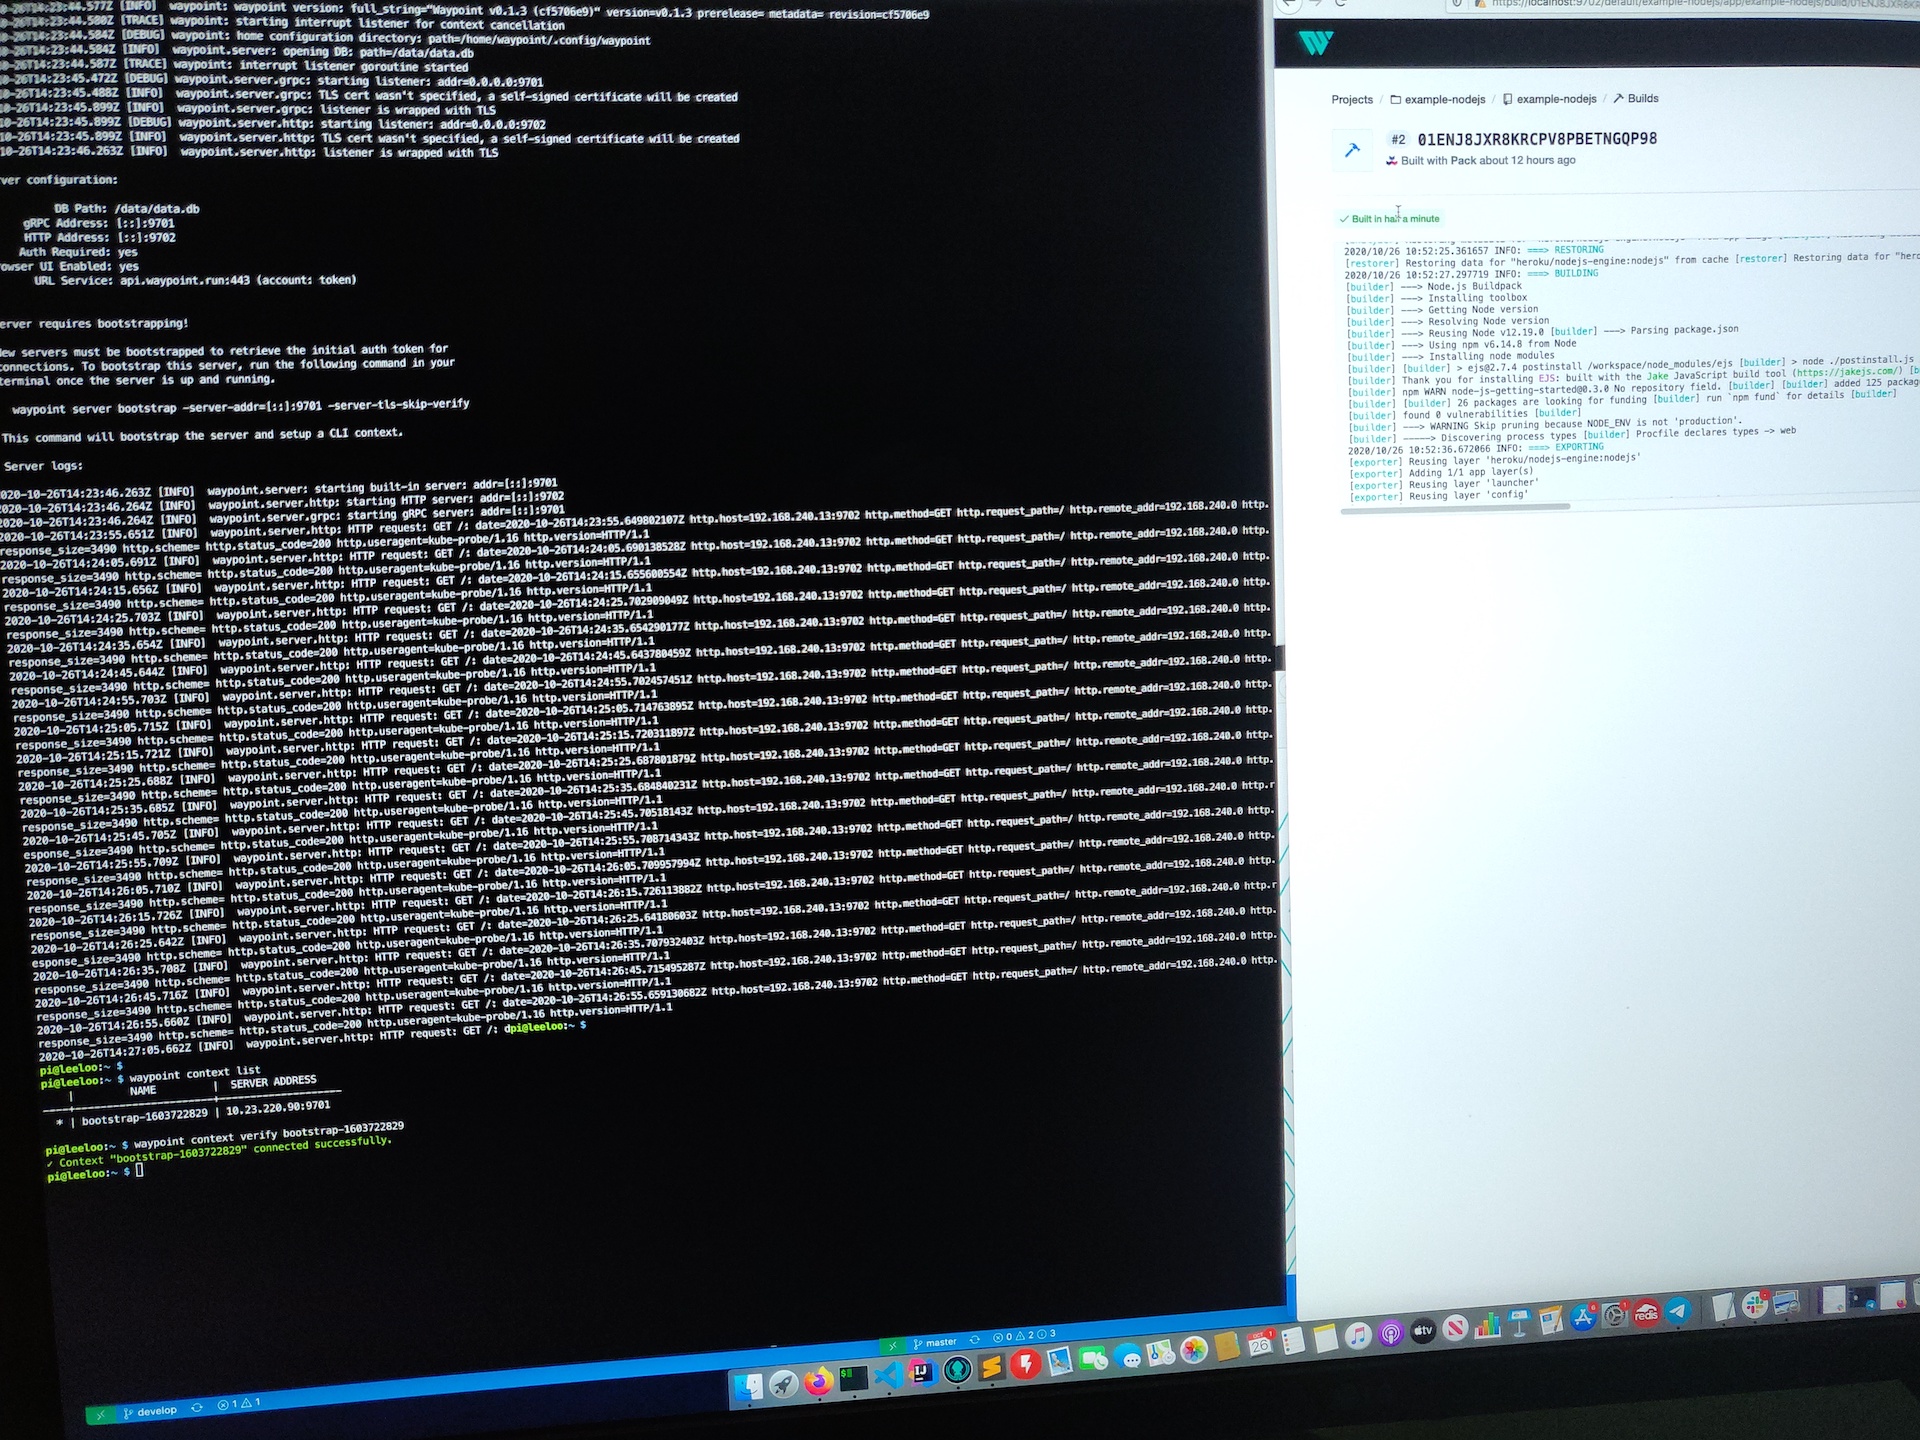
This evening I finally got a little time to play around with Waypoint. This wasn’t a straightforward install of Waypoint on my desktop though. I wanted to run and test HashiCorp Waypoint Server on Raspberry Pi. Specifically on my Pi Kubernetes cluster.
Out of the box Waypoint is simple to setup locally, whether you’re on Windows, Linux, or Mac. The binary is written in the Go programming language, which is common across HashiCorp software.
There is even an ARM binary available which lets you run the CLI on Raspberry Pi straight out of the box.
Installing Hashicorp Waypoint Server on Raspberry Pi hosted Kubernetes
I ran into some issues initially when assuming that waypoint install --platform=kubernetes -accept-tos would ensure an ARM docker image was pulled down for my Pi based Kubernetes hosts though.
My Kubernetes cluster also has the nfs-client-provisioner setup, which fulfills PersistentVolumeClaim resources with storage from my home FreeNAS Server Build. I noticed that PVCs were not being honored because they did not have the specific storage-class of nfs-storage that my nfs-client-provisioner required.
Fixing the PVC Issue
Looking at the waypoint CLI command, it’s possible to generate the YAML for the Kubernetes resources it would deploy with a --platform=kubernetes flag. So I fetched a base YAML resource definition:
That sorted out the pending PVC issue in my cluster.
Fixing the ARM Docker Issue
Looking at the Docker image that the waypoint install command for Kubernetes gave me, I could see right away that it was not right for ARM architecture.
To get a basic Waypoint server deployment for development and testing purposes on my Raspberry Pi Kubernetes Cluster, I created a simple Dockerfile for armhf builds.
Basing it on the hypriot/rpi-alpine image, to get things moving quickly I did the following in my Dockerfile.
Added few tools, such as cURL.
Added a RUN command to download the waypoint ARM binary (currently 0.1.3) from Hashicorp releases and place in /usr/bin/waypoint.
Now it is just a simple case of updating the image in the generated YAML StatefulSet to use the ARM image with the ARM waypoint binary embedded.
containers:
- name: server
  image: shoganator/waypoint:0.1.3.20201026-armhf
  imagePullPolicy: Always
With the YAML updated, I simply ran kubectl apply to deploy it to my Kubernetes Cluster. i.e.
kubectl apply -f ./waypoint-armhf.yaml
Now Waypoint Server was up and running on my Raspberry Pi cluster. It just needed bootstrapping, which is expected for a new installation.
Configuring Waypoint CLI to Connect to the Server
Next I needed to configure my internal jumpbox to connect to Waypoint Server to verify everything worked.
Things may differ for you here slightly, depending on how your cluster is setup.
Waypoint on Kubernetes creates a LoadBalancer resource. I’m using MetalLB in my cluster, so I get a virtual LoadBalancer, and the EXTERNAL-IP MetalLB assigned to the waypoint service for me was 10.23.220.90.
My cluster is running on it’s own dedicated network in my house. I use another Pi as a router / jumpbox. It has two network interfaces, and the internal interface is on the Kubernetes network.
By getting an SSH session to this Pi, I could verify the Waypoint Server connectivity via it’s LoadBalancer resource.
curl -i --insecure https://10.23.220.90:9702

HTTP/1.1 200 OK
Accept-Ranges: bytes
Content-Length: 3490
Content-Type: text/html; charset=utf-8
Last-Modified: Mon, 19 Oct 2020 21:11:45 GMT
Date: Mon, 26 Oct 2020 14:27:33 GMT
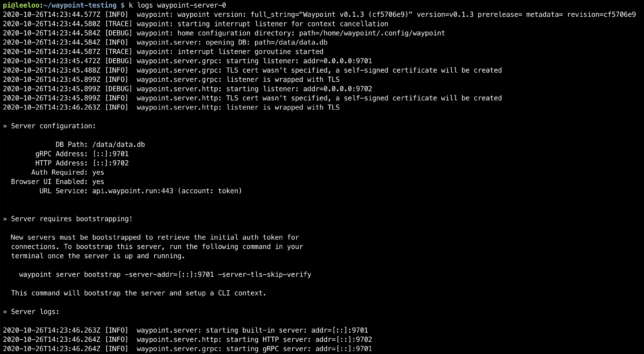
Bootstrapping Waypoint Server
On a first time run, you need to bootstrap Waypoint. This also sets up a new context for you on the machine you run the command from.
The Waypoint LoadBalancer has two ports exposed. 9702 for HTTPS, and 9701 for the Waypoint CLI to communicate with using TCP.
With connectivity verified using curl, I could now bootstrap the server with the waypoint bootstrap command, pointing to the LoadBalancer EXTERNAL-IP and port 9701.
waypoint server bootstrap -server-addr=10.23.220.90:9701 -server-tls-skip-verify
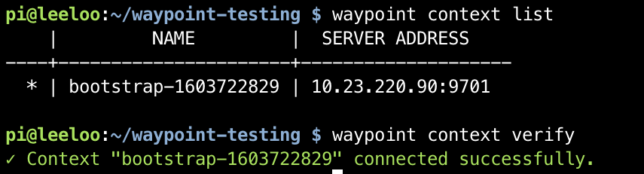
waypoint context list
waypoint context verify
This command gives back a token as a response and sets up a waypoint CLI context from the machine it ran from.
Waypoint context setup and verified from an internal kubernetes network connected machine.
Using Waypoint CLI from a machine external to the Cluster
I wanted to use Waypoint from a management or workstation machine outside of my Pi Cluster network. If you have a similar network setup, you could also do something similar.
As mentioned before, my Pi Router device has two interfaces. A wireless interface, and a phyiscal network interface. To get connectivity over ports 9701 and 9702 I used some iptables rules. Importantly, my Kubernetes facing network interface is on 10.0.0.1 in the example below:
These rules have the effect of sending traffic destined for port 9701 and 9702 hitting the wlan0 interface, to the MetalLB IP 10.23.220.90.
The source and destination network address translation will translate the ‘from’ address of the TCP reply packets to make them look like they’re coming from 10.0.0.1 instead of 10.23.220.90.
Now, I can simply setup a Waypoint CLI context on a machine on my ‘normal’ network. This network has visibility of my Raspberry Pi Router’s wlan0 interface. I used my previously generated token in the command below:
I’ve been constantly evolving my cloud backup strategies to find the ultimate cheap S3 cloud backup solution.
The reason for sticking to “S3” is because there are tons of cloud provided storage service implementations of the S3 API. Sticking to this means that one can generally use the same backup/restore scripts for just about any service.
The S3 client tooling available can of course be leveraged everywhere too (s3cmd, aws s3, etc…).
BackBlaze B2 gives you 10GB of storage free for a start. If you don’t have too much to backup you could get creative with lifecycle policies and stick within the 10GB free limit.
Current Backup Solution
This is the current solution I’ve setup.
I have a bunch of files on a FreeNAS storage server that I need to backup daily and send to the cloud.
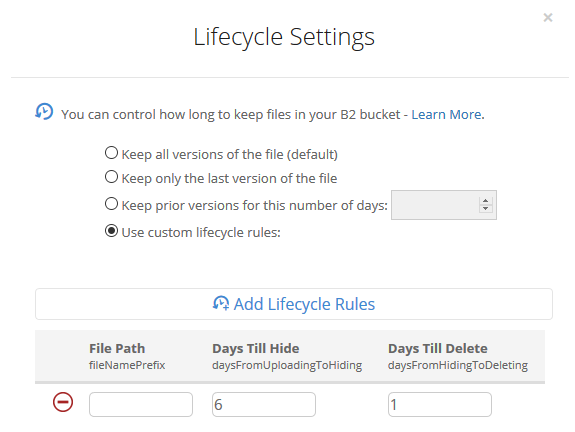
I’ve setup a private BackBlaze B2 bucket and applied a lifecycle policy that removes any files older than 7 days. (See example screenshot above).
I leveraged a FreeBSD jail to install my S3 client (s3cmd) tooling, and mount my storage to that jail. You can follow the steps below if you would like to setup something similar:
Step-by-step setup guide
Create a new jail.
Enable VNET, DHCP, and Auto-start. Mount the FreeNAS storage path you’re interested in backing up as read-only to the jail.
The first step in a clean/base jail is to get s3cmd compiled and installed, as well as gpg for encryption support. You can use portsnap to get everything downloaded and ready for compilation.
portsnap fetch
portsnap extract # skip this if you've already run extract before
portsnap update

cd /usr/ports/net/py-s3cmd/
make -DBATCH install clean
# Note -DBATCH will take all the defaults for the compile process and prevent tons of pop-up dialogs asking to choose. If you don't want defaults then leave this bit off.

# make install gpg for encryption support
cd /usr/ports/security/gnupg/ && make -DBATCH install clean
The compile and install process takes a number of minutes. Once complete, you should be able to run s3cmd –configure to set up your defaults.
For BackBlaze you’ll need to configure s3cmd to use a specific endpoint for your region. Here is a page that describes the settings you’ll need in addition to your access / secret key.
After gpg was compiled and installed you should find it under the path /usr/local/bin/gpg, so you can use this for your s3cmd configuration too.
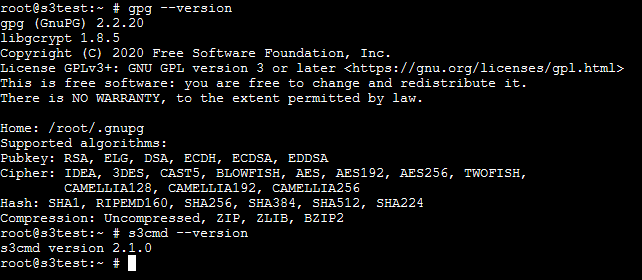
Double check s3cmd and gpg are installed with simple version checks.
gpg --version
s3cmd --version
A simple backup shell script
Here is a quick and easy shell script to demonstrate compressing a directory path and all of it’s contents, then uploading it to a bucket with s3cmd.
DATESTAMP=$(date "+%Y-%m-%d")
TIMESTAMP=$(date "+%Y-%m-%d-%H-%M-%S")

tar --exclude='./some-optional-stuff-to-exclude' -zcvf "/root/$TIMESTAMP-backup.tgz" .
s3cmd put "$TIMESTAMP-backup.tgz" "s3://your-bucket-name-goes-here/$DATESTAMP/$TIMESTAMP-backup.tgz"
Scheduling the backup script is an easy task with crontab. Run crontab -e and then set up your desired schedule. For example, daily at 25 minutes past 1 in the morning:
Amazon S3 is overkill for simple home cloud backup solutions (in my opinion). You can change to use infrequent access or even glacier tiered storage to get the pricing down, but you’re still not going to beat BackBlaze on pure storage pricing.
Digital Ocean Spaces was nice for a short while, but they have an annoying minimum charge of $5 per month just to use Spaces. This rules it out for me as I was hunting for the absolute cheapest option.
BackBlaze currently has very cheap storage costs for B2. Just $0.005 per GB and only $0.01 per GB of download (only really needed if you want to restore some backup files of course).
Concluding
You can of course get more technical and coerce a willing friend/family member to host a private S3 compatible storage service for you like Minio, but I doubt many would want to go to that level of effort.
So, if you’re looking for a cheap S3 cloud backup solution with minimal maintenance overhead, definitely consider the above.
Specifically, at any one point in time, this site is powered by one of a bunch of different ARM Cortex-A72 processors. In other words, it runs across a bunch of Raspberry Pi 4 devices.
There is a long history of where this blog has been hosted. Back in 2008 it was running in a virtual machine on a Dell OptiPlex PC.
I don’t need anything powerful to run Shogan.tech. Most of my web traffic comes in steadily over the working week during typical working hours.
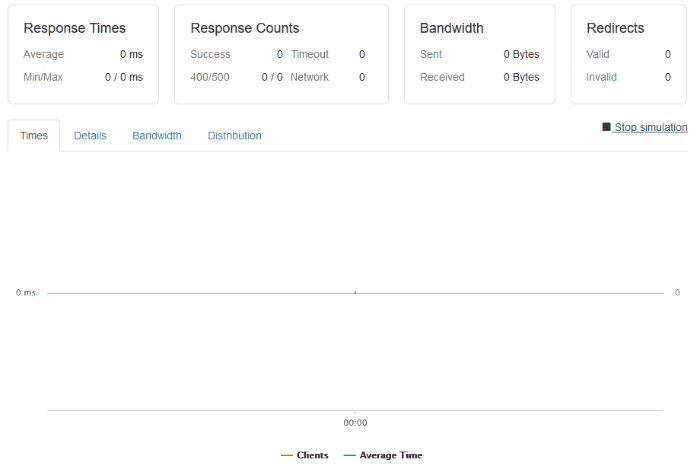
I have done some basic load testing though and the setup I have is capable of handling a few tens of clients per second, or as in this particular test, around 500 clients over 1 minute.
The response times may not be brilliant, but they’re OK. Especially considering the route a typical request/response takes:
A request hits my ‘outer’ router from the internet and goes through some firewall rules.
Then, the request enters my ‘inner’ network router and is routed over a WiFi link to a Raspberry Pi device running a bunch of iptables rules.
This Raspberry Pi ‘router’ directs the request through another physical network interface into my dedicated Raspberry Pi cluster.
The request hits an IP address being used as a software Load Balancer (Metal LB) where Kubernetes directs it to the backing NGINX ingress service (and hence pod).
The Ingress Controller figures out which pod to direct the request to and sends it there.
Finally the request hits the actual container running this site, and the software serves the response back to the requesting client.
Not to forget there is also a request to the database container that the web container makes too!
ARM technology for me personally has been great. I’ve been able to play with cheap hardware and come up with interesting use cases for it.
Playing Minecraft on a server running on Kubernetes with Raspberry Pi hardware
The future of computing with ARM
When I look back at this request/response lifecycle, I’m always impressed that a tiny Raspberry Pi board the size of a credit card is responsible for doing this.
To me, ARM architecture has seemingly been slowly changing the computing landscape over the last 5 years, accelerating in pace in the last year or so.
Let’s take a look at some notable cases of this:
Fugaku (Super computer)
Earlier this week’s big news in the super computing space was that Fugaku, a super computer built in Japan is now online.
This supercomputer is built with the Fujitsu A64FX microprocessor (which is based on ARM architecture).
Even though its not yet fully online, it leads the way with a peak performance of 0.54 exaFLOPS rated in the TOP500.
Microsoft Surface hardware
Microsoft have been making big moves within the ARM processor space. Here are some notable points:
Surface Pro X and the 3GHz Microsoft SQ1 (ARM) processor
Amazon AWS EC2 instances powered by ARM
AWS have started ramping up their own processor production with their Graviton chips.
These power newer generation EC2 instances and have allowed AWS to focus down on improvements that they know their customers will benefit from.
In a competitive cloud space, this gives AWS an advantage where they can design their own processors to deliver faster performance in key areas like compression, video encoding, machine learning, and more.
Another key advantage here is if you think about the plethora of recent Intel vulnerabilities that have been patched out and resulted in slower processor performance across various providers.
AWS can design their new chips with multi-tenancy and security as first class considerations. (Always-on 256-bit DRAM encryption etc…)
Apple macOS on ARM
Of course the big news the last couple of weeks has been Apple announcing they will be moving their Mac hardware over to ARM too.
In addition to longer term benefits they can realize with their own chip designs, this also allows them to unify their mobile and desktop ecosystem.
Soon users will be able to run their iOS and macOS apps on the same hardware.
It remains to be seen how the transition goes, but there is no doubt they’ll be breaking out Rosetta v2 to help support existing software on the new platform and ease the move from Intel to ARM for their customers.
Thoughts
Considering these examples of massive investments into ARM technology, I think there is certainly a big change coming to the CPU landscape in the near future.
For us consumers, more competition means better prices and more options. Cloud pricing will continue to reduce. But how will the software landscape change?
Software houses will certainly need to be on the ball and get their existing apps ready for ARM if they’re not already on it.
What about the future of x86? I personally can’t see the PC gaming market changing very soon. I love my Steam library collection of games. Those won’t work on ARM any time soon. The same goes for a lot of enterprise software.
So with cheaper hardware, decreasing power requirements, processors that are designed for specific workloads, and more competition across the board on the horizon, I have one closing thought.
As long as we don’t pay the price in performance loss for power efficiency, and we don’t end up with a massive chasm for software compatibility, I’ll be happy.
I purchased a new Apple Mac Mini recently and didn’t want to fall victim to Apple’s “RAM Tax”.
I used Apple’s site to configure a Mac Mini with a quad core processor, 32GB RAM, and a 512GB SSD.
I was shocked to see they added £600.00 to the price of a base model with 8GB RAM. They’re effectively charging all of this money for 24GB of extra RAM. This memory is nothing special, it’s pretty standard 2666MHz DDR4 SODIMM modules. The same stuff that is used in generic laptops.
I decided to cut back my order to the base model with 8GB of RAM. I ordered a Crucial 32GB Kit (2 x 16GB DDR4-2666 SODIMM modules running at 1.2 volts with a CAS latency of 19ns). This kit cost me just over £100.00 online.
In total I saved around £500.00 for the trouble of about 30 minutes of work to open up the Mac Mini and replace the RAM modules myself.
The Teardown Process
Use the iFixit Guide
You can use my photos and brief explanations below if you would like to follow the steps I took to replace the RAM, but honestly, you’re better off following iFixit’s excellent guide here.
Follow along Here
If you want to compare or follow along in my format, then read on…
Get a good tool kit with hex screw drivers. I used iFixit’s basic kit.
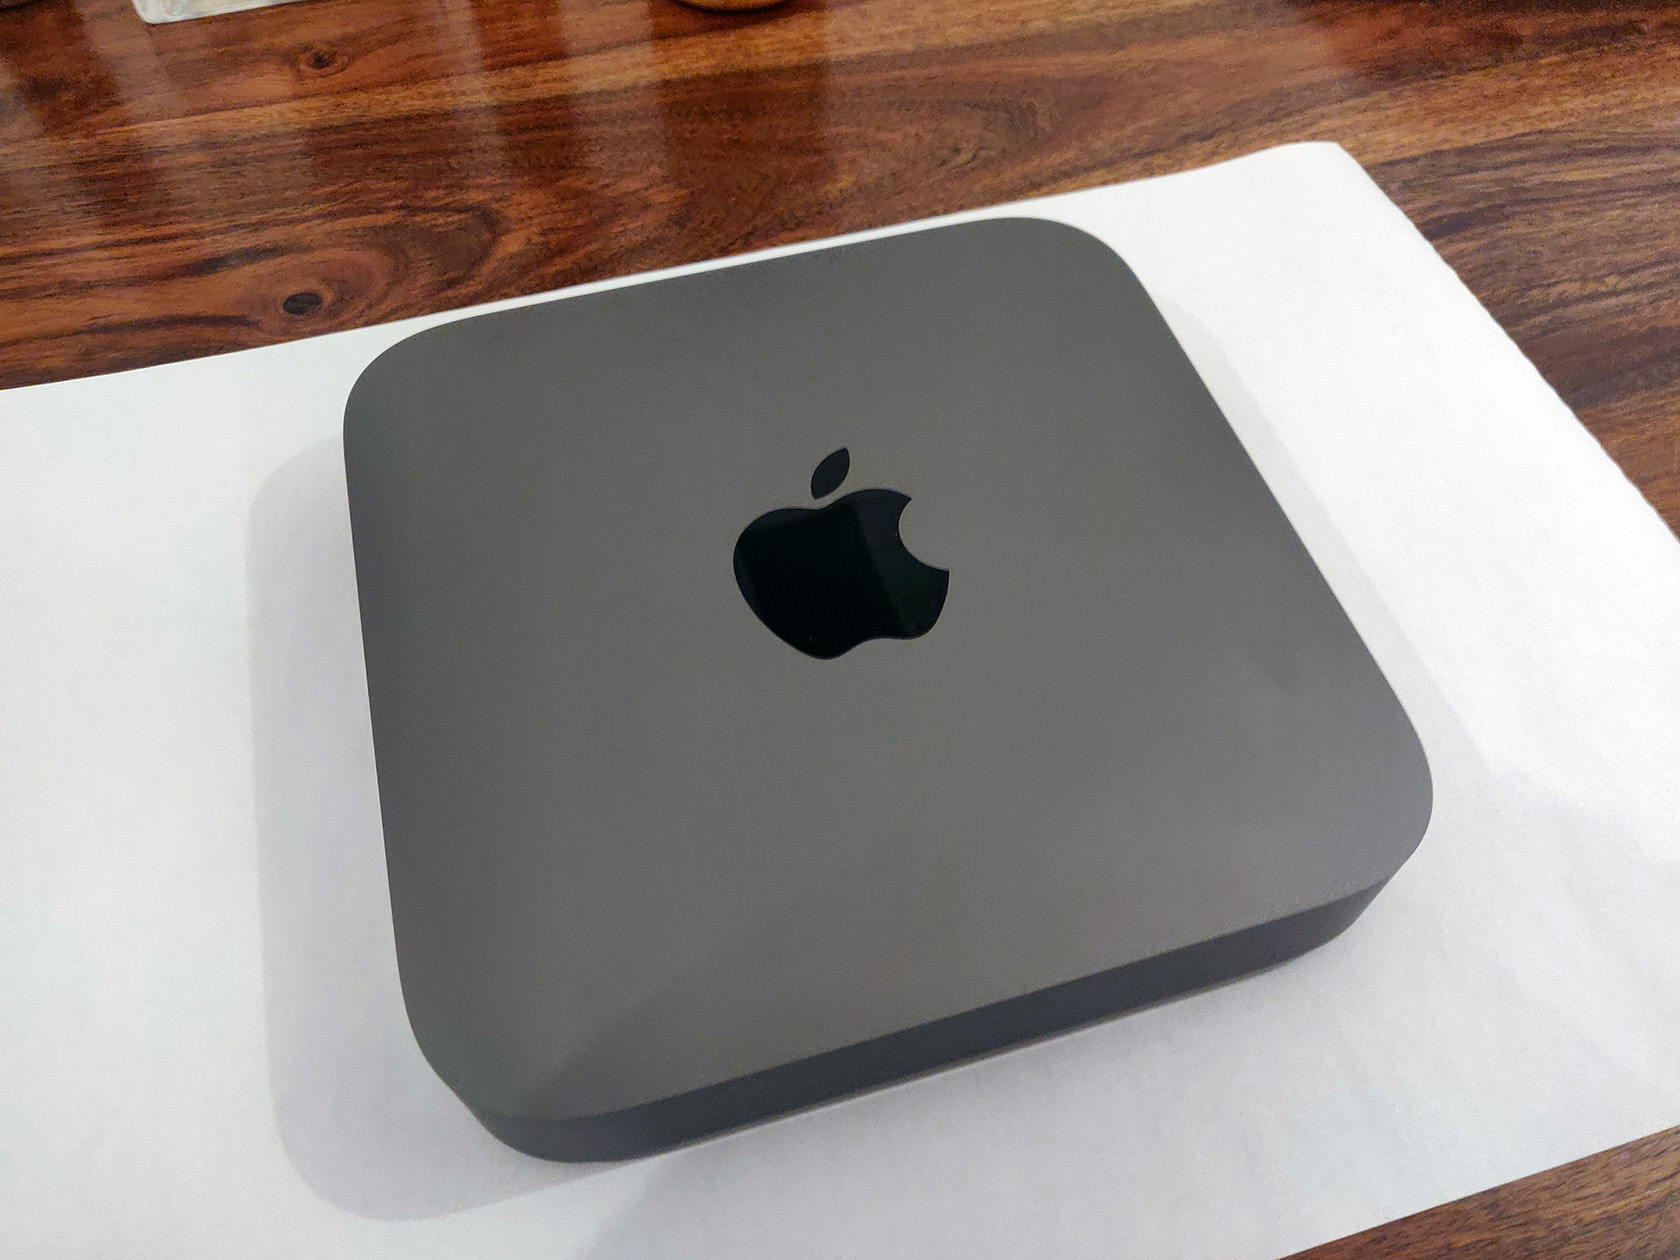
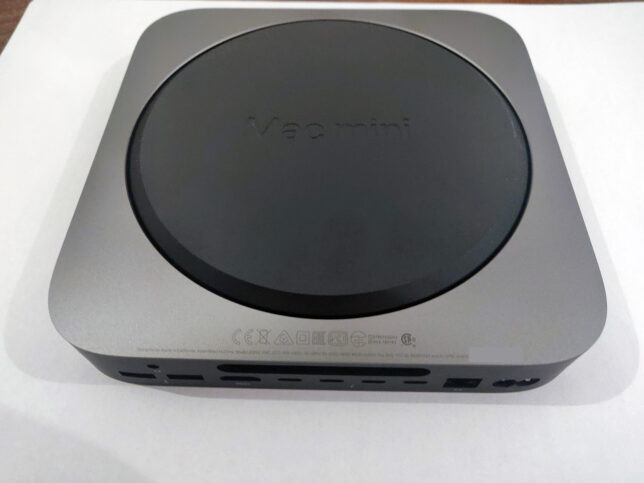
Flip the Mac Mini upside down.
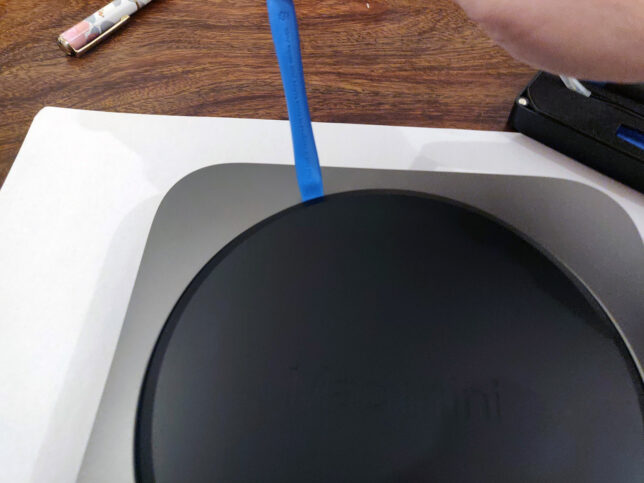
Pry open the back cover, carefully with a plastic prying tool
Undo the 6 x hex screws on the metal plate under the black plastic cover. Be careful to remember the positions of these, as there are 2 x different types. 3 x short screws, and 3 x longer.
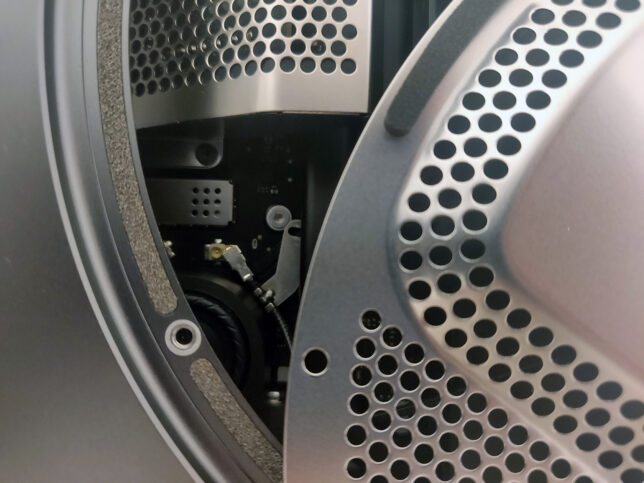
Very carefully, move the cover to the side, revealing the WiFi antenna connector. Unscrew the small hex screw holding the metal tab on the cable. Use a plastic levering tool to carefully pop the antenna connector off.
Next, unscrew 4 x screws that hold the blower fan to the exhaust port. You can see one of the screws in the photo below. Two of the screws are angled at a 45 degree orientation, so carefully undo those, and use tweezers to catch them as they come out.
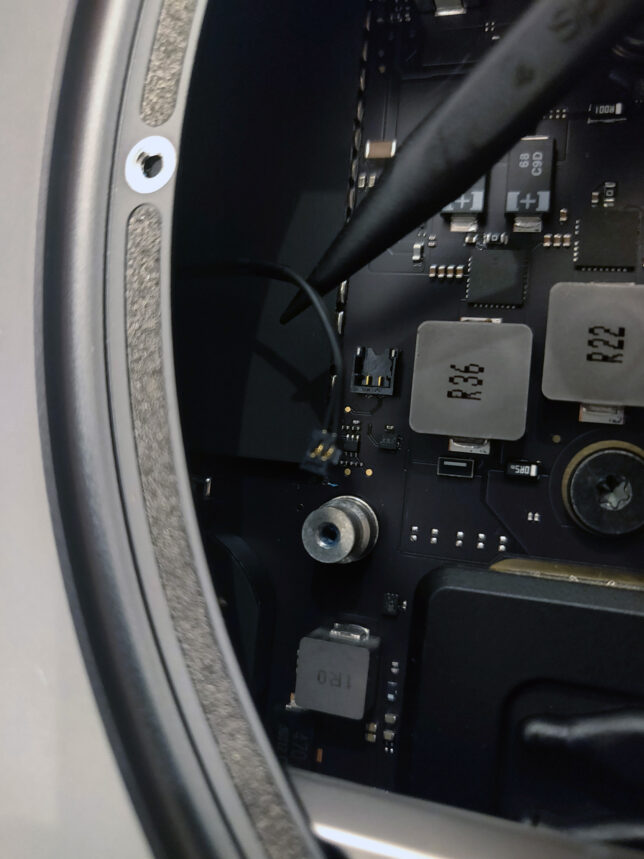
Carefully lift the blower fan up, and disconnect it’s cable using a plastic pick or prying tool. The trick is to lift from underneat the back of the cable’s connector and it’ll pop off.
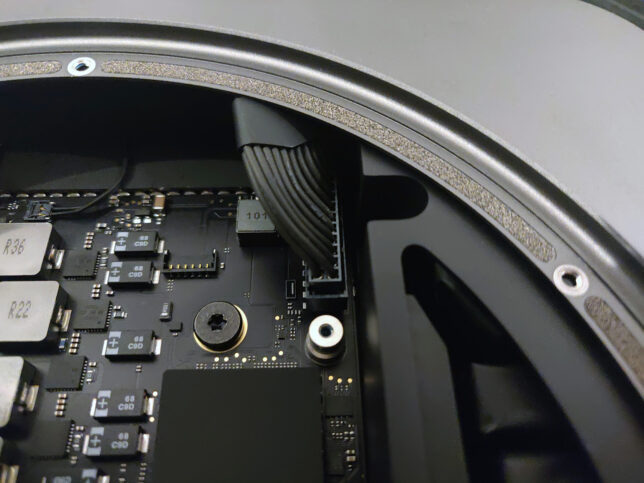
Next, disconnect the main power cable at the top right of the photo below. This requires a little bit of wiggling to loosen and lift it as evenly as possible.
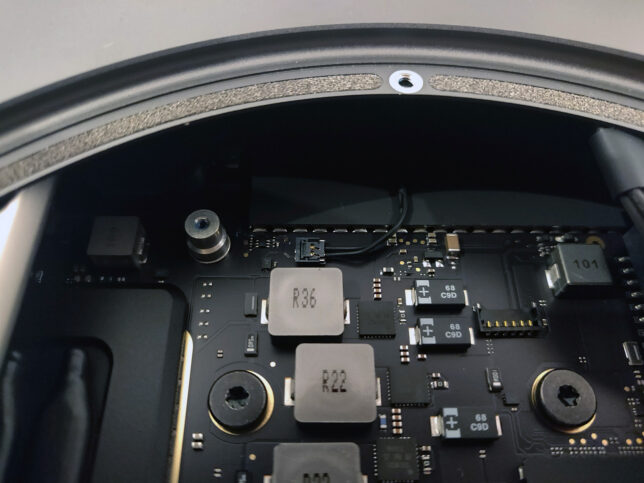
Now disconnect the LED cable (two pin). It’s very delicate, so do this as carefully as possible.
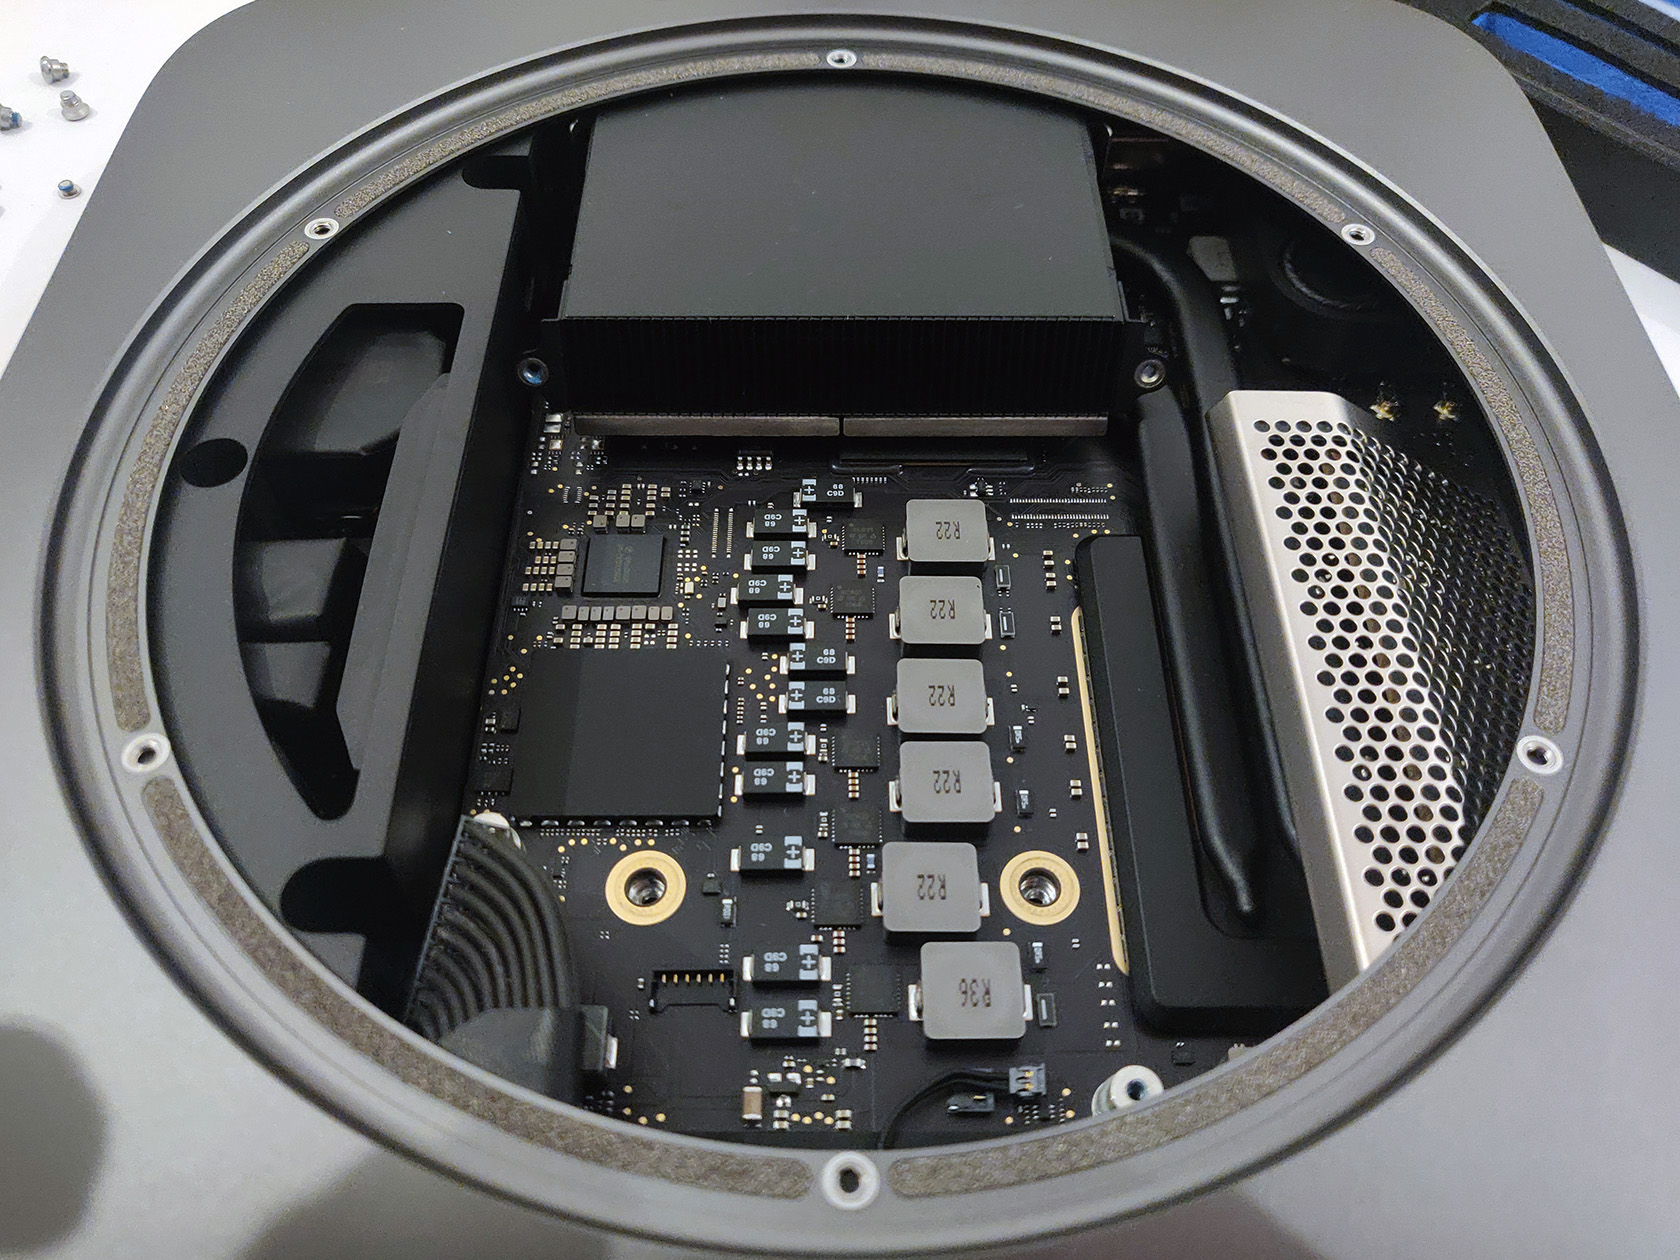
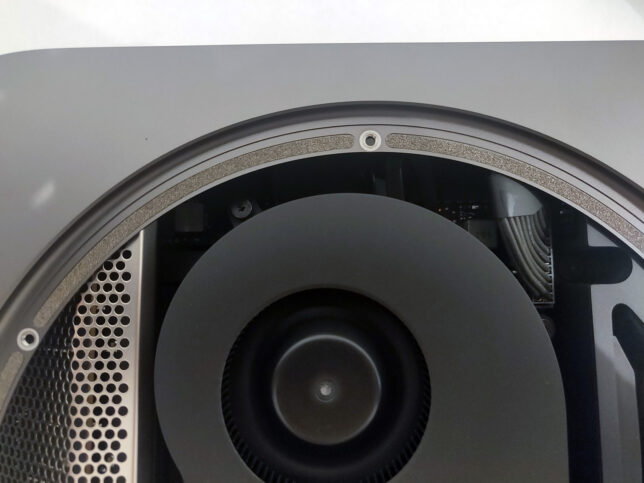
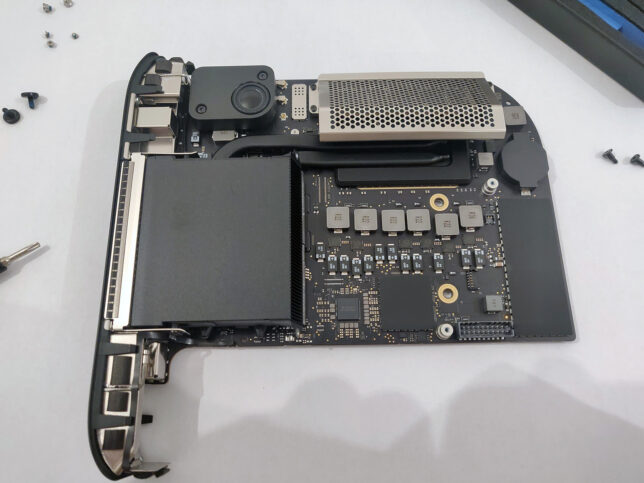
There are two main hex screws to remove from the motherboard central area now. You can see them removed below near the middle (where the brass/gold coloured rings are).
With everything disconnected, carefully push the inner motherboard and it’s tray out, using your thumbs on the fan’s exhaust port. You should ideally position your thumbs on the screw hole areas of the fan exhaust port. It’ll pop out, then just very carefully push it all the way out.
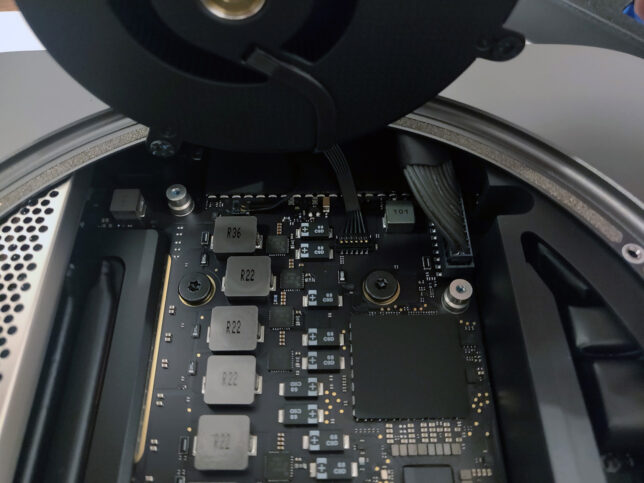
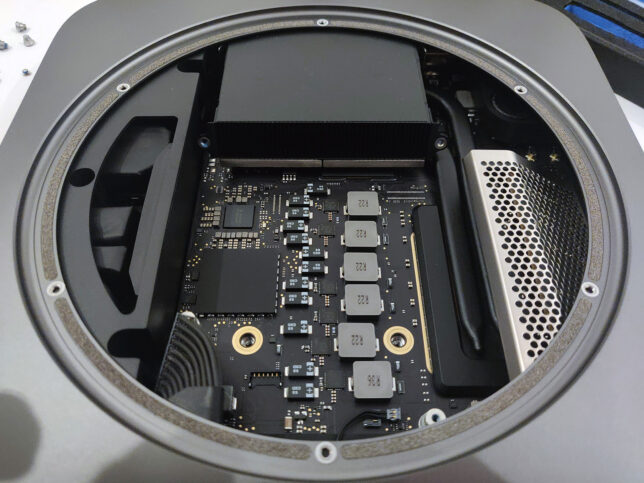
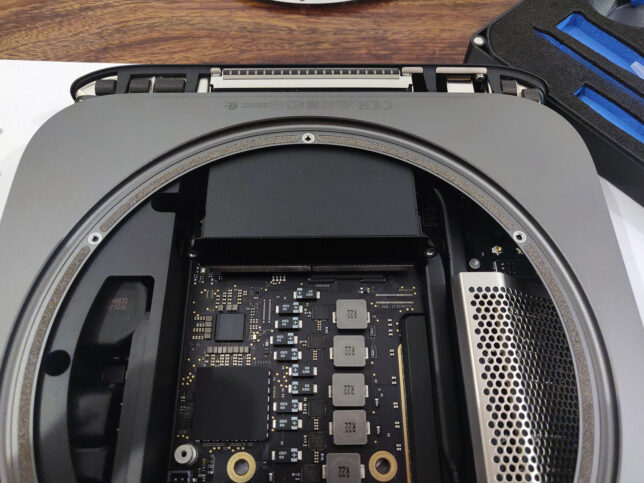
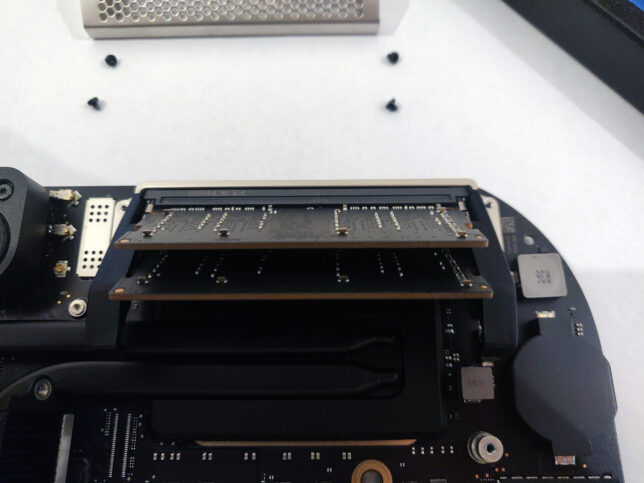
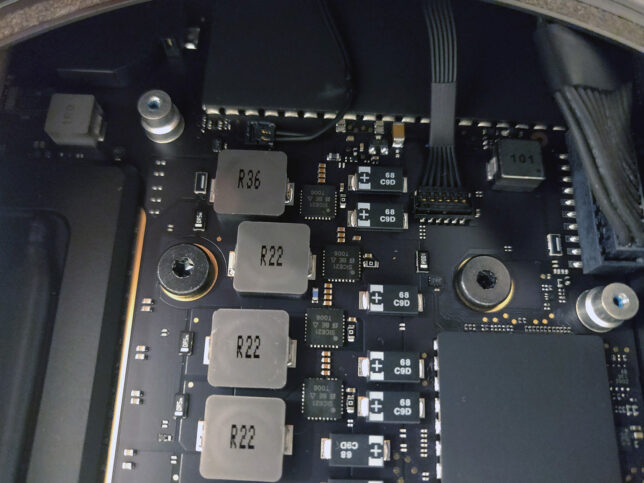
The RAM area is protected by a metal ‘cage’. Unscrew it’s 4 x hex screws and slowly lift the cage off the RAM retainer clips.
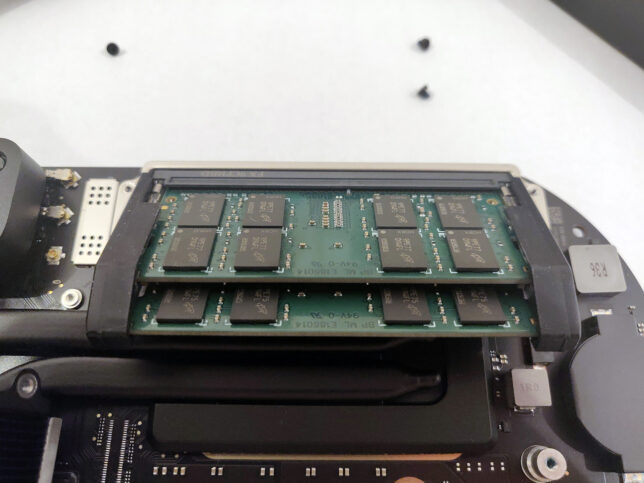
Carefully push the RAM module retainer clips to the side (they have a rubber grommet type covering over them), and the existing SODIMM modules will pop loose.
Remove the old modules and replace with your new ones. Make sure you align the modules in the correct orientation. The slots are keyed, so pay attention to that. Push them down toward the board once aligned and the retainer clips will snap shut and lock them in place.
Replace the RAM ‘cage’ with it’s 4 x hex screws.
Reverse the steps you took above to insert the motherboard tray back into the chassis and re-attach all the cables and connectors in the correct order.
Make sure you didn’t miss any screws or cables when reconnecting everything.