According to the Minecraft Realms plan pricing page, you can get a realms server at around £5.59 per month. You get some nice conveniences there but… I refuse to pay much at all when I can throw some infrastructure together myself in the cloud to create the ultimate cheap Minecraft server.
Considering my Docker instance running Traefik hosts another 3 or 4 of my personal services along with a Minecraft server, then this solution only costs me around £1.50 a month.
I chose to go with a single AWS EC2 instance that runs Docker. Minecraft runs in a container and sits alongside other personal websites and services that I host there too.
I use Traefik to route traffic coming in to this single host for various TCP ports as well as HTTP(s) on different hostnames. This essentially levels up the cost savings even further as I don’t need multiple EC2 instances (one for each service), and I don’t even need to pay for something like an application or network load balancer, as Traefik does this for me.
A Quick Review of Alternatives
There are other alternatives to consider if you’re looking for a cheap Minecraft server, so don’t take this as being the only option. Here is what I’ve used in the past before settling on my current solution:
- Minecraft on a dedicated cloud VM. If you just want a dedicated Minecraft VM in the cloud, then DigitalOcean is a good, cheap option. You can also get fairly cheap instances Vultr.
- Running Minecraft on my own personal Raspberry Pi Kubernetes Cluster. I was even able to expose it over the internet for friends to play on by leveraging a Pi device as a dedicated router. I then used port forwarding to get it working through my double NAT setup. The ARM container was a little slow as a server for more than 2 or 3 players on Raspberry Pi hardware though.
- Minecraft Server on a home PC / Workstation, with port forwarding to allow other players to connect. This is not ideal, especially on Windows machines or systems that you don’t want to leave running 24/7 as you would for a dedicated server.
- Various other Minecraft-as-a-service providers. These are decent options in some cases. However for me price and control are important, and I much prefer to self host in this case.
Cheap Minecraft Server in AWS EC2 with Traefik
I used my Cheap Traefik EC2 Docker Hosting solution as the base. You can read that article to get access to the CDK resources required to deploy it yourself.
The cost benefits to using this particular recipe are:
- EC2 Graviton2 ARM based processor – slightly cheaper to run than Intel and AMD. The downside is more limited software choices. You need to make sure you use ARM compatible packages or Docker images.
- Spot instance – this has massive savings over a normal lifecycle EC2 instance. The downside is that it can be terminated at any time with only a couple of minutes of notice. When using these you need to make sure you have good data persistence that is not local to the EC2 instance. I personally use a mounted EFS volume. It is re-attached to a new instance from the autoscaling group if the old instance is terminated.
If you don’t use the CDK solution I mentioned above, then alternatively deploy yourself an EC2 instance. Give it an elastic IP address, set up the Security Group ingress rules accordingly, and get shell access. First thing you’ll want to install is Docker, then you’re pretty much good to go.
Minecraft Docker Image
I found a great Minecraft Docker image that is well maintained and has the correct ARM image builds for use on Graviton2 hardware. Check out itzg/minecraft-server. There are other arch builds there that’ll run on just about any other platform.
Docker Compose Service
If you use docker-compose, then here is the simple service definition to get things running.
version: "3"

networks:
  web:
    external: true
  internal:
    external: false

services:
  mc:
    image: itzg/minecraft-server:2021.1.0-multiarch-latest
    environment:
      EULA: "TRUE"
      VERSION: "1.16.5"
      ENABLE_AUTOPAUSE: "TRUE"
      OVERRIDE_SERVER_PROPERTIES: "TRUE"
      MAX_TICK_TIME: "-1"
      TYPE: "BUKKIT"
    labels:
      - traefik.tcp.routers.mc.rule=HostSNI(`*`)
      - traefik.port=25565
    networks:
      - web
    volumes:
      - /data/mc:/data
The docker-compose definition will run a Docker container using the latest multiarch image (which will run on ARM devices). When starting, the container will prepare and run a Minecraft 1.16.5 server. It will also use Bukkit and enable auto pause. The game server does not tick over when there are no players connected.
Traefik Configuration
In the docker-compose definition above, you might have noticed the container labels. The labels prefixed with traefik are used to inform Traefik of how to route network traffic.
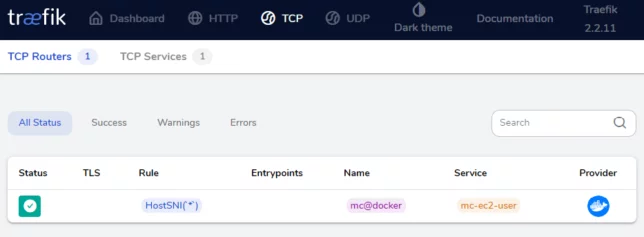
In our case, TCP connections are required on port 25565 and HostSNI is used to route those coming in for * (all hosts). The TCP connections on port 25565 go to Traefik, and based on this rule, directed to the Minecraft container.
There is one limitation to be aware of here, and that is that you can only use HostSNI with * for connections that do not use TLS. This is because Server Name Indication (SNI) is an extension of the TLS protocol.
I don’t believe Minecraft supports TLS in any case though. It just means that you won’t be able to have more than one Minecraft server container using the same port running on the single Docker host.
Finishing Off Configuration
Lastly, you might want to point a convenient Host record (A record) to your AWS EC2 Elastic IP address. For example: yourmcserver.example.com -> 1.2.3.4.
All being well, you should now be able to find and connect to your server.