Cheap Minecraft Server in AWS with Docker and Traefik

minecraft-like figure on the grass

According to the Minecraft Realms plan pricing page, you can get a realms server at around £5.59 per month. You get some nice conveniences there but… I refuse to pay much at all when I can throw some infrastructure together myself in the cloud to create the ultimate cheap Minecraft server.

Considering my Docker instance running Traefik hosts another 3 or 4 of my personal services along with a Minecraft server, then this solution only costs me around £1.50 a month.

I chose to go with a single AWS EC2 instance that runs Docker. Minecraft runs in a container and sits alongside other personal websites and services that I host there too.

I use Traefik to route traffic coming in to this single host for various TCP ports as well as HTTP(s) on different hostnames. This essentially levels up the cost savings even further as I don’t need multiple EC2 instances (one for each service), and I don’t even need to pay for something like an application or network load balancer, as Traefik does this for me.

A Quick Review of Alternatives

There are other alternatives to consider if you’re looking for a cheap Minecraft server, so don’t take this as being the only option. Here is what I’ve used in the past before settling on my current solution:

  • Minecraft on a dedicated cloud VM. If you just want a dedicated Minecraft VM in the cloud, then DigitalOcean is a good, cheap option. You can also get fairly cheap instances Vultr.
  • Running Minecraft on my own personal Raspberry Pi Kubernetes Cluster. I was even able to expose it over the internet for friends to play on by leveraging a Pi device as a dedicated router. I then used port forwarding to get it working through my double NAT setup. The ARM container was a little slow as a server for more than 2 or 3 players on Raspberry Pi hardware though.
  • Minecraft Server on a home PC / Workstation, with port forwarding to allow other players to connect. This is not ideal, especially on Windows machines or systems that you don’t want to leave running 24/7 as you would for a dedicated server.
  • Various other Minecraft-as-a-service providers. These are decent options in some cases. However for me price and control are important, and I much prefer to self host in this case.

Cheap Minecraft Server in AWS EC2 with Traefik

I used my Cheap Traefik EC2 Docker Hosting solution as the base. You can read that article to get access to the CDK resources required to deploy it yourself.

The cost benefits to using this particular recipe are:

  • EC2 Graviton2 ARM based processor – slightly cheaper to run than Intel and AMD. The downside is more limited software choices. You need to make sure you use ARM compatible packages or Docker images.
  • Spot instance – this has massive savings over a normal lifecycle EC2 instance. The downside is that it can be terminated at any time with only a couple of minutes of notice. When using these you need to make sure you have good data persistence that is not local to the EC2 instance. I personally use a mounted EFS volume. It is re-attached to a new instance from the autoscaling group if the old instance is terminated.

If you don’t use the CDK solution I mentioned above, then alternatively deploy yourself an EC2 instance. Give it an elastic IP address, set up the Security Group ingress rules accordingly, and get shell access. First thing you’ll want to install is Docker, then you’re pretty much good to go.

Minecraft Docker Image

I found a great Minecraft Docker image that is well maintained and has the correct ARM image builds for use on Graviton2 hardware. Check out itzg/minecraft-server. There are other arch builds there that’ll run on just about any other platform.

Docker Compose Service

If you use docker-compose, then here is the simple service definition to get things running.

version: "3"

networks:
  web:
    external: true
  internal:
    external: false

services:
  mc:
    image: itzg/minecraft-server:2021.1.0-multiarch-latest
    environment:
      EULA: "TRUE"
      VERSION: "1.16.5"
      ENABLE_AUTOPAUSE: "TRUE"
      OVERRIDE_SERVER_PROPERTIES: "TRUE"
      MAX_TICK_TIME: "-1"
      TYPE: "BUKKIT"
    labels:
      - traefik.tcp.routers.mc.rule=HostSNI(`*`)
      - traefik.port=25565
    networks:
      - web
    volumes:
      - /data/mc:/data

The docker-compose definition will run a Docker container using the latest multiarch image (which will run on ARM devices). When starting, the container will prepare and run a Minecraft 1.16.5 server. It will also use Bukkit and enable auto pause. The game server does not tick over when there are no players connected.

Traefik Configuration

In the docker-compose definition above, you might have noticed the container labels. The labels prefixed with traefik are used to inform Traefik of how to route network traffic.
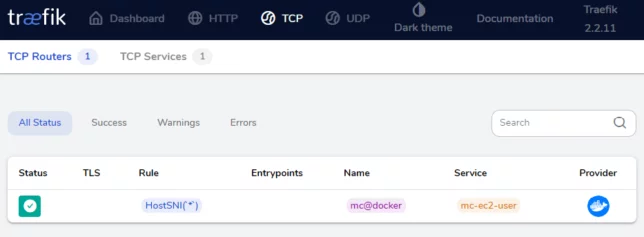
the cheap minecraft server uses a Traefik TCP router with HostSNI *
The TCP router using HostSNI on *

In our case, TCP connections are required on port 25565 and HostSNI is used to route those coming in for * (all hosts). The TCP connections on port 25565 go to Traefik, and based on this rule, directed to the Minecraft container.

There is one limitation to be aware of here, and that is that you can only use HostSNI with * for connections that do not use TLS. This is because Server Name Indication (SNI) is an extension of the TLS protocol.

I don’t believe Minecraft supports TLS in any case though. It just means that you won’t be able to have more than one Minecraft server container using the same port running on the single Docker host.

Finishing Off Configuration

Lastly, you might want to point a convenient Host record (A record) to your AWS EC2 Elastic IP address. For example: yourmcserver.example.com -> 1.2.3.4.

All being well, you should now be able to find and connect to your server.
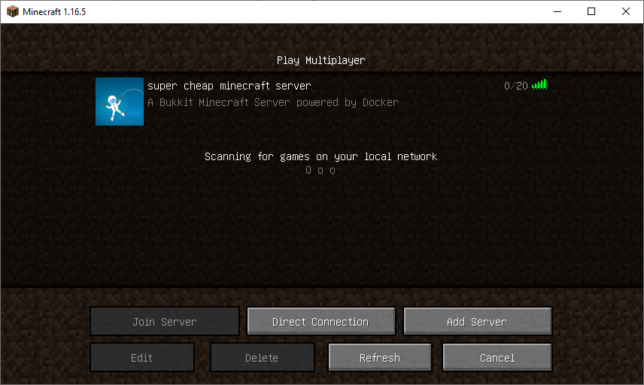
minecraft server listing

Minimal Cost Web Hosting With Spot, Graviton2, EFS, Traefik, & Let’s Encrypt

web

I’m constantly searching for minimal cost web hosting solutions. To clarify that statement, I mean ‘dynamic‘ websites, not static. At the moment I am running this blog and a bunch of others on a Raspberry Pi Kubernetes cluster at home. I got to thinking though, what happens if I need to move? I’ll have an inevitable period of downtime. Clearly self-hosting from home has it’s drawbacks.

I’ve run my personal dynamic websites from AWS before (EC2 with a single Docker instance), but used an application load balancer (ALB) to help with routing traffic to different hostnames. The load balancer itself adds a large chunk of cost, and storage was EBS, a little more difficult to manage when automating host provisioning.

A Minimal Cost Web Hosting Infrastructure in AWS

I wanted to find something that minimises costs in AWS. My goal was to go as cheap as possible. I’ve arrived at the following solution, which saves on costs for networking, compute, and storage.

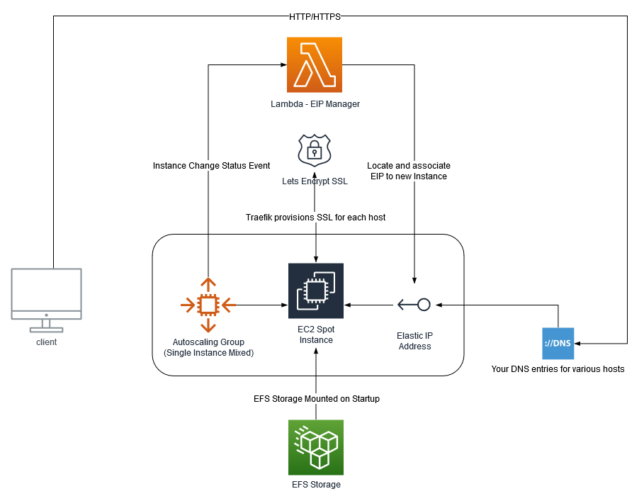
minimal cost web hosting Infrastructure diagram
  • AWS spot EC2 single instance running on AWS Graviton2 (ARM).
  • EFS storage for persistence (a requirement is that containers have persistence, as I use wordpress and require MySQL etc…)
  • Elastic IP address
  • Simple Lambda Function that manages auto-attachment of a static, Elastic IP (EIP) to the single EC2 instance. (In case the spot instance is terminated due to demand/price changes for example).
  • Traefik v2 for reverse proxying of traffic hitting the single EC2 instance to containers. This allows for multiple websites / hosts on a single machine

It isn’t going to win any high availability awards, but I’m OK with that for my own self-hosted applications and sites.

One important requirement with this solution is the ability to run dynamic sites. I know I could be doing this all a lot easier with S3/CloudFront if I were to only be hosting static sites.

Using this setup also allows me to easily move workloads between my home Kubernetes cluster and the cloud. This is because the docker images and tags I am using are now compatible between ARM (on Raspberry Pi) and ARM on Graviton2 AWS docker instances.

The choices I have gone with allow me to avoid ‘cloud lock in’, as I can easily switch between the two setups if needed.

Cost Breakdown

I’ve worked out the monthly costs to be roughly as follows:

  • EC2 Graviton2 ARM based instance (t4g.medium), $7.92
  • 3GB EFS Standard Storage, $0.99
  • Lambda – will only invoke when an EC2 instance change occurs, so cost not even worth calculating
  • EIP – free, as it will remain attached to the EC2 instance at all times
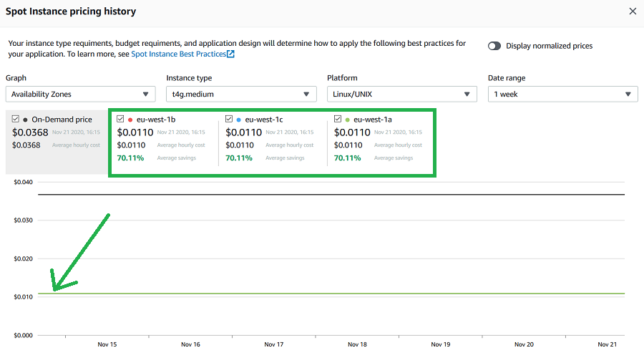
minimal cost web hosting solution - spot instance pricing chart
Current Spot Instance pricing for t4g.medium instances

If you don’t need 4GB of RAM, you can drop down to a t4g.small instance type for half the cost.

Total monthly running costs should be around $8.91.

Keep in mind that this solution will provide multiple hostname support (multiple domains/sites hosted on the same system), storage persistence, and a pretty quick and responsive ARM based Graviton2 processor.

You will need to use ARM compatible Docker images, but there are plenty out there for all the standard software like MySQL, WordPress, Adminer, etc…

How it Works

The infrastructure diagram above pretty much explains how everything fits together. But at a high level:

  • An Autoscaling Group is created, in mixed mode, but only allows a single, spot instance. This EC2 instance uses a standard Amazon Linux 2 ARM based AMI (machine image).
  • When the new instance is created, a Lambda function (subscribed to EC2 lifecycle events) is invoked, locates a designated Elastic IP (EIP), and associates it with the new spot EC2 instance.
  • The EC2 machine mounts the EFS storage on startup, and bootstraps itself with software requirements, a base Traefik configuration, as well as your custom ‘dynamic’ Traefik configuration that you specify. It then launches the Traefik container.
  • You point your various A records in DNS to the public IP address of the EIP.
  • Now it doesn’t matter if your EC2 spot instance is terminated, you’ll always have the same IP address, and the same EFS storage mounted when the new one starts up.
  • There is the question of ‘what if the spot market goes haywire?’ By default the spot price will be allowed to go all the way up to the on-demand price. This means you could potentially pay more for the EC2 instance, but it is not likely. If it did happen, you could change the instance configuration or choose another instance type.

Deploying the Solution

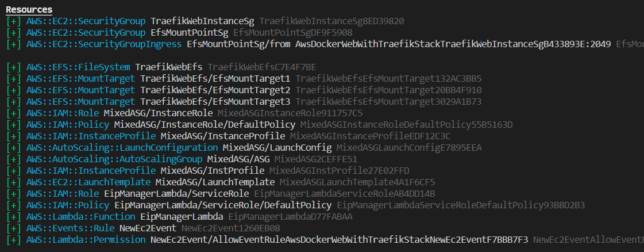
As this is an AWS opinionated infrastructure choice, I’ve packaged everything into an AWS Cloud Development Kit (AWS CDK) app. AWS CDK is an open source software development framework that allows you to do infrastructure-as-code. I’ve used Typescript as my language of choice.

Clone the source from GitHub

Deploy Requirements

You’ll need the following requirements on your local machine to deploy this for yourself:

  • NodeJS installed, along with npm.
  • AWS CDK installed globally (npm install -g aws-cdk)
  • Define your own traefik_dynamic.toml configuration, and host it somewhere where the EC2 instance will be able to grab it with curl. Note, that the Traefik dashboard basic auth password is defined using htpasswd.
htpasswd -nb YourUsername YourSuperSecurePasswordGoesHere
  • An existing VPC in your account to use. The CDK app does not create a VPC (additional cost). You can definitely use your default account VPC that is already available in all accounts though.
  • An existing AWS Keypair
  • An existing Elastic IP address (EIP) created, and tagged with the key/value of Usage:Traefik (this is for the Lambda function to identify the right EIP to associate to the EC2 instance when it starts)
Tag requirement for the Elastic IP Address

I haven’t set up the CDK app to pass in parameters, so you’ll just need to modify a bunch of variables at the top of aws-docker-web-with-traefik-stack.ts to substitute your specific values for the aforementioned items. For example:

const vpcId = "your-vpc-id";
const instanceType = "t4g.medium"; // t4g.small for even more cost saving
const keypairName = "your-existing-keypair-name";
const managementLocationCidr = "1.1.1.1/32"; // your home / management network address that SSH access will be allowed from. Change this!
const traefikDynContentUrl = "https://gist.githubusercontent.com/Shogan/f96a5a20183e672f9c49f278ea67503b/raw/351c52b7f2bacbf7b8dae65404b61ff4e4313d81/example-traefik-dynamic.toml"; // this should point to your own dynamic traefik config in toml format.
const emailForLetsEncryptAcmeResolver = 'email = "youremail@example.com"'; // update this to your own email address for lets encrypt certs
const efsAutomaticBackups = false; // set to true to enable automatic backups for EFS

Build and Deploy

Build the Typescript project using npm run build. This compiles the CDK and the EIP Manager Lambda function typescript.

At this point you’re ready to deploy with CDK.

If you have not used CDK before, all you really need to know is that it takes the infrastructure described by the code (typescript in this case), and coverts it to CloudFormation language. The cdk deploy command deploys the stack (which is the collection of AWS resources defined in code).

Run:

# Check what changes will be made first
cdk diff

# Deploy
cdk deploy

Testing a Sample Application Stack

Here is a sample docker-compose stack that will install MySQL, Adminer, and a simple WordPress setup.

SSH onto the EC2 instance that is provisioned, and use docker-compose up -d deploy the compose example stack. Just remember to edit and change the template passwords in the two environment variables.

You’ll also need to update the hostnames to your own (from .example.com), and point those A records to your Elastic public IP address.

One more thing, there is a trick to running docker-compose on ARM systems. I personally prefer to grab a docker image that contains a pre-built docker-compose binary, and shell script that ties it together with the docker-compose command. Here are the steps if you need them (run on the EC2 instance that you SSH onto):

sudo curl -L --fail https://raw.githubusercontent.com/linuxserver/docker-docker-compose/master/run.sh -o /usr/local/bin/docker-compose
sudo chmod +x /usr/local/bin/docker-compose

For your own peace of mind, make sure you inspect that githubusercontent run.sh script yourself before downloading, as well as the docker image(s) it references and pulls down to run docker-compose.

Tear Down

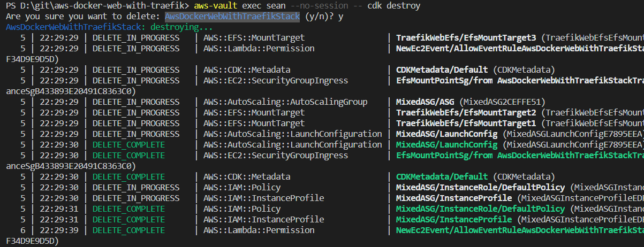
To destroy the stack, simply issue the cdk destroy command. The EFS storage is marked by default with a retain policy, so it will not be deleted automatically.

cdk destroy AwsDockerWebWithTraefikStack
deleting the minimal cost web hosting solution cdk stack

Closing

If you’re on the look out for a minimal cost web hosting solution, then give this a try.

The stack uses the new Graviton2 based t4g instance type (ARM) to help achieve a minimal cost web hosting setup. Remember to find compatible ARM docker images for your applications before you go all in with something like this.

The t4g instance family is also a ‘burstable’ type. This means you’ll get great performance as long as you don’t use up your burst credits. Performance will slow right down if that happens. Keep an eye on your burst credit balance with CloudWatch. For 99% of use cases you’ll likely be just fine though.

Also remember that you don’t need to stick to AWS. You could bolt together services from any other cloud provider to do something similiar, most likely at a similar cost too.