Minimal Cost Web Hosting With Spot, Graviton2, EFS, Traefik, & Let’s Encrypt

web

I’m constantly searching for minimal cost web hosting solutions. To clarify that statement, I mean ‘dynamic‘ websites, not static. At the moment I am running this blog and a bunch of others on a Raspberry Pi Kubernetes cluster at home. I got to thinking though, what happens if I need to move? I’ll have an inevitable period of downtime. Clearly self-hosting from home has it’s drawbacks.

I’ve run my personal dynamic websites from AWS before (EC2 with a single Docker instance), but used an application load balancer (ALB) to help with routing traffic to different hostnames. The load balancer itself adds a large chunk of cost, and storage was EBS, a little more difficult to manage when automating host provisioning.

A Minimal Cost Web Hosting Infrastructure in AWS

I wanted to find something that minimises costs in AWS. My goal was to go as cheap as possible. I’ve arrived at the following solution, which saves on costs for networking, compute, and storage.

minimal cost web hosting Infrastructure diagram
  • AWS spot EC2 single instance running on AWS Graviton2 (ARM).
  • EFS storage for persistence (a requirement is that containers have persistence, as I use wordpress and require MySQL etc…)
  • Elastic IP address
  • Simple Lambda Function that manages auto-attachment of a static, Elastic IP (EIP) to the single EC2 instance. (In case the spot instance is terminated due to demand/price changes for example).
  • Traefik v2 for reverse proxying of traffic hitting the single EC2 instance to containers. This allows for multiple websites / hosts on a single machine

It isn’t going to win any high availability awards, but I’m OK with that for my own self-hosted applications and sites.

One important requirement with this solution is the ability to run dynamic sites. I know I could be doing this all a lot easier with S3/CloudFront if I were to only be hosting static sites.

Using this setup also allows me to easily move workloads between my home Kubernetes cluster and the cloud. This is because the docker images and tags I am using are now compatible between ARM (on Raspberry Pi) and ARM on Graviton2 AWS docker instances.

The choices I have gone with allow me to avoid ‘cloud lock in’, as I can easily switch between the two setups if needed.

Cost Breakdown

I’ve worked out the monthly costs to be roughly as follows:

  • EC2 Graviton2 ARM based instance (t4g.medium), $7.92
  • 3GB EFS Standard Storage, $0.99
  • Lambda – will only invoke when an EC2 instance change occurs, so cost not even worth calculating
  • EIP – free, as it will remain attached to the EC2 instance at all times
minimal cost web hosting solution - spot instance pricing chart
Current Spot Instance pricing for t4g.medium instances

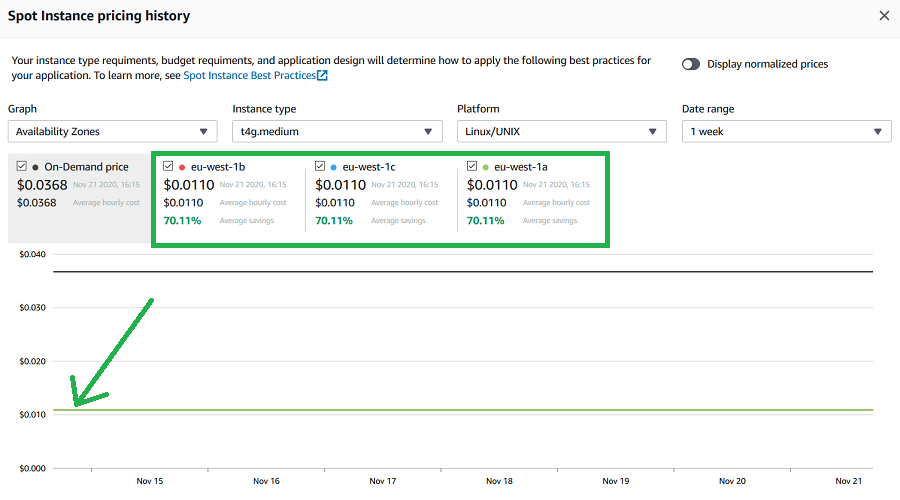
If you don’t need 4GB of RAM, you can drop down to a t4g.small instance type for half the cost.

Total monthly running costs should be around $8.91.

Keep in mind that this solution will provide multiple hostname support (multiple domains/sites hosted on the same system), storage persistence, and a pretty quick and responsive ARM based Graviton2 processor.

You will need to use ARM compatible Docker images, but there are plenty out there for all the standard software like MySQL, WordPress, Adminer, etc…

How it Works

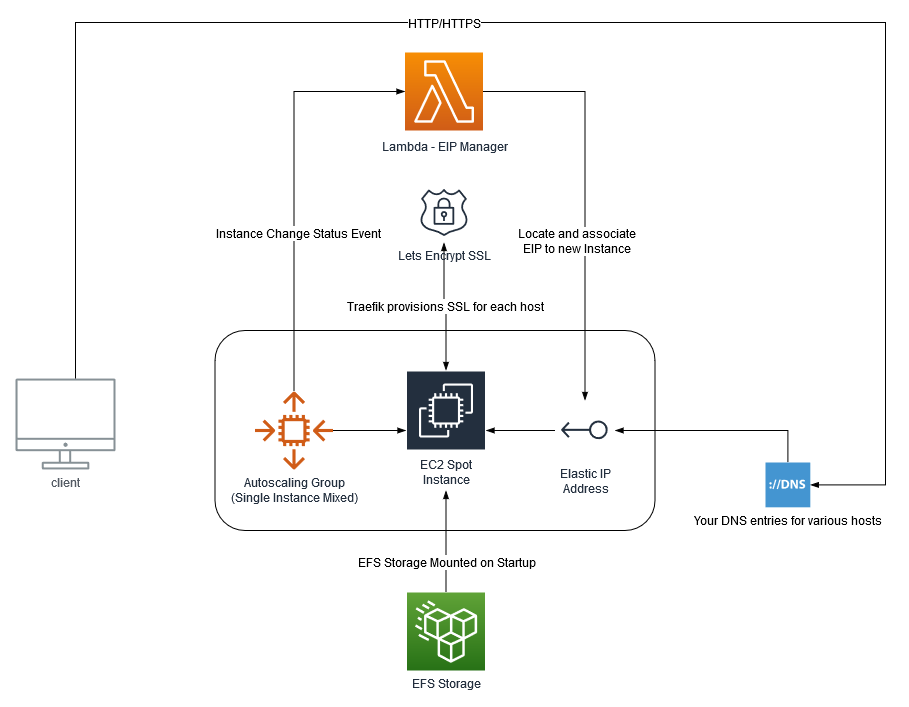
The infrastructure diagram above pretty much explains how everything fits together. But at a high level:

  • An Autoscaling Group is created, in mixed mode, but only allows a single, spot instance. This EC2 instance uses a standard Amazon Linux 2 ARM based AMI (machine image).
  • When the new instance is created, a Lambda function (subscribed to EC2 lifecycle events) is invoked, locates a designated Elastic IP (EIP), and associates it with the new spot EC2 instance.
  • The EC2 machine mounts the EFS storage on startup, and bootstraps itself with software requirements, a base Traefik configuration, as well as your custom ‘dynamic’ Traefik configuration that you specify. It then launches the Traefik container.
  • You point your various A records in DNS to the public IP address of the EIP.
  • Now it doesn’t matter if your EC2 spot instance is terminated, you’ll always have the same IP address, and the same EFS storage mounted when the new one starts up.
  • There is the question of ‘what if the spot market goes haywire?’ By default the spot price will be allowed to go all the way up to the on-demand price. This means you could potentially pay more for the EC2 instance, but it is not likely. If it did happen, you could change the instance configuration or choose another instance type.

Deploying the Solution

As this is an AWS opinionated infrastructure choice, I’ve packaged everything into an AWS Cloud Development Kit (AWS CDK) app. AWS CDK is an open source software development framework that allows you to do infrastructure-as-code. I’ve used Typescript as my language of choice.

Clone the source from GitHub

Deploy Requirements

You’ll need the following requirements on your local machine to deploy this for yourself:

  • NodeJS installed, along with npm.
  • AWS CDK installed globally (npm install -g aws-cdk)
  • Define your own traefik_dynamic.toml configuration, and host it somewhere where the EC2 instance will be able to grab it with curl. Note, that the Traefik dashboard basic auth password is defined using htpasswd.
htpasswd -nb YourUsername YourSuperSecurePasswordGoesHere
  • An existing VPC in your account to use. The CDK app does not create a VPC (additional cost). You can definitely use your default account VPC that is already available in all accounts though.
  • An existing AWS Keypair
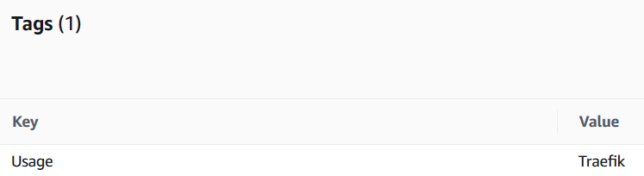
  • An existing Elastic IP address (EIP) created, and tagged with the key/value of Usage:Traefik (this is for the Lambda function to identify the right EIP to associate to the EC2 instance when it starts)
Tag requirement for the Elastic IP Address

I haven’t set up the CDK app to pass in parameters, so you’ll just need to modify a bunch of variables at the top of aws-docker-web-with-traefik-stack.ts to substitute your specific values for the aforementioned items. For example:

const vpcId = "your-vpc-id";
const instanceType = "t4g.medium"; // t4g.small for even more cost saving
const keypairName = "your-existing-keypair-name";
const managementLocationCidr = "1.1.1.1/32"; // your home / management network address that SSH access will be allowed from. Change this!
const traefikDynContentUrl = "https://gist.githubusercontent.com/Shogan/f96a5a20183e672f9c49f278ea67503b/raw/351c52b7f2bacbf7b8dae65404b61ff4e4313d81/example-traefik-dynamic.toml"; // this should point to your own dynamic traefik config in toml format.
const emailForLetsEncryptAcmeResolver = 'email = "youremail@example.com"'; // update this to your own email address for lets encrypt certs
const efsAutomaticBackups = false; // set to true to enable automatic backups for EFS

Build and Deploy

Build the Typescript project using npm run build. This compiles the CDK and the EIP Manager Lambda function typescript.

At this point you’re ready to deploy with CDK.

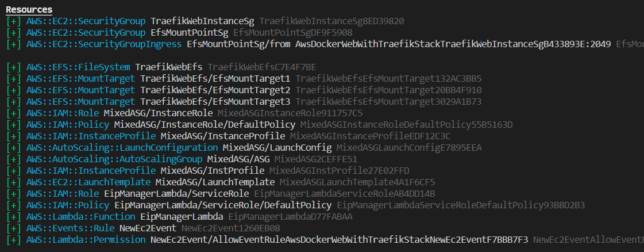
If you have not used CDK before, all you really need to know is that it takes the infrastructure described by the code (typescript in this case), and coverts it to CloudFormation language. The cdk deploy command deploys the stack (which is the collection of AWS resources defined in code).

Run:

# Check what changes will be made first
cdk diff

# Deploy
cdk deploy

Testing a Sample Application Stack

Here is a sample docker-compose stack that will install MySQL, Adminer, and a simple WordPress setup.

SSH onto the EC2 instance that is provisioned, and use docker-compose up -d deploy the compose example stack. Just remember to edit and change the template passwords in the two environment variables.

You’ll also need to update the hostnames to your own (from .example.com), and point those A records to your Elastic public IP address.

One more thing, there is a trick to running docker-compose on ARM systems. I personally prefer to grab a docker image that contains a pre-built docker-compose binary, and shell script that ties it together with the docker-compose command. Here are the steps if you need them (run on the EC2 instance that you SSH onto):

sudo curl -L --fail https://raw.githubusercontent.com/linuxserver/docker-docker-compose/master/run.sh -o /usr/local/bin/docker-compose
sudo chmod +x /usr/local/bin/docker-compose

For your own peace of mind, make sure you inspect that githubusercontent run.sh script yourself before downloading, as well as the docker image(s) it references and pulls down to run docker-compose.

Tear Down

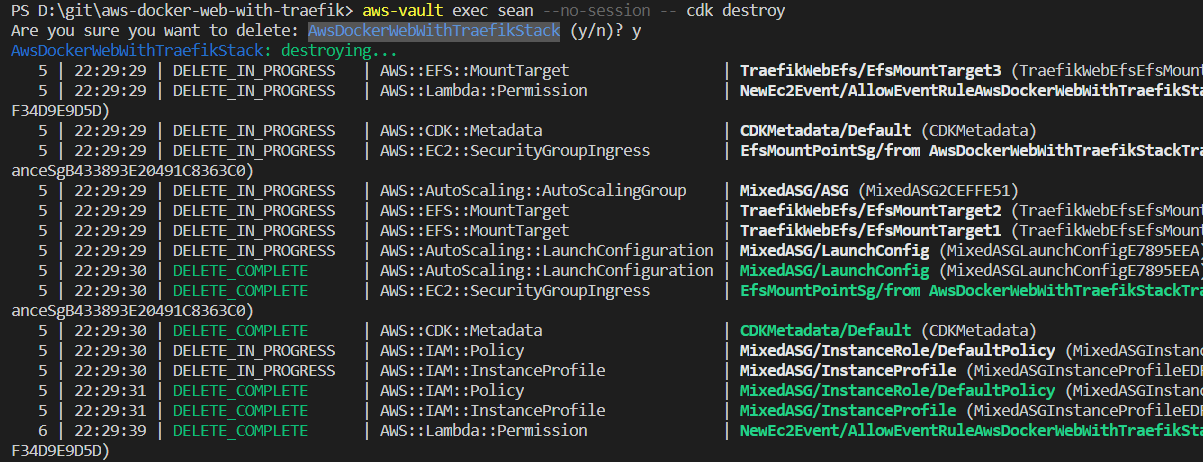
To destroy the stack, simply issue the cdk destroy command. The EFS storage is marked by default with a retain policy, so it will not be deleted automatically.

cdk destroy AwsDockerWebWithTraefikStack
deleting the minimal cost web hosting solution cdk stack

Closing

If you’re on the look out for a minimal cost web hosting solution, then give this a try.

The stack uses the new Graviton2 based t4g instance type (ARM) to help achieve a minimal cost web hosting setup. Remember to find compatible ARM docker images for your applications before you go all in with something like this.

The t4g instance family is also a ‘burstable’ type. This means you’ll get great performance as long as you don’t use up your burst credits. Performance will slow right down if that happens. Keep an eye on your burst credit balance with CloudWatch. For 99% of use cases you’ll likely be just fine though.

Also remember that you don’t need to stick to AWS. You could bolt together services from any other cloud provider to do something similiar, most likely at a similar cost too.

Provision your own Kubernetes cluster with private network topology on AWS using kops and Terraform – Part 1

Goals

In this post series I’ll be covering how to provision a brand new self-hosted Kubernetes environment provisioned into AWS (on top of EC2 instances) with a specific private networking topology as follows:

  • Deploy into an existing VPC
  • Use existing VPC Subnets
  • Use private networking topology (Calico), with a private/internal ELB to access the API servers/cluster
  • Don’t use Route 53 AWS DNS services or external DNS, instead use Kubernetes gossip DNS service for internal cluster name resolution, and allow for upstream DNS to be set up to your own private DNS servers for outside-of-cluster DNS lookups

This is a more secure set up than a more traditional / standard kops provisioned Kubernetes cluster,  placing API servers on a private subnet, yet still allows you the flexibility of using Load Balanced services in your cluster to expose web services or APIs for example to the public internet if you wish.

Set up your workstation with the right tools

You need a Linux or MacOS based machine to work from (management station/machine). This is because kops only runs on these platforms right now.

sudo apt install python-pip
  • Use pip to install the awscli
pip install awscli --upgrade --user
  • Create yourself an AWS credentials file (~/.aws/credentials) and set it up to use an access and secret key for your kops IAM user you created earlier.
  • Setup the following env variables to reference from, but make sure you fill in the values you require for this new cluster. So change the VPC ID, S3 state store bucket name, and cluster NAME.
export ZONES=us-east-1b,us-east-1c,us-east-1d
export KOPS_STATE_STORE=s3://your-k8s-state-store-bucket
export NAME=yourclustername.k8s.local
export VPC_ID=vpc-yourvpcidgoeshere
  • Note for the above exports above, ZONES is used to specify where the master nodes in the k8s cluster will be placed (Availability Zones). You’ll definitely want these spread out for maximum availability

Set up your S3 state store bucket for the cluster

You can either create this manually, or create it with Terraform. Here is a simple Terraform script that you can throw into your working directory to create it. Just change the name of the bucket to your desired S3 bucket name for this cluster’s state storage.

Remember to use the name for this bucket that you specified in your KOPS_STATE_STORE export variable.

resource "aws_s3_bucket" "state_store" {
  bucket        = "${var.name}-${var.env}-state-store"
  acl           = "private"
  force_destroy = true

  versioning {
    enabled = true
  }

  tags {
    Name        = "${var.name}-${var.env}-state-store"
    Infra       = "${var.name}"
    Environment = "${var.env}"
    Terraformed = "true"
  }
}

Terraform plan and apply your S3 bucket if you’re using Terraform, passing in variables for name/env to name it appropriately…

terraform plan
terraform apply

Generate a new SSH private key for the cluster

  • Generate a new SSH key. By default it will be created in ~/.ssh/id_rsa
ssh-keygen -t rsa

Generate the initial Kubernetes cluster configuration and output it to Terraform script

Use the kops tool to create a cluster configuration, but instead of provisioning it directly, you’ll output it to terraform script. This is important, as you’ll be wanting to change values in this output file to provision the cluster into existing VPC and subnets. You also want to change the ELB from a public facing ELB to internal only.

kops create cluster --master-zones=$ZONES --zones=$ZONES --topology=private --networking=calico --vpc=$VPC_ID --target=terraform --out=. ${NAME}

Above you ran the kops create cluster command and specified to use a private topology with calico networking. You also designated an existing VPC Id, and told the tool to create terraform script as the output in the current directory instead of actually running the create cluster command against AWS right now.

Change your default editor for kops if you require a different one to vim. E.g for nano:

set EDITOR=nano

Edit the cluster configuration:

kops edit cluster ${NAME}

Change the yaml that references the loadBalancer value as type Public to be Internal.

While you are still in the editor for the cluster config, you need to also change the entire subnets section to reference your existing VPC subnets, and egress pointing to your NAT instances. Remove the current subnets section, and add the following template, (updating it to reference your own private subnet IDs for each region availability zone, and the correct NAT instances for each too. (You might possibly use one NAT instance for all subnets or you may have multiple). The Utility subnets should be your public subnets, and the Private subnets your private ones of course. Make sure that you reference subnets for the correct VPC you are deploying into.

subnets:
- egress: nat-2xcdc5421df76341
  id: subnet-b32d8afg
  name: us-east-1b
  type: Private
  zone: us-east-1b
- egress: nat-04g7fe3gc03db1chf
  id: subnet-da32gge3
  name: us-east-1c
  type: Private
  zone: us-east-1c
- egress: nat-0cd542gtf7832873c
  id: subnet-6dfb132g
  name: us-east-1d
  type: Private
  zone: us-east-1d
- id: subnet-234053gs
  name: utility-us-east-1b
  type: Utility
  zone: us-east-1b
- id: subnet-2h3gd457
  name: utility-us-east-1c
  type: Utility
  zone: us-east-1c
- id: subnet-1gvb234c
  name: utility-us-east-1d
  type: Utility
  zone: us-east-1d
  • Save and exit the file from your editor.
  • Output a new terraform config over the existing one to update the script based on the newly changed ELB type and subnets section.
kops update cluster --out=. --target=terraform ${NAME}
  • The updated file is now output to kubernetes.tf in your working directory
  • Run a terraform plan from your terminal, and make sure that the changes will not affect any existing infrastructure, and will not create or change any subnets or VPC related infrastructure in your existing VPC. It should only list out a number of new infrastructure items it is going to create.
  • Once happy, run terraform apply from your terminal
  • Once terraform has run with the new kubernetes.tf file, the certificate will only allow the standard named cluster endpoint connection (cert only valid for api.internal.clustername.k8s.local for example). You now need to re-run kops update and output to terraform again.
kops update cluster $NAME --target=terraform --out=.
  • This will update the cluster state in your S3 bucket with new certificate details, but not actually change anything in the local kubernetes.tf file (you shouldn’t see any changes here). However you can now run a rolling update rolling update with the cloudonly and force –yes options:
kops rolling-update cluster $NAME --cloudonly --force --yes

This will roll all the masters and nodes in the cluster (the created autoscaling groups will initialise new nodes from the launch configurations) and when the ASGs initiate new instances, they’ll get the new certs applied from the S3 state storage bucket. You can then access the ELB endpoint on HTTPS, and you should get an auth prompt popup.

Find the endpoint on the internal ELB that was created. The rolling update may take around 10 minutes to complete, and as mentioned before, will terminate old instances in the Autoscaling group and bring new instances up with the new certificate configuration.

Tag your public subnets to allow auto provisioning of ELBs for Load Balanced Services

In order to allow Kubernetes to automatically create load balancers (ELBs) in AWS for services that use the LoadBalancer configuration, you need to tag your utility subnets with a special tag to allow the cluster to find these subnets automatically and provision ELBs for any services you create on-the-fly.

Tag the subnets that you are using as utility subnets (public) with the following tag:

Key: kubernetes.io/role/elb Value: (Don’t add a value, leave it blank)

Tag your private subnets for internal-only ELB provisioning for Load Balanced Services

In order to allow Kubernetes to automatically create load balancers (ELBs) in AWS for services that use the LoadBalancer configuratio and a private facing configuration, you need to tag the private subnets that the cluster operates in with a special tag to allow k8s to find these subnets automatically.

Tag the subnets that you are using as private (where your nodes and master nodes should be running now) with the following two tags:

Key: kubernetes.io/cluster/{yourclusternamehere.k8s.local} Value: shared
Key: kubernetes.io/role/internal-elb Value: 1

As an example for the above, the key might end up with a value of “kubernetes.io/cluster/yourclusternamehere.k8s.local” if your cluster is named “yourclusternamehere.k8s.local” (remember you named your cluster when you created your local workstation EXPORT value for {NAME}.

Closing off

This concludes part one of this series for now.

As a summary, you should now have a kubernetes cluster up and running in your private subnets, spread across availability zones, and you’ve done it all using kops and Terraform.

Straighten things out by creating a git repository, and commiting your terraform artifacts for the cluster and storing them in version control. Watch out for the artifacts that kops output along with the Terraform script like the private certificate files – these should be kept safe.

Part two should be coming soon, where we’ll run through some more tasks to continue setting the cluster up like setting upstream DNS, provisioning the Kubernetes Dashboard service/pod and more…