A quick post with some useful querying patterns when using JMESPath queries to find keys in a target S3 bucket.
Finding and filtering with JMESPath expressions
Find keys ending or starting with a certain value, and sort by Size
Here is a JMESPath query using s3api to find and sort keys based on the ending with a certain value, with the sort then being applied based on the resulting key sizes.
The pipe operator is used to stop projections in the query, or group expressions together.
Here is an example of filtering objects in a bucket down, followed by another expression to find only those with a key containing the value example_string:
This can be useful if you have a large, nested object structure and wish to create a short property in the pipeline for use in expressions further down the line. This wouldn’t be the case in the S3 object structure we’re primarily working with here, but a query example would be:
AWS System Manager Session Manager added the port forwarding feature, announced in this blog post back in 2019. In this post I’ll show you how to leverage SSM and socat port forwarding to access systems in a private subnet that don’t have the SSM agent installed.
You’ll use an SSM agent enabled EC2 instance as an initial target for the ssm port forward session. On this instance, you’ll run socat as a relay for the incoming TCP session to the other instance that does not have the SSM agent.
What is socat?
To quote the official man page, socat (SOcket CAT) is a multipurpose relay. It is a command line tool that establishes two bidirectional byte streams and transfers data between them.
You can use it to connect all sorts of channels. For example:
files
pipes
devices
sockets, such as TCP, UDP, IPv4, etc
SSL sockets
programs
SSM and socat Port Forwarding Example
In my example I have an AWS EMR (Elastic Map Reduce) master node running a web dashboard for ganglia in a private VPC subnet.
I don’t want to add a bastion host / jump box or provide SSH access from the public net.
SSM would provide a nice way for me to connect a remote session, or port forward using IAM authentication and negating the need for any ingress security group rules, but only if I had the SSM agent available on this instance.
Seeing as though the EMR master node is not SSM agent enabled, and I can’t use SSM port forwarding directly to this instance, we could use an interim machine with SSM as a jump box.
Example Configuration
Here is how I configured port forwarding in my use case to access ganglia on a private instance EMR node.
The EC2 instance with SSM agent must have an IAM policy attached that allows the relevant ssm access. The blog post linked above has instructions. In a nutshell though, most standard Amazon AMIs include the ssm agent. Your EC2 instance profile should include the required actions too. The AmazonSSMManagedInstanceCore managed policy includes these.
Install socat on the SSM agent enabled interim machine the private subnet. For this I connected an SSM session to get shell access and ran sudo yum install -y socat
Now I needed to open a source channel for the SSM port forward aws cli command to connect, and connect that source to the destination of the EMR master node running ganglia.
The command listens on port 8080, and forwards TCP to the EMR node, 10.0.4.149 on port 80. Importantly, the command uses fork and reuseaddr to allow multiple connections.
Next is to use the AWS CLI ssm start-session command to start a port forwarding session to the interim instance with the SSM agent running. Grab the Instance ID for the EC2 machine and:
If you setup socat correctly to listen on port 8080, then the connection should be opened and accepted.
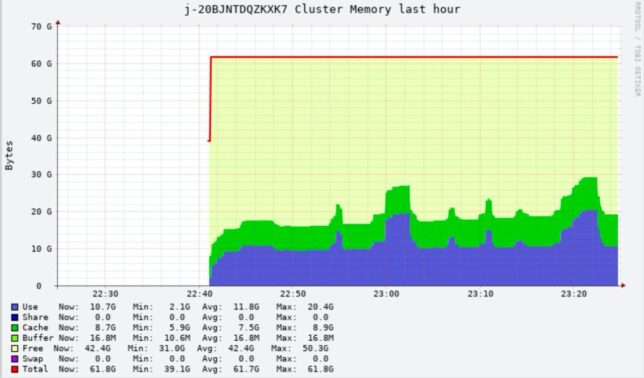
Now you can simply open a web browser locally and direct it to http://localhost:8089/ganglia to access ganglia on the remote EMR master node.
Accessing EMR cluster memory stats via the remote port forwarded session.
Closing
AWS SSM is a useful tool to get access to instances in a secure, audited fashion without needing to open up risky SSH access or other remote ports to the public internet.
When constrained and needing a jump across to an instance without the SSM agent you can leverage tools to help. Socat is one such tool that can facilitate this within the private network.
According to the Minecraft Realms plan pricing page, you can get a realms server at around £5.59 per month. You get some nice conveniences there but… I refuse to pay much at all when I can throw some infrastructure together myself in the cloud to create the ultimate cheap Minecraft server.
Considering my Docker instance running Traefik hosts another 3 or 4 of my personal services along with a Minecraft server, then this solution only costs me around £1.50 a month.
I chose to go with a single AWS EC2 instance that runs Docker. Minecraft runs in a container and sits alongside other personal websites and services that I host there too.
I use Traefik to route traffic coming in to this single host for various TCP ports as well as HTTP(s) on different hostnames. This essentially levels up the cost savings even further as I don’t need multiple EC2 instances (one for each service), and I don’t even need to pay for something like an application or network load balancer, as Traefik does this for me.
A Quick Review of Alternatives
There are other alternatives to consider if you’re looking for a cheap Minecraft server, so don’t take this as being the only option. Here is what I’ve used in the past before settling on my current solution:
Minecraft on a dedicated cloud VM. If you just want a dedicated Minecraft VM in the cloud, then DigitalOcean is a good, cheap option. You can also get fairly cheap instances Vultr.
Running Minecraft on my own personal Raspberry Pi Kubernetes Cluster. I was even able to expose it over the internet for friends to play on by leveraging a Pi device as a dedicated router. I then used port forwarding to get it working through my double NAT setup. The ARM container was a little slow as a server for more than 2 or 3 players on Raspberry Pi hardware though.
Minecraft Server on a home PC / Workstation, with port forwarding to allow other players to connect. This is not ideal, especially on Windows machines or systems that you don’t want to leave running 24/7 as you would for a dedicated server.
Various other Minecraft-as-a-service providers. These are decent options in some cases. However for me price and control are important, and I much prefer to self host in this case.
The cost benefits to using this particular recipe are:
EC2 Graviton2 ARM based processor – slightly cheaper to run than Intel and AMD. The downside is more limited software choices. You need to make sure you use ARM compatible packages or Docker images.
Spot instance – this has massive savings over a normal lifecycle EC2 instance. The downside is that it can be terminated at any time with only a couple of minutes of notice. When using these you need to make sure you have good data persistence that is not local to the EC2 instance. I personally use a mounted EFS volume. It is re-attached to a new instance from the autoscaling group if the old instance is terminated.
If you don’t use the CDK solution I mentioned above, then alternatively deploy yourself an EC2 instance. Give it an elastic IP address, set up the Security Group ingress rules accordingly, and get shell access. First thing you’ll want to install is Docker, then you’re pretty much good to go.
Minecraft Docker Image
I found a great Minecraft Docker image that is well maintained and has the correct ARM image builds for use on Graviton2 hardware. Check out itzg/minecraft-server. There are other arch builds there that’ll run on just about any other platform.
Docker Compose Service
If you use docker-compose, then here is the simple service definition to get things running.
The docker-compose definition will run a Docker container using the latest multiarch image (which will run on ARM devices). When starting, the container will prepare and run a Minecraft 1.16.5 server. It will also use Bukkit and enable auto pause. The game server does not tick over when there are no players connected.
Traefik Configuration
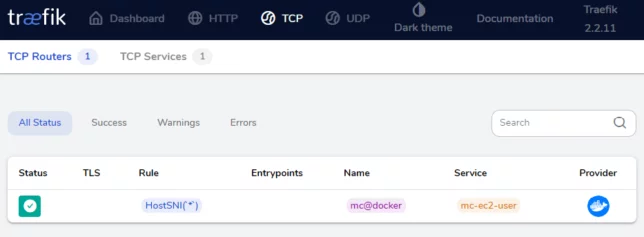
In the docker-compose definition above, you might have noticed the container labels. The labels prefixed with traefik are used to inform Traefik of how to route network traffic.
The TCP router using HostSNI on *
In our case, TCP connections are required on port 25565 and HostSNI is used to route those coming in for * (all hosts). The TCP connections on port 25565 go to Traefik, and based on this rule, directed to the Minecraft container.
There is one limitation to be aware of here, and that is that you can only use HostSNI with * for connections that do not use TLS. This is because Server Name Indication (SNI) is an extension of the TLS protocol.
I don’t believe Minecraft supports TLS in any case though. It just means that you won’t be able to have more than one Minecraft server container using the same port running on the single Docker host.
Finishing Off Configuration
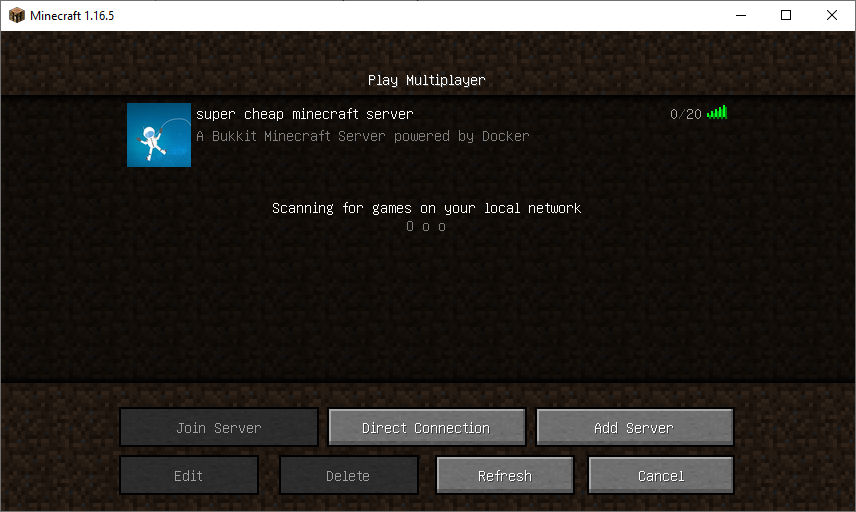
Lastly, you might want to point a convenient Host record (A record) to your AWS EC2 Elastic IP address. For example: yourmcserver.example.com -> 1.2.3.4.
All being well, you should now be able to find and connect to your server.
The saga pattern is useful when you have transactions that require a bunch of steps to complete successfully, with failure of steps requiring associated rollback processes to run. This post will cover the saga pattern with aws-cdk, leveraging AWS Step Functions and Lambda.
If you need an introduction to the saga pattern in an easy to understand format, I found this GOTO conference session by Caitie McCaffrey very informative.
I’ll be taking things one step further by automating the setup and deployment of a sample app which uses the saga pattern with aws-cdk.
I’ve started using aws-cdk fairly frequently, but realise it has the issue of vendor lock-in. I found it nice to work with in the case of step functions particularly in the way you construct step chains.
Saga Pattern with Step Functions
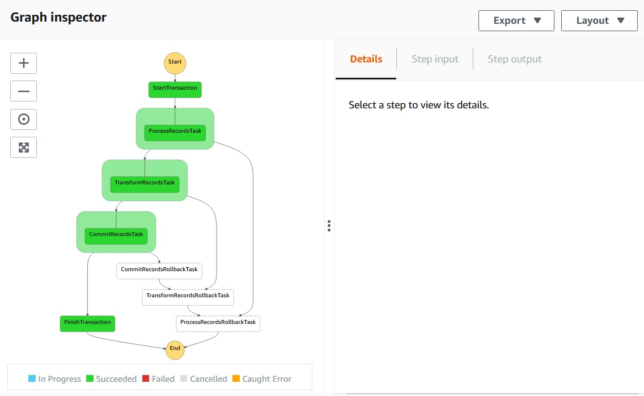
So here is the step function state machine you’ll create using the fairly simple saga pattern aws-cdk app I’ve set up.
A successful transaction run
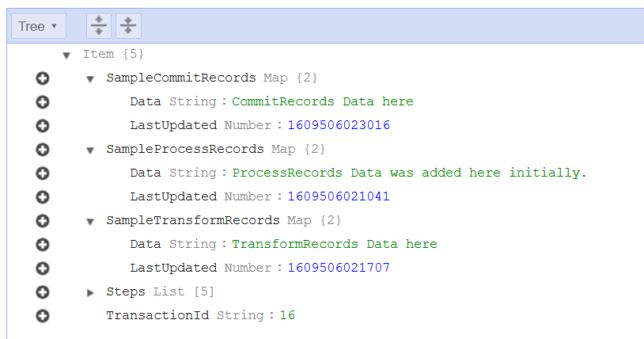
Above you see a successful transaction run, where all records are saved to a DynamoDB table entry.
The sample data written by a succesful transaction run. Each step has a ‘Sample’ map entry with ‘Data’ and a timestamp.
If one of those steps were to fail, you need to manage the rollback process of your transaction from that step backwards.
Illustrating Failure Rollback
As mentioned above, with the saga pattern you’ll want to rollback any steps that have run from the point of failure backward.
The example app has three steps:
Process Records
Transform Records
Commit Records
Each step is a simple lambda function that writes some data to a DynamoDB table with a primary partition key of TransactionId.
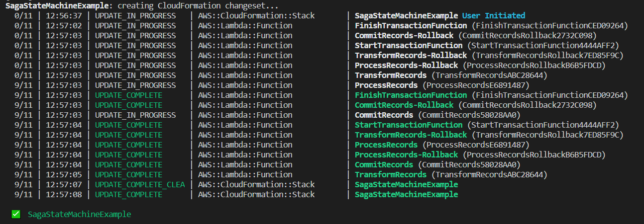
In the screenshot below, TransformRecords has a simulated failure, which causes the lambda function to throw an error.
A catch step is linked to each of the process steps to handle rollback for each of them. Above, TransformRecordsRollbackTask is run when TransformRecordsTask fails.
The rollback steps cascade backward to the first ‘business logic’ step ProcessRecordsTask. Any steps that have run up to that point will therefore have their associated rollback tasks run.
Here is what an entry looks like in DynamoDB if it failed:
A failed transaction has no written data, because the data written up to the point of failure was ‘rolled back’.
You’ll notice this one does not have the ‘Sample’ data that you see in the previously shown successful transaction. In reality, for a brief moment it does have that sample data. As each rollback step is run, the associated data for that step is removed from the table entry, resulting in the above entry for TransactionId 18.
Deploying the Sample Saga Pattern App with aws-cdk
The lambda functions check the payload input for the simulateFail flag, and if found will do a Math.random() check to give chance of failure in one of the process steps.
Taking it Further
To take this example further, you’ll want to more carefully manage step outputs using Step Function ResultPath configuration. This will ensure that your steps don’t overwrite data in the state machine and that steps further down the line have access to the data that they need.
You’ll probably also want a step at the end of the line for the case of failure (which runs after all rollback steps have completed). This can handle notifications or other tasks that should run if a transaction fails.
When writing tests for a service you’ll often find that there are other dependent services that may need to be called in some way or another. You won’t want to actually invoke the real service during test, but rather ‘stub’ out the dependent service call function. Sinon stub provides an easy and customisable way to replace these external service calls for your tests.
Practical Example: AWS SQS sendMessage Sinon Stub
Let’s say you have an AWS Lambda function that drops a message onto an SQS queue. To test this function handler, your test should invoke the handler and verify that the message was sent.
This simple case already involves an external service call – the SQS sendMessage action that will drop the message onto the queue.
Here is a simple NodeJS module that wraps the SQS sendMessage call.
// sqs.ts

import AWS = require("aws-sdk");
import { AWSError } from "aws-sdk";
import { SendMessageRequest, SendMessageResult } from "aws-sdk/clients/sqs";
import { PromiseResult } from "aws-sdk/lib/request";

const sqs = new AWS.SQS({apiVersion: '2012-11-05'});

export function sendMessage(messageBody: string, queueUrl: string) : Promise<PromiseResult<SendMessageResult, AWSError>> {

  var params = {
    QueueUrl: queueUrl,
    MessageBody: messageBody,
  } as SendMessageRequest;

  return sqs
    .sendMessage(params)
    .promise()
    .then(res => res)
    .catch((err) => { throw err; });
}
The actual Lambda Handler code that uses the sqs.ts module above looks like this:
Next you’ll create a Sinon stub to ‘stub out’ the sendMessage function of this module (the actual code that the real AWS Lambda function would call).
Setup an empty test case that calls the Lambda handler function to test the result.
// handler.spec.ts

import * as chai from 'chai';
import * as sinon from "sinon";
import { assert } from "sinon";

import * as sqs from '../src/sqs';
import { handler } from '../src/index';
import sinonChai from "sinon-chai";
import { PromiseResult } from 'aws-sdk/lib/request';
import { SendMessageResult } from 'aws-sdk/clients/SQS';
import { Response } from 'aws-sdk';
import { AWSError } from 'aws-sdk';

const expect = chai.expect;
chai.use(sinonChai);

const event = {
  test: "test"
};

describe("lambda-example-sqs-handler", () => {
  describe("handler", () => {

    it("should send an sqs message and return the message ID", async () => {

      // WHEN

      process.env.SQS_QUEUE_URL = "https://sqs.eu-west-1.amazonaws.com/123456789012/test-queue";
      const result = await handler(event);

      // THEN

      expect(result).to.exist;
      expect(result).to.eql(`Sent message with ID: 123`);
    });
  });
});
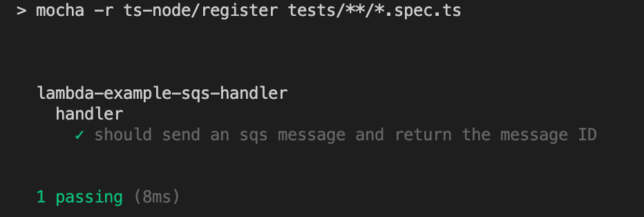
Right now running this test will fail due to the test code trying to call the sqs.ts module’s code that in turn calls the real SQS service’s sendMessage.
Here is where Sinon stub will come in handy. You can replace this specific call that sqs.ts makes with a test stub.
In the describe handler section, add the following just before the ‘it‘ section.
The code above calls sinon.stub() and passes in the sqs module object, as well as a string (“sendMessage” in this case) identifying the specific method in the module that should be stubbed.
An optional promise result can be passed in to resolves() to get the stub to return data for the test. In this case, we’re having it return an object that matches the real SQS sendMessage return result. Among other things, this contains a message ID which the Lambda function includes in it’s response.
Add a test to verify that the stub method call.
assert.calledOnce(sendMessageStub);
If you run the test again it should now pass. The stub replaces the real service call. Nice!
Conclusion
Replacing dependent service function calls with stubs can be helpful in many ways. For example:
Preventing wasteful, real service calls, which could result in unwanted test data, logs, costs, etc…
Faster test runs that don’t rely on network calls.
Exercising only the relevant code you’re interested in testing.
Sinon provides a testing framework agnostic set of tools such as test spies, stubs and mocks for JavaScript. In this case, you’ve seen how it can be leveraged to make testing interconnected AWS services a breeze with a Lambda function that calls SQS sendMessage to drop a message onto a queue.