Using Sinon stub to Replace External Service Calls in Tests

When writing tests for a service you’ll often find that there are other dependent services that may need to be called in some way or another. You won’t want to actually invoke the real service during test, but rather ‘stub’ out the dependent service call function. Sinon stub provides an easy and customisable way to replace these external service calls for your tests.

Practical Example: AWS SQS sendMessage Sinon Stub

Let’s say you have an AWS Lambda function that drops a message onto an SQS queue. To test this function handler, your test should invoke the handler and verify that the message was sent.

This simple case already involves an external service call – the SQS sendMessage action that will drop the message onto the queue.

Here is a simple NodeJS module that wraps the SQS sendMessage call.

// sqs.ts

import AWS = require("aws-sdk");
import { AWSError } from "aws-sdk";
import { SendMessageRequest, SendMessageResult } from "aws-sdk/clients/sqs";
import { PromiseResult } from "aws-sdk/lib/request";

const sqs = new AWS.SQS({apiVersion: '2012-11-05'});

export function sendMessage(messageBody: string, queueUrl: string) : Promise<PromiseResult<SendMessageResult, AWSError>> {

  var params = {
    QueueUrl: queueUrl,
    MessageBody: messageBody,
  } as SendMessageRequest;

  return sqs
    .sendMessage(params)
    .promise()
    .then(res => res)
    .catch((err) => { throw err; });
}

The actual Lambda Handler code that uses the sqs.ts module above looks like this:

// index.ts

import { sendMessage } from './sqs';
import { Context } from 'aws-lambda';

export const handler = async (event: any, context?: Context) => {

    try {
        const queueUrl = process.env.SQS_QUEUE_URL || "https://sqs.eu-west-2.amazonaws.com/0123456789012/test-stub-example";
        const sendMessageResult = await sendMessage(JSON.stringify({foo: "bar"}), queueUrl);
        return `Sent message with ID: ${sendMessageResult.MessageId}`;
    } catch (err) {
        console.log("Error", err);
        throw err;
    }
}

Next you’ll create a Sinon stub to ‘stub out’ the sendMessage function of this module (the actual code that the real AWS Lambda function would call).

Setup an empty test case that calls the Lambda handler function to test the result.

// handler.spec.ts

import * as chai from 'chai';
import * as sinon from "sinon";
import { assert } from "sinon";

import * as sqs from '../src/sqs';
import { handler } from '../src/index';
import sinonChai from "sinon-chai";
import { PromiseResult } from 'aws-sdk/lib/request';
import { SendMessageResult } from 'aws-sdk/clients/SQS';
import { Response } from 'aws-sdk';
import { AWSError } from 'aws-sdk';

const expect = chai.expect;
chai.use(sinonChai);

const event = {
  test: "test"
};

describe("lambda-example-sqs-handler", () => {
  describe("handler", () => {

    it("should send an sqs message and return the message ID", async () => {

      // WHEN

      process.env.SQS_QUEUE_URL = "https://sqs.eu-west-1.amazonaws.com/123456789012/test-queue";
      const result = await handler(event);
      
      // THEN

      expect(result).to.exist;
      expect(result).to.eql(`Sent message with ID: 123`);
    });
  });
});

Right now running this test will fail due to the test code trying to call the sqs.ts module’s code that in turn calls the real SQS service’s sendMessage.

Here is where Sinon stub will come in handy. You can replace this specific call that sqs.ts makes with a test stub.

In the describe handler section, add the following just before the ‘it‘ section.

const sendMessageStub = sinon.stub(sqs, "sendMessage");

let stubResponse : PromiseResult<SendMessageResult, AWSError> = {
  $response: new Response<SendMessageResult, AWSError>(),
  MD5OfMessageBody: '828bcef8763c1bc616e25a06be4b90ff',
  MessageId: '123',
};

sendMessageStub.resolves(stubResponse);

The code above calls sinon.stub() and passes in the sqs module object, as well as a string (“sendMessage” in this case) identifying the specific method in the module that should be stubbed.

An optional promise result can be passed in to resolves() to get the stub to return data for the test. In this case, we’re having it return an object that matches the real SQS sendMessage return result. Among other things, this contains a message ID which the Lambda function includes in it’s response.

Add a test to verify that the stub method call.

assert.calledOnce(sendMessageStub);

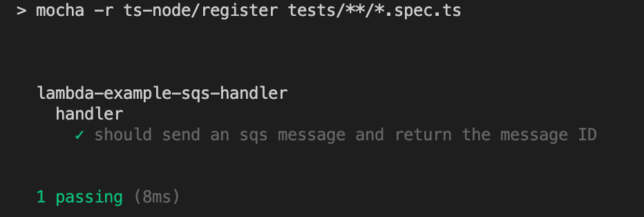
If you run the test again it should now pass. The stub replaces the real service call. Nice!

sinon stub test result

Conclusion

Replacing dependent service function calls with stubs can be helpful in many ways. For example:

  • Preventing wasteful, real service calls, which could result in unwanted test data, logs, costs, etc…
  • Faster test runs that don’t rely on network calls.
  • Exercising only the relevant code you’re interested in testing.

Sinon provides a testing framework agnostic set of tools such as test spies, stubs and mocks for JavaScript. In this case, you’ve seen how it can be leveraged to make testing interconnected AWS services a breeze with a Lambda function that calls SQS sendMessage to drop a message onto a queue.

Feel free to Download the source code for this post’s example.

Custom Kubernetes Webhook Token Authentication with Github (a NodeJS implementation)

Introduction

Recently I was tasked with setting up a couple of new Kubernetes clusters for a team of developers to begin transitioning an older .NET application over to .NET Core 2.0. Part of my this work lead me down the route of trying out some different authentication strategies.

I ended on RBAC being a good solution for our needs allowing for nice role based permission flexibility, but still needed a way of handling authentication for users of the Kubernetes clusters. One of the options I looked into here was to use Kubernetes’ support for webhook token authentication.

Webhook token authentication allows a remote service to authenticate with the cluster, meaning we could hand off some of the work / admin overhead to another service that implements part of the solution already.

Testing Different Solutions

I found an interesting post about setting up Github with a custom webhook token authentication integration and tried that method out. It works quite nicely and some good benefits as discussed in the post linked before, but summarised below:

  • All developers on the team already have their own Github accounts.
  • Reduces admin overhead as users can generate their own personal tokens in their Github account and can manage (e.g. revoke/re-create) their own tokens.
  • Flexible as tokens can be used to access Kubernetes via kubectl or the Dashboard UI from different machines
  • An extra one I thought of – Github teams could potentially be used to group users / roles in Kubernetes too (based on team membership)

As mentioned before, I tried out this custom solution which was written in Go and was excited about the potential customisation we could get out of it if we wanted to expand on the solution (see my last bullet point above).

However, I was still keen to play around with Kubernetes’ Webhook Token Authentication a bit more and so decided to reimplement this solution in a language I am more familiar with. .NET Core would have been a good candidate, but I didn’t have a lot of time at hand and thought doing this in NodeJS would be quicker.

With that said, I rewrote the Github Webhook Token Authenticator service in NodeJS using a nice lightweight node alpine base image and set things up for Docker builds. Basically readying it for deployment into Kubernetes.

Implementing the Webhook Token Authenticator service in NodeJS

The Webhook Token Authentication Service simply implements a webhook to verify tokens passed into Kubernetes.

On the Kubernetes side you just need to deploy the DaemonSet with this authenticator docker image, run your API servers with RBAC enabled

Create a DaemonSet to run the NodeJS webhook service on all relevant master nodes in your cluster.

Here is the DaemonSet configuration already setup to point to the correct docker hub image.

Deploy it with:

kubectl create -f .\daemonset.yaml

Use the following configurations to start your API servers with:

authentication-token-webhook-config-file
authentication-token-webhook-cache-ttl

Update your cluster spec to add a fileAsset entry and also point to the authentication token webhook config file that will be put in place by the fileAsset using the kubeAPIServer config section.

You can get the fileAsset content in my Github repository here.

Here is how the kubeAPIServer and fileAssets sections should look once done. (I’m using kops to apply these configurations to my cluster in this example).

You can then set up a ClusterRole and ClusterRoleBinding along with usernames that match your users’ actual Github usernames to set up RBAC permissions. (Going forward it would be great to hook up the service to work with Github teams too.)

Here is an example ClusterRole that provides blanket admin access as a simple example.

kind: ClusterRole
apiVersion: rbac.authorization.k8s.io/v1
metadata:
  name: youradminsclusterrole
rules:
  - apiGroups: ["*"]
    resources: ["*"]
    verbs: ["*"]
  - nonResourceURLs: ["*"]
    verbs: ["*"]

Hook up the ClusterRole with a ClusterRoleBinding like so (pointing the user parameter to the name of your github user account you’re binding to the role):

kubectl create clusterrolebinding yourgithubusernamehere-admin-binding --clusterrole=youradminsclusterrole --user=yourgithubusernamehere

Don’t forget to create yourself (in your Github account), a personal access token. Update your .kube config file to use this token as the password, or login to the Kubernetes Dashboard UI and select “Token” as the auth method and drop your token in there to sign in.

The auth nodes running in the daemonset across cluster API servers will handle the authentication via your newly configured webhook authentication method, go over to Github, check that the token belongs to the user in the ClusterRoleBinding (of the same github username) and then use RBAC to allow access to the resources specified in your ClusterRole that you bound that user to. Job done!

For more details on how to build the NodeJS Webhook Authentication Docker image and get it deployed into Kubernetes, or to pull down the code and take a look, feel free to check out the repository here.