Custom Kubernetes Webhook Token Authentication with Github (a NodeJS implementation)

Introduction

Recently I was tasked with setting up a couple of new Kubernetes clusters for a team of developers to begin transitioning an older .NET application over to .NET Core 2.0. Part of my this work lead me down the route of trying out some different authentication strategies.

I ended on RBAC being a good solution for our needs allowing for nice role based permission flexibility, but still needed a way of handling authentication for users of the Kubernetes clusters. One of the options I looked into here was to use Kubernetes’ support for webhook token authentication.

Webhook token authentication allows a remote service to authenticate with the cluster, meaning we could hand off some of the work / admin overhead to another service that implements part of the solution already.

Testing Different Solutions

I found an interesting post about setting up Github with a custom webhook token authentication integration and tried that method out. It works quite nicely and some good benefits as discussed in the post linked before, but summarised below:

  • All developers on the team already have their own Github accounts.
  • Reduces admin overhead as users can generate their own personal tokens in their Github account and can manage (e.g. revoke/re-create) their own tokens.
  • Flexible as tokens can be used to access Kubernetes via kubectl or the Dashboard UI from different machines
  • An extra one I thought of – Github teams could potentially be used to group users / roles in Kubernetes too (based on team membership)

As mentioned before, I tried out this custom solution which was written in Go and was excited about the potential customisation we could get out of it if we wanted to expand on the solution (see my last bullet point above).

However, I was still keen to play around with Kubernetes’ Webhook Token Authentication a bit more and so decided to reimplement this solution in a language I am more familiar with. .NET Core would have been a good candidate, but I didn’t have a lot of time at hand and thought doing this in NodeJS would be quicker.

With that said, I rewrote the Github Webhook Token Authenticator service in NodeJS using a nice lightweight node alpine base image and set things up for Docker builds. Basically readying it for deployment into Kubernetes.

Implementing the Webhook Token Authenticator service in NodeJS

The Webhook Token Authentication Service simply implements a webhook to verify tokens passed into Kubernetes.

On the Kubernetes side you just need to deploy the DaemonSet with this authenticator docker image, run your API servers with RBAC enabled

Create a DaemonSet to run the NodeJS webhook service on all relevant master nodes in your cluster.

Here is the DaemonSet configuration already setup to point to the correct docker hub image.

Deploy it with:

kubectl create -f .\daemonset.yaml

Use the following configurations to start your API servers with:

authentication-token-webhook-config-file
authentication-token-webhook-cache-ttl

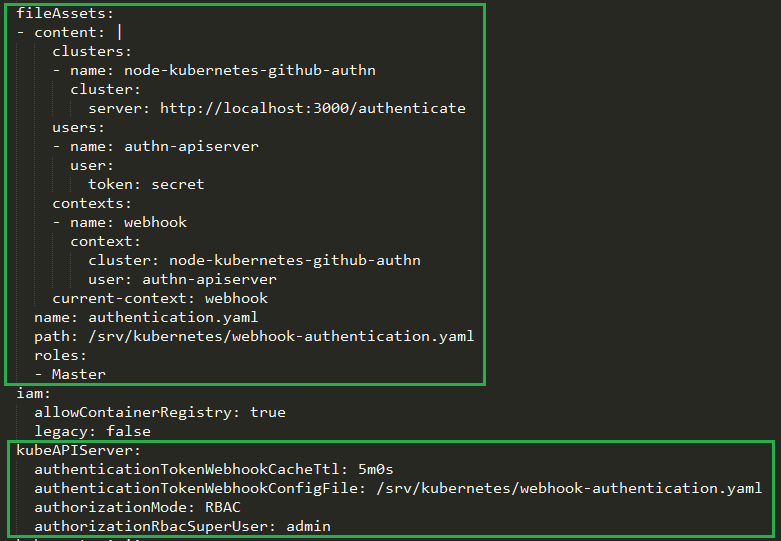
Update your cluster spec to add a fileAsset entry and also point to the authentication token webhook config file that will be put in place by the fileAsset using the kubeAPIServer config section.

You can get the fileAsset content in my Github repository here.

Here is how the kubeAPIServer and fileAssets sections should look once done. (I’m using kops to apply these configurations to my cluster in this example).

You can then set up a ClusterRole and ClusterRoleBinding along with usernames that match your users’ actual Github usernames to set up RBAC permissions. (Going forward it would be great to hook up the service to work with Github teams too.)

Here is an example ClusterRole that provides blanket admin access as a simple example.

kind: ClusterRole
apiVersion: rbac.authorization.k8s.io/v1
metadata:
  name: youradminsclusterrole
rules:
  - apiGroups: ["*"]
    resources: ["*"]
    verbs: ["*"]
  - nonResourceURLs: ["*"]
    verbs: ["*"]

Hook up the ClusterRole with a ClusterRoleBinding like so (pointing the user parameter to the name of your github user account you’re binding to the role):

kubectl create clusterrolebinding yourgithubusernamehere-admin-binding --clusterrole=youradminsclusterrole --user=yourgithubusernamehere

Don’t forget to create yourself (in your Github account), a personal access token. Update your .kube config file to use this token as the password, or login to the Kubernetes Dashboard UI and select “Token” as the auth method and drop your token in there to sign in.

The auth nodes running in the daemonset across cluster API servers will handle the authentication via your newly configured webhook authentication method, go over to Github, check that the token belongs to the user in the ClusterRoleBinding (of the same github username) and then use RBAC to allow access to the resources specified in your ClusterRole that you bound that user to. Job done!

For more details on how to build the NodeJS Webhook Authentication Docker image and get it deployed into Kubernetes, or to pull down the code and take a look, feel free to check out the repository here.

Kwikfit – Avoid if you value your safety and money

So this is a bit of a change to my normal subject matter, but I felt like I should post this up, as this is shockingly bad service that should not go unnoticed.


Around 5 or 6 weeks ago I noticed a scraping sound coming from my car’s braking system on the way in to work. I finished the trip, and arranged to have the braking system checked out at lunch time at the nearest Kwikfit branch – Bracknell, in Surrey (closest at the time as I was on client site). I took the car over, and explained to the person at the counter that I had heard a loud, scraping noise coming from the front of the car whenever I applied brakes lightly. They did their standard “free” brake check and called me back about 40 minutes later to say that everything had passed and was 100%, nothing to worry about. They then explained that the scraping sound was probably just a bit of dirt and that they had cleaned the  brakes out after removing everything to check them.


On the way back I still noticed the slight scraping sound and thought I would give it a while in case it was in fact dirt, and just needed to come loose – like a small stone for example. Fast forward a few weeks and the noise is still there. I trust Kwikfit’s diagnostic report and advice, as this is their area of expertise – how hard can it be to check brake pads anyway? Things at work have been, and are getting very busy, so I kind of forget about the brake noises for a couple more weeks.


Today I thought I better get a second opinion, as the noise has been getting progressively worse over the last couple of days. I send the car over to my trusted mechanic and he comes back to me straight away to say that the front left brake pad is completely worn through and it is plainly obvious that this is what is causing the noise. Aside from that, the brake disc has of course been worn down by the metal-on-metal wear. I need to replace both front brake discs and pads as a set. £200 later I have replaced everything and at the end of today I got my car back – no more noise, and the brakes feel great. I pulled out my Kwikfit diagnost report from around a month back to double check – as I remembered, everything is marked off as “OK” on the brake pad and other components. At the top of the report, you can even see where they marked down that I had reported “Noise” coming from the brakes!


I am appalled with the service and bad advice I received. Not only did Kwikfit’s service cost me more money in the end – having more components to replace because of damage, but they also put me and my family’s safety on the line by telling me that there was nothing wrong with my brakes, when in fact, they were completely worn down! I most certainly won’t be using their services in the future, and sincerely hope that they can correct things like this from happening in the future.

For those interested, here is original diagnostic report they gave me – scanned in colour. I have of course blanked out my personal details, but you can see where they marked down the symptoms I had reported, and where they give everything a nice big “OK”.


HP P2000 G3 FC MSA – troubleshooting a faulty Controller (blinking Fault/Service Required LED)

Setting up a new HP P2000 G3 FC MSA with dual controllers over the last couple of days for a small staging environment, I ran into issues from the word go. The device in question was loaded with 24 SFF disks and two Controllers (Controller A and B).


On the very first boot we noticed a fault (amber) LED on the front panel. Inspecting the back of the unit, I noticed that Controller A and B were both still flashing their green “FRU OK” LEDs, (which according to the manual means that the controllers were still booting up), even after waiting a number of hours. On Controller A, I could see a blinking amber “Fault/Service Required” LED. Following through the troubleshooting steps in the manuals lead nowhere as the end synopsis was to check the event logs. Even the Web interface was acting up – I could not see the controller’s listed, could not see any disks and the event logs were completely empty. Obviously there was a larger issue at hand preventing the MSA and even the Web interface from functioning properly. To further confuse matters, after shutting down and restarting the device, controller B starting blinking the amber LED instead of A this time, both still stuck in their “Booting up” state. Refer to the linked LED diagram below and you’ll see that the LED flashing green is labelled as 6, and the amber blinking LED is the one labelled as 7 on the top controller in the diagram.

LED Diagram

HP Official documentation

After powering the unit down completely, and then powering back up again, the MSA was still stuck in the same state. Powering down the unit once more, removing and reseating both controllers did not help either. Lastly, I powered it all off again, removed controller A completely, then powered up the device with just Controller B installed. Surprisingly the MSA booted up perfectly, and LED number 6 (FRU OK) went a nice solid green after a minute or so of booting up. No amber LEDs were to be seen. Good news then! Hot plugging controller A back in at this stage with the device powered on resulted in both controllers reporting a healthy status and all the disks and hardware being detected. A final test was done by powering off everything and powering it back up again as it should be from a cold start. Everything worked this time.


Here is a photo of the rear of the device once all was resolved showing the solid green FRU OK LEDs on both controllers.


Bit of an odd one, but it would seem that controllers together were preventing each other from starting up. Removing one then booting up with this seemed to solve the problem, and at the end of the day all hardware was indeed healthy. After this the 24 disks were assigned and carved up into some vdisks to be presented to our ESXi hosts!


Restarting the VMWare ESX 3.5 Pegasus health monitoring service

Here is something I ran into the other day at work that might help anyone else getting this issue. VMWare also told me that this tends to happen from time to time on an ESX 3.5 infrastructure. Apparently the issue has been sorted out in vSphere. It doesn’t have any negative effect on production though, apart from the fact that you can’t see your host health statuses correctly.

Also I wouldn’t recommend only relying on these health statistics. Install Dell’s OMSA for extra health monitoring and statistics if you are running Dell servers for example.

Problem:

The Pegasus hardware health service needs restarting or a specific ESX host in the Virtual Center cluster is not showing it’s hardware health indicators in VC correctly. (Could be showing as “Unknown”).

Solution:

Log into the console of the ESX Host in question using PuTTy (SSH).

Run the following command from the ESX server console as root to restart the Pegasus service.

service pegasus restart

I did speak to VMWare support about this and they have said that this does not have any effect on live VMs. I have tested this in a live environment twice now and it did not affect any Virtual Machines.

In both cases I needed to wait 5 to 10 minutes for the ESX host health to update in Virtual Center.

Note that restarting the pegasus health monitoring service does not affect any running VMs on your host.