3D Printing Useful Parts

water tap design perspective view from fusion 360

I purchased my first 3D printer about 6 months ago after having putting the idea off for a year or so before that. For a while now I’ve had a fascination with being able to use 3D printing for hobby projects and bespoke creations.

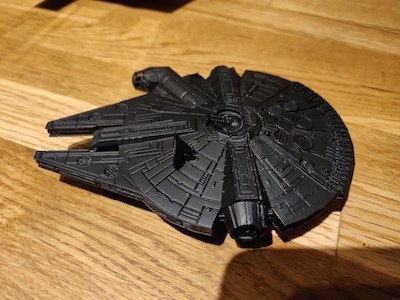
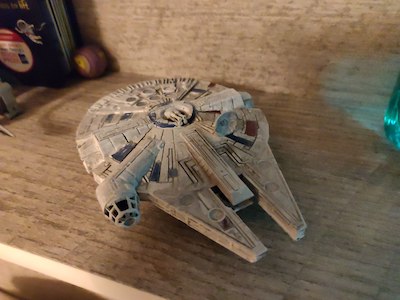
From purchase until just recently I had only been printing 3D models for fun. Figurines, Star Wars replicas, and other random items. I even printed a Millenium Falcon (in two halves) and painted it for my oldest son.

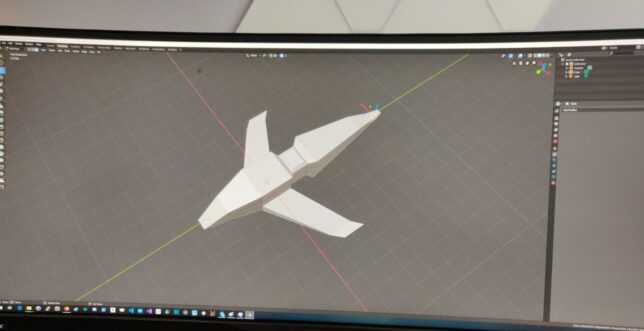
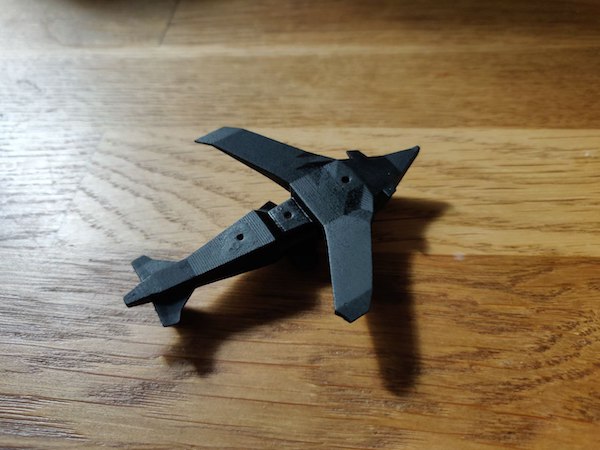
After printing these pre-made 3D models, my oldest son and I sat together and created a simple ‘dropship’ model in Blender which we also printed.

These have all been a lot of fun, but after a while I had a hankering to use the 3D printer for some good around the house too.

3D printing useful parts

The printer I am using is the Elegoo Mars. It uses UV photocuring technology to print models out of a liquid resin. The printing plate lifts up from the resin basin and UV light is shone from underneath, emitted by an LCD panel. This cures the resin on the print plate one layer at a time.

elegoo mars uv lcd resin printer

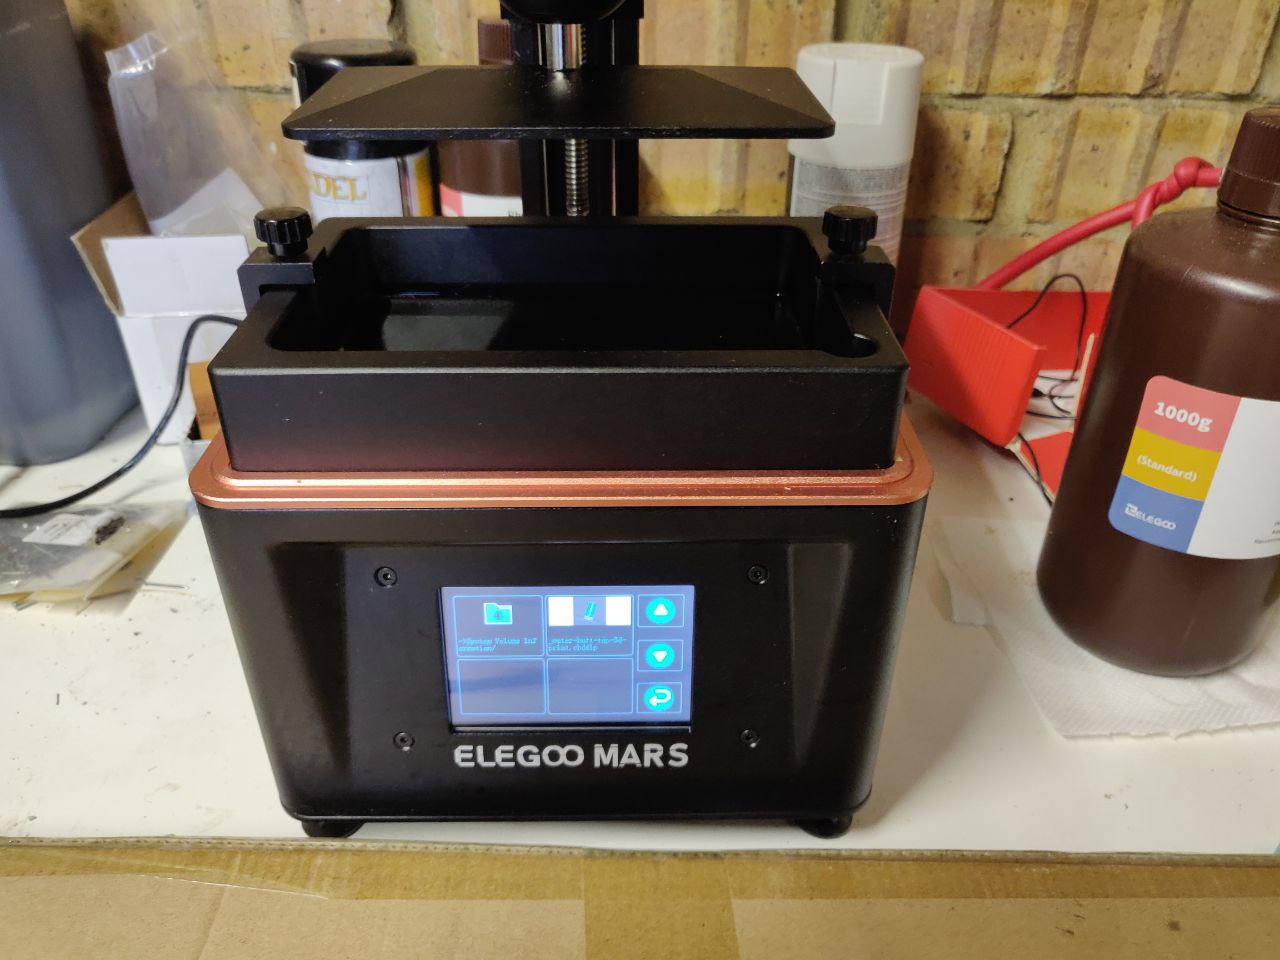
The main benefit of this compared to FDM printers is that you can get a really good level of detail (resolution). One of the bigger downsides to this however is that the cured resin is more brittle.

The Elegoo Mars was a very cheap entry point for me to get started and I’m happy with the limitations (especially when considering the great detail that is achievable).

Printing a fake water tank handle

The reason I had this idea was to put in a fake water tank handle for our outdoors water butt.

Our 1.5 year old is currently a huge fan of running water and has learned how to open this tap and drain our collected rain water. One option would have been a lockable cover to go over the tap handle, but why do that when you can create your own solution?

I pulled out the tap handle and observed how it lets the water out when turned. Basically the tap handle shaft has a circular cut out on one side. Turning this aligns the hole with the opening in the water tank and allows water to flow through. Turning it further closes the hole again.

The ‘fake’ tap handle solution is pretty simple, replicate the part, but close the hole in the shaft.

Design

I’ve used Blender for more creative projects in the past, but decided to move onto something more suited for CAD and 3D printing. A friend recommended Fusion 360. After trying it out for this project I can highly recommend it.

It allows you to design your parts in stages. If at some point you want to reconfigure the design and change measurements, the process is simple. You go to that stage, apply the new measurement, and the software will ‘replay’ that through the remaining stages. Your whole design adjusts accordingly.
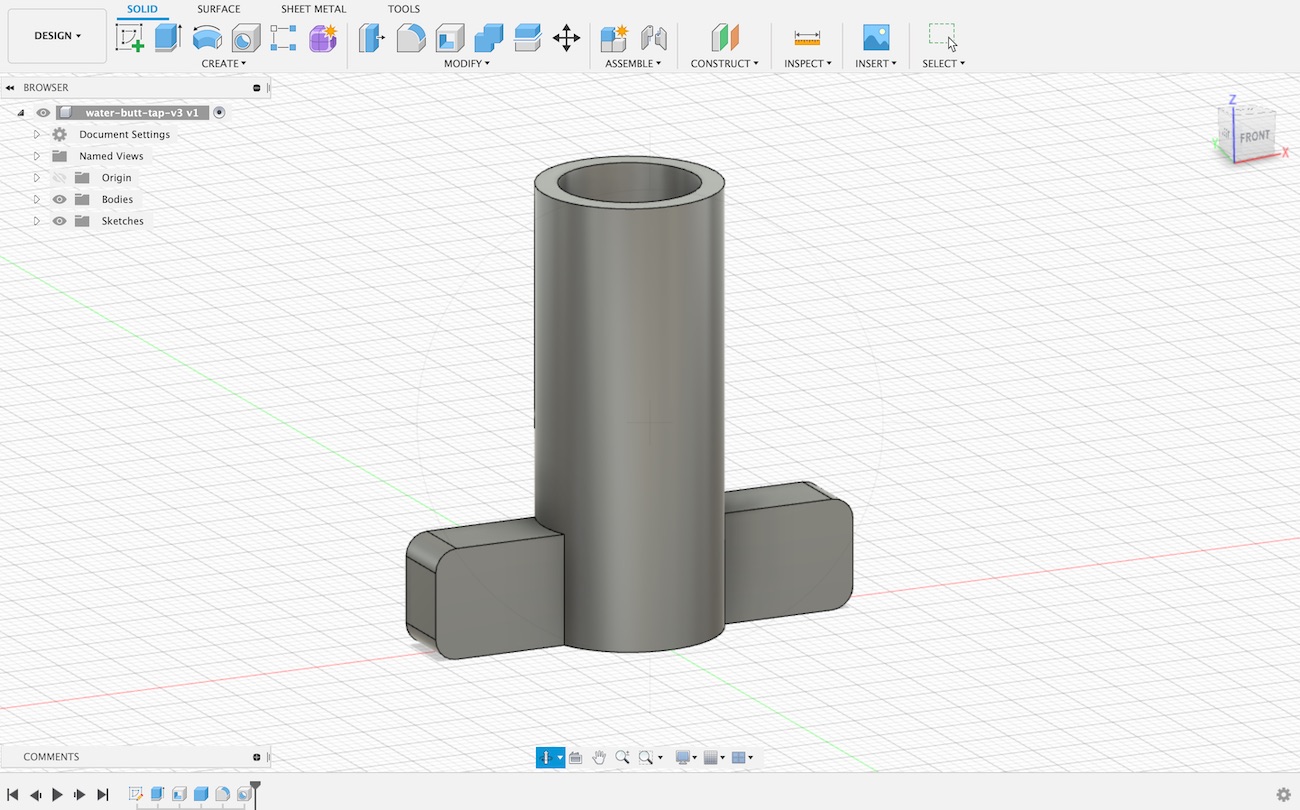
top view of the design
water tap design in fusion 360
The water butt tap design with no hole in the central shaft

Result

The resulting print shown below is actually the second iteration. The first design I made didn’t have a strong enough handle.

Here is the ‘fake’ water tap 3D print in action.

In the video above you can see the water tap in action. Turning it to any angle keeps the water flow blocked now. On the ground you can see the original water tap which is now just simply kept out of reach for when we actually need to use the water.

It is possible to pull the fake tap out as you can see above, but for a small toddler it is not easily possible. In order to keep it water tight, I had to get the measurement just right so as not to leak, but also not be too tight to remove again.

This is post #6 in my effort towards 100DaysToOffload.

Useful NGINX Ingress Controller Configurations for Kubernetes using Helm

My favourite Ingress Controller for Kubernetes is definitely the official NGINX Ingress Controller. It provides tons of customisation and is under active development with great community support. This post will dive into some of the more useful nginx ingress controller configurations and options available.

If you use the official stable/nginx-ingress chart for Helm, the default values you’ll get with installation are not always the best choices.

This is my collection of useful / common configuration options I tend to change when installing an ingress controller. A few of these options are geared towards AWS deployments, but otherwise the rest of the options are generic enough to apply to any platform you may be running on.

Useful nginx ingress controller options for Kubernetes

AWS only configuration options

  • Use an internal (private) Elastic Load Balancer for Ingress. Annotate with: service.beta.kubernetes.io/aws-load-balancer-internal: 0.0.0.0/0
  • Specify the kind of AWS Load Balancer to use with Ingress Controller. Annotate with: service.beta.kubernetes.io/aws-load-balancer-type: nlb/elb/alb

Common configuration options

  • controller.service.type (default == LoadBalancer) – specifies the type of controller service to create. Useful to open up the Ingress Controller for North/South traffic with differing models of access. E.g. Cluster only with ClusterIP, NodePort for specific host only access, or LoadBalancer to expose with a public or internal facing Load Balancer.
  • controller.scope.enabled (default == disabled / watch all namespaces) – where the controller should look out for ingress rule resources. Useful to limit the namespace(s) that the Ingress Controller works in.
  • controller.scope.namespace – namespace to watch for ingress rules if the controller.scope.enabled option is toggled on.
  • controller.minReadySeconds – how many seconds a pod needs to be ready before killing the next, during update – useful for when updating/upgrading the Ingress Controller deployment.
  • controller.replicaCount (default == 1) – definitely set this higher than 1. You want at least 2 for replicaCount to ensure there is always a controller running when draining nodes or updating your ingress controller.
  • controller.service.loadBalancerSourceRanges (default == []) – Useful to lock your Ingress Controller Load Balancer down. For example, you might not want Ingress open to 0.0.0.0/0 (all internet) and instead assign a value that restricts ingress access to an IP range you own. Using helm, you can specify an array with typical array square brackets e.g. [10.0.0.0/8, 172.0.0.0/8]
  • controller.service.enableHttp (default == true) – Useful to disable insecure HTTP (and leave only HTTPS)
  • controller.stats.enabled (default == false) – Enables controller stats page – Useful for stats and debugging. Not a good idea for production though. The controller stats service can be locked down if required by specific CIDR range.

To deploy the NGINX Ingress Controller helm chart and specify some of the above customisations, you can create a yaml file and populate it with the following example configuration (replace/change as required):

controller:
  replicaCount: 2
  service:
    type: "LoadBalancer"
    loadBalancerSourceRanges: [10.0.0.0/8]
    targetPorts:
      http: http
      https: http
    annotations:
      service.beta.kubernetes.io/aws-load-balancer-internal: 0.0.0.0/0
      service.beta.kubernetes.io/aws-load-balancer-backend-protocol: "http"
      service.beta.kubernetes.io/aws-load-balancer-ssl-ports: "https"
      service.beta.kubernetes.io/aws-load-balancer-connection-idle-timeout: '3600'
  stats:
    enabled: true

Install with helm like so:

helm install -f ingress-custom.yaml stable/nginx-ingress --name nginx-ingress --namespace example

If you’re using an internal elastic load balancer (like the above example yaml configuration), don’t forget to make sure your private subnets are tagged with the following key/value:

key = “kubernetes.io/role/internal-elb”
value = “1”

Enjoy customising your own ingress controller!

Custom Kubernetes Webhook Token Authentication with Github (a NodeJS implementation)

Introduction

Recently I was tasked with setting up a couple of new Kubernetes clusters for a team of developers to begin transitioning an older .NET application over to .NET Core 2.0. Part of my this work lead me down the route of trying out some different authentication strategies.

I ended on RBAC being a good solution for our needs allowing for nice role based permission flexibility, but still needed a way of handling authentication for users of the Kubernetes clusters. One of the options I looked into here was to use Kubernetes’ support for webhook token authentication.

Webhook token authentication allows a remote service to authenticate with the cluster, meaning we could hand off some of the work / admin overhead to another service that implements part of the solution already.

Testing Different Solutions

I found an interesting post about setting up Github with a custom webhook token authentication integration and tried that method out. It works quite nicely and some good benefits as discussed in the post linked before, but summarised below:

  • All developers on the team already have their own Github accounts.
  • Reduces admin overhead as users can generate their own personal tokens in their Github account and can manage (e.g. revoke/re-create) their own tokens.
  • Flexible as tokens can be used to access Kubernetes via kubectl or the Dashboard UI from different machines
  • An extra one I thought of – Github teams could potentially be used to group users / roles in Kubernetes too (based on team membership)

As mentioned before, I tried out this custom solution which was written in Go and was excited about the potential customisation we could get out of it if we wanted to expand on the solution (see my last bullet point above).

However, I was still keen to play around with Kubernetes’ Webhook Token Authentication a bit more and so decided to reimplement this solution in a language I am more familiar with. .NET Core would have been a good candidate, but I didn’t have a lot of time at hand and thought doing this in NodeJS would be quicker.

With that said, I rewrote the Github Webhook Token Authenticator service in NodeJS using a nice lightweight node alpine base image and set things up for Docker builds. Basically readying it for deployment into Kubernetes.

Implementing the Webhook Token Authenticator service in NodeJS

The Webhook Token Authentication Service simply implements a webhook to verify tokens passed into Kubernetes.

On the Kubernetes side you just need to deploy the DaemonSet with this authenticator docker image, run your API servers with RBAC enabled

Create a DaemonSet to run the NodeJS webhook service on all relevant master nodes in your cluster.

Here is the DaemonSet configuration already setup to point to the correct docker hub image.

Deploy it with:

kubectl create -f .\daemonset.yaml

Use the following configurations to start your API servers with:

authentication-token-webhook-config-file
authentication-token-webhook-cache-ttl

Update your cluster spec to add a fileAsset entry and also point to the authentication token webhook config file that will be put in place by the fileAsset using the kubeAPIServer config section.

You can get the fileAsset content in my Github repository here.

Here is how the kubeAPIServer and fileAssets sections should look once done. (I’m using kops to apply these configurations to my cluster in this example).

You can then set up a ClusterRole and ClusterRoleBinding along with usernames that match your users’ actual Github usernames to set up RBAC permissions. (Going forward it would be great to hook up the service to work with Github teams too.)

Here is an example ClusterRole that provides blanket admin access as a simple example.

kind: ClusterRole
apiVersion: rbac.authorization.k8s.io/v1
metadata:
  name: youradminsclusterrole
rules:
  - apiGroups: ["*"]
    resources: ["*"]
    verbs: ["*"]
  - nonResourceURLs: ["*"]
    verbs: ["*"]

Hook up the ClusterRole with a ClusterRoleBinding like so (pointing the user parameter to the name of your github user account you’re binding to the role):

kubectl create clusterrolebinding yourgithubusernamehere-admin-binding --clusterrole=youradminsclusterrole --user=yourgithubusernamehere

Don’t forget to create yourself (in your Github account), a personal access token. Update your .kube config file to use this token as the password, or login to the Kubernetes Dashboard UI and select “Token” as the auth method and drop your token in there to sign in.

The auth nodes running in the daemonset across cluster API servers will handle the authentication via your newly configured webhook authentication method, go over to Github, check that the token belongs to the user in the ClusterRoleBinding (of the same github username) and then use RBAC to allow access to the resources specified in your ClusterRole that you bound that user to. Job done!

For more details on how to build the NodeJS Webhook Authentication Docker image and get it deployed into Kubernetes, or to pull down the code and take a look, feel free to check out the repository here.

Finding Vendor specific VIBs on ESXi hosts with PowerCLI


Example showing VIBs loaded on a host with a search of the vendor name "VMware"


The other day I was trying to find a list of Custom VIBs (VMware Installation Bundles) that were installed on an ESXi host. The reason was that I just wanted to verify that the VIB had actually installed correctly or not. I threw the query out on Twitter and of course @alanrenouf had a solution in next to no time.

So Alan’s solution is to use the Get-EsxCli cmdlet and specify the host name using the VMHost parameter. After that, he simply uses the code property “software” to gain access to the list of VIBs on the host. E.g.

$ESXCLI = Get-EsxCli -VMHost esxi-01.noobs.local
$ESXCLI.software.vib.list()

I have used esxcli on its own before but didn’t realise that PowerCLI had this cmdlet built in to interface with hosts in the same way that esxcli would. This is a great solution and means you can fetch so much more in this regard.

To filter things down a bit more and find the exact match for the Dell OMSA VIB I was looking out for, I used a where clause looking for a match for “dell” on the Vendor property:

$ESXCLI.software.vib.list() | Select AcceptanceLevel,ID,InstallDate,Name,ReleaseDate,Status,Vendor,Version | Where {$_.Vendor -match "dell"}

Thanks again to Alan Renouf for pointing out the use of Get-EsxCli and for providing an example!


Create a custom Welcome Message / DCUI Splash screen for your ESXi Hosts with esxcli


Messing around with ESXCLI the other day I came across the commands to get / set the welcome message for your ESXi host. By default you are greeted with the following familiar splash screen for your ESXi hosts:


Standard DCUI Splash Screen / Welcome Message


Well, with esxcli, it turns out you can very easily change this to your own custom welcome message / splash screen. I personally don’t see any practical gains by doing this, but just thought I would show the command to set it. Using esxcli, enter the following (of course the bit between quotes is up to you):


esxcli system welcomemsg set -m="My Custom Welcome Screen. Press F2 to Customize System/View Logs or F12 to Shutdown/Restart."


To see what the current custom message is set to simply use the same command, but this time use “get” –


esxcli system welcomemsg get


Finally, to set it back to the default (No welcome message), simply set your welcome message to nothing –


esxcli system welcomemsg set -m=


Here is an example of a custom welcome message for an ESXi host in my lab I tested this with: