AWS Control Tower Enrollment Gotchas

person looking down from on top of a control tower at an airport.

I have been working on moving a collection of about 20-30 AWS accounts from two different AWS Organizations into a new AWS Organization with Control Tower enabled. During the process I have run into a number of different blockers and issues which have not always had the most obvious solutions due to cryptic errors that the AWS Control Tower enrollment process shows.

This blog post lists out some of the issues I have run into during account migrations, and what the underlying reasons and resolutions ended up being.

You can’t use the AWS IAM Identity Center provided user or account root user when enrolling accounts

If you login to the management account and try to enroll member accounts into AWS Control Tower, you’ll get a cryptic error in the AWS Console like:

An unknown error occurred. Try again later, or contact AWS Support. No launch paths found for resource: prod-xxxxxxxxxxxx

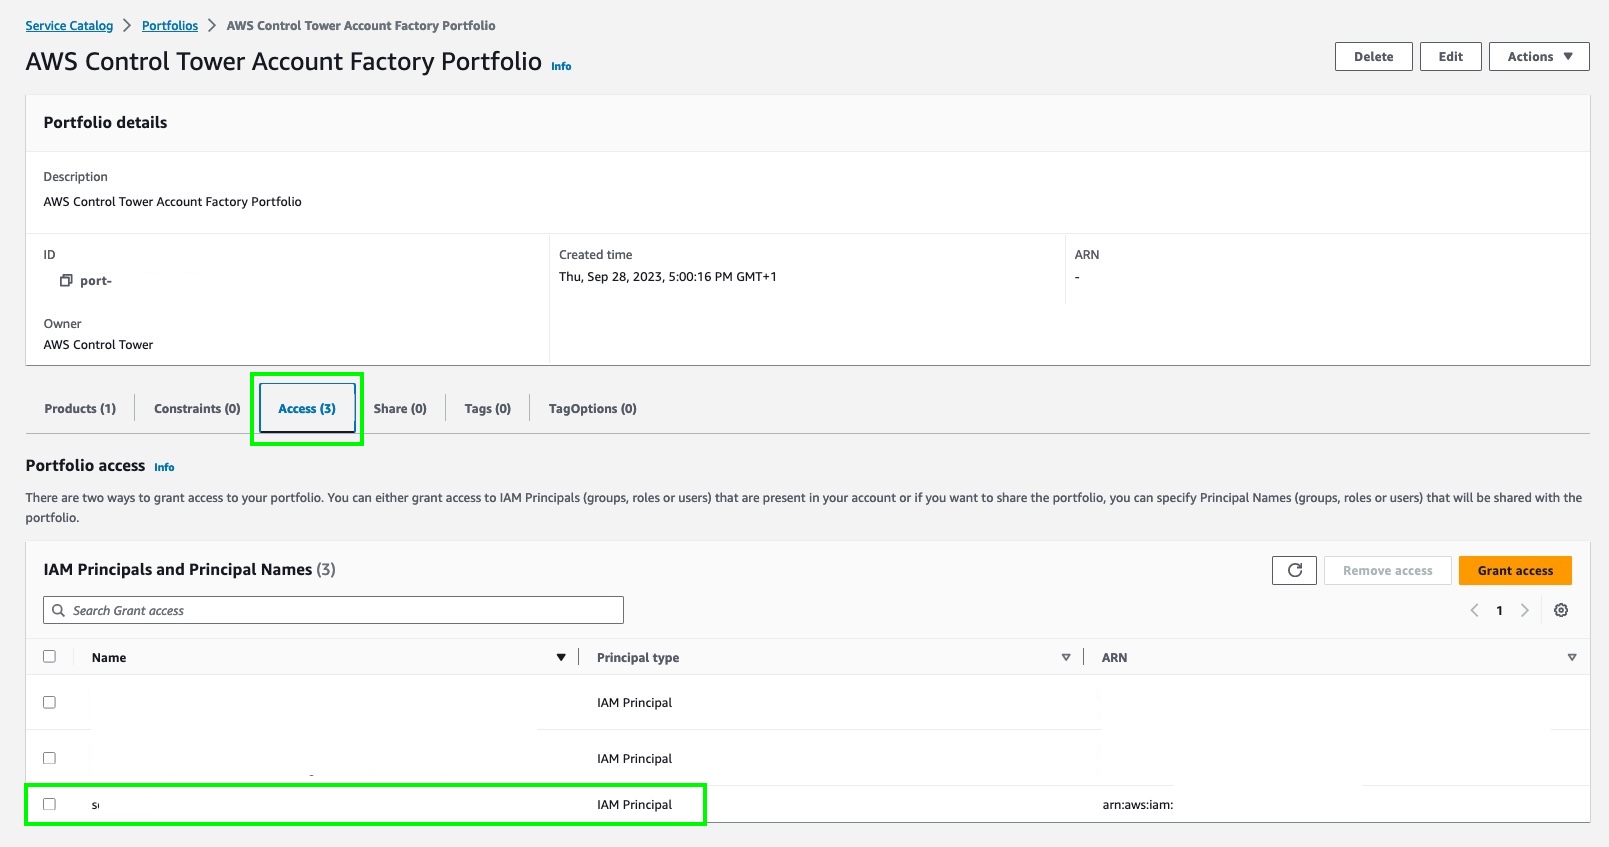
In my case, I was logged in initially with the AWS IAM Identity Center provisioned user account for the management account. This account is identified by the default Display Name of: AWS Control Tower Admin. The solution was to create a single IAM user with AdministratorAccess managed policy attached, then use the AWS Service Catalog console to add the user to the Portfolio Access on the AWS Control Tower Account Factory Portfolio item.

Once that was done, I could use the standard IAM user to login and successfully enroll member accounts into Control Tower.

In theory it should be possible to use the AWS IAM Identity Center provided user to enroll accounts into AWS Control Tower by ensuring it is added to the relevant Groups relating to provisioning and enrollment, but even after this I was unable to. Using a standard IAM user added to Portfolio access as above worked for me.

Forgetting to create the AWSControlTowerExecution IAM role in a member account before enrolling

Don’t forget to create the AWSControlTowerExecution IAM role with Principal ID access for the main Control Tower management account to assume during account enrollment.

This IAM role needs to be created before you can enroll accounts into AWS Control Tower. At a high level, it should be named AWSControlTowerExecution, it should have the AWS managed policy AdministratorAccess attached, and it should have a trust policy attached like the following:

{
   "Version":"2012-10-17",
   "Statement":[
      {
      "Effect":"Allow",
      "Principal":{
         "AWS": "arn:aws:iam::Management Account ID:root"
         },
         "Action": "sts:AssumeRole",
         "Condition": {} 
      }
   ]
  }

The process and role requirements are detailed in this AWS page.

AWS Config in existing accounts before enrolling them with AWS Control Tower

Here’s another issue that caught me out on one account. The account had it’s own AWS Config service Recorder and Delivery Channel setup (but it wasn’t actually being actively used).

When AWS Control Tower enrolls an account, it configures AWS Config with various best practices and configuration settings to record config changes. If there is existing AWS Config in the account, the enrollment process fails.

In my case I got the lovely error message:


I was scratching my head on this one until I decided to use the Update feature in the Control Tower console to try enrollment once more (where the account enrollment status showed Failed). The second time around, a clearer message was displayed:

AWS Control Tower could not enroll your account for the following reason: AWS Control Tower cannot create an AWS Config delivery channel because one already exists. To continue, delete the existing delivery channel and try again.

Trying to delete the AWS Config delivery channel was impossible though. AWS Control Tower applies guard rails via SCP, and because this account was partly enrolled, and now moved to an Organizational Unit (OU) that had SCPs attached to prevent AWS Config changes, it was impossible to remove the AWS Config settings that were blocking the enrollment process.

The fix was to ‘unmanage’ or un-enroll the AWS account (even though it wasn’t fully enrolled) using the AWS Control Tower console. Once that was done, and the account was moved back into the Organization root OU, I was able to use the AWS CLI to remove the offending AWS Config settings.

# find any delivery channels
aws configservice describe-delivery-channels

# describe delivery channel status
aws configservice describe-delivery-channel-status

# stop configuration recorder named 'default' (seen in describe above)
aws configservice stop-configuration-recorder --configuration-recorder-name default

# delete configuration recorder named 'default'
aws configservice delete-configuration-recorder --configuration-recorder-name default

With the AWS Config preferences removed, the AWS Config console should show the initial ‘Set up AWS Config’ option – i.e. nothing is configured. At this stage it’s possible to enroll the account into Control Tower successfully.

Feature Photo by id23: https://www.pexels.com/photo/person-on-air-traffic-control-tower-10893728/

SSM and socat Port Forwarding to Access Private VPC Resources

AWS System Manager Session Manager added the port forwarding feature, announced in this blog post back in 2019. In this post I’ll show you how to leverage SSM and socat port forwarding to access systems in a private subnet that don’t have the SSM agent installed.

You’ll use an SSM agent enabled EC2 instance as an initial target for the ssm port forward session. On this instance, you’ll run socat as a relay for the incoming TCP session to the other instance that does not have the SSM agent.

What is socat?

To quote the official man page, socat (SOcket CAT) is a multipurpose relay. It is a command line tool that establishes two bidirectional byte streams and transfers data between them.

You can use it to connect all sorts of channels. For example:

  • files
  • pipes
  • devices
  • sockets, such as TCP, UDP, IPv4, etc
  • SSL sockets
  • programs

SSM and socat Port Forwarding Example

In my example I have an AWS EMR (Elastic Map Reduce) master node running a web dashboard for ganglia in a private VPC subnet.

I don’t want to add a bastion host / jump box or provide SSH access from the public net.

SSM would provide a nice way for me to connect a remote session, or port forward using IAM authentication and negating the need for any ingress security group rules, but only if I had the SSM agent available on this instance.

Seeing as though the EMR master node is not SSM agent enabled, and I can’t use SSM port forwarding directly to this instance, we could use an interim machine with SSM as a jump box.

Example Configuration

Here is how I configured port forwarding in my use case to access ganglia on a private instance EMR node.

  • The EC2 instance with SSM agent must have an IAM policy attached that allows the relevant ssm access. The blog post linked above has instructions. In a nutshell though, most standard Amazon AMIs include the ssm agent. Your EC2 instance profile should include the required actions too. The AmazonSSMManagedInstanceCore managed policy includes these.
  • Install socat on the SSM agent enabled interim machine the private subnet. For this I connected an SSM session to get shell access and ran sudo yum install -y socat
  • Now I needed to open a source channel for the SSM port forward aws cli command to connect, and connect that source to the destination of the EMR master node running ganglia.
socat TCP4-LISTEN:8080,fork,reuseaddr TCP4:10.0.4.149:80

The command listens on port 8080, and forwards TCP to the EMR node, 10.0.4.149 on port 80. Importantly, the command uses fork and reuseaddr to allow multiple connections.

  • Next is to use the AWS CLI ssm start-session command to start a port forwarding session to the interim instance with the SSM agent running. Grab the Instance ID for the EC2 machine and:
aws ssm start-session --target {your-instance-id-here} --document-name AWS-StartPortForwardingSession --parameters '{"portNumber":["8080"],"localPortnumber":["8089"]}'
ssm and socat port forwarding in action

If you setup socat correctly to listen on port 8080, then the connection should be opened and accepted.

Now you can simply open a web browser locally and direct it to http://localhost:8089/ganglia to access ganglia on the remote EMR master node.

Accessing EMR cluster memory stats via the remote port forwarded session.

Closing

AWS SSM is a useful tool to get access to instances in a secure, audited fashion without needing to open up risky SSH access or other remote ports to the public internet.

When constrained and needing a jump across to an instance without the SSM agent you can leverage tools to help. Socat is one such tool that can facilitate this within the private network.

Saga Pattern with aws-cdk, Lambda, and Step Functions

steps

The saga pattern is useful when you have transactions that require a bunch of steps to complete successfully, with failure of steps requiring associated rollback processes to run. This post will cover the saga pattern with aws-cdk, leveraging AWS Step Functions and Lambda.

If you need an introduction to the saga pattern in an easy to understand format, I found this GOTO conference session by Caitie McCaffrey very informative.

Another useful resource with regard to the saga pattern and AWS Step Functions is this post over at theburningmonk.com.

Saga Pattern with aws-cdk

I’ll be taking things one step further by automating the setup and deployment of a sample app which uses the saga pattern with aws-cdk.

I’ve started using aws-cdk fairly frequently, but realise it has the issue of vendor lock-in. I found it nice to work with in the case of step functions particularly in the way you construct step chains.

Saga Pattern with Step Functions

So here is the step function state machine you’ll create using the fairly simple saga pattern aws-cdk app I’ve set up.

saga pattern with aws-cdk - a successful transaction run
A successful transaction run

Above you see a successful transaction run, where all records are saved to a DynamoDB table entry.

dynamodb data from sample app using saga pattern with aws-cdk
The sample data written by a succesful transaction run. Each step has a ‘Sample’ map entry with ‘Data’ and a timestamp.

If one of those steps were to fail, you need to manage the rollback process of your transaction from that step backwards.

Illustrating Failure Rollback

As mentioned above, with the saga pattern you’ll want to rollback any steps that have run from the point of failure backward.

The example app has three steps:

  • Process Records
  • Transform Records
  • Commit Records

Each step is a simple lambda function that writes some data to a DynamoDB table with a primary partition key of TransactionId.

In the screenshot below, TransformRecords has a simulated failure, which causes the lambda function to throw an error.

A catch step is linked to each of the process steps to handle rollback for each of them. Above, TransformRecordsRollbackTask is run when TransformRecordsTask fails.

The rollback steps cascade backward to the first ‘business logic’ step ProcessRecordsTask. Any steps that have run up to that point will therefore have their associated rollback tasks run.

Here is what an entry looks like in DynamoDB if it failed:

A failed transaction has no written data, because the data written up to the point of failure was ‘rolled back’.

You’ll notice this one does not have the ‘Sample’ data that you see in the previously shown successful transaction. In reality, for a brief moment it does have that sample data. As each rollback step is run, the associated data for that step is removed from the table entry, resulting in the above entry for TransactionId 18.

Deploying the Sample Saga Pattern App with aws-cdk

Clone the source code for the saga pattern aws-cdk app here.

You’ll need to npm install and typescript compile first. From the root of the project:

npm install && npm run build

Now you can deploy using aws-cdk.

# Check what you'll deploy / modify first with a diff
cdk diff
# Deploy
cdk deploy

With the stack deployed, you’ll now have the following resources:

  • Step Function / State Machine
  • Various Lambda functions for transaction start, finish, the process steps, and each process rollback step.
  • A DynamoDB table for the data
  • IAM role(s) created for the above

Testing the Saga Pattern Sample App

To test, head over to the Step Functions AWS Console and navigate to the newly created SagaStateMachineExample state machine.

Click New Execution, and paste the following for the input:

{
    "Payload": {
      "TransactionDetails": {
        "TransactionId": "1"
      }
    }
}

Click Start Execution.

In a few short moments, you should have a successful execution and you should see your transaction and sample data in DynamoDB.

Moving on, to simulate a random failure, try executing again, but this time with the following payload:

{
    "Payload": {
      "TransactionDetails": {
        "TransactionId": "2",
        "simulateFail": true
      }
    }
}

The lambda functions check the payload input for the simulateFail flag, and if found will do a Math.random() check to give chance of failure in one of the process steps.

Taking it Further

To take this example further, you’ll want to more carefully manage step outputs using Step Function ResultPath configuration. This will ensure that your steps don’t overwrite data in the state machine and that steps further down the line have access to the data that they need.

You’ll probably also want a step at the end of the line for the case of failure (which runs after all rollback steps have completed). This can handle notifications or other tasks that should run if a transaction fails.

AWS CodeBuild local with Docker

AWS have a handy post up that shows you how to get CodeBuild local by running it with Docker here.

Having a local CodeBuild environment available can be extremely useful. You can very quickly test your buildspec.yml files and build pipelines without having to go as far as push changes up to a remote repository or incurring AWS charges by running pipelines in the cloud.

I found a few extra useful bits and pieces whilst running a local CodeBuild setup myself and thought I would document them here, along with a summarised list of steps to get CodeBuild running locally yourself.

Get CodeBuild running locally

Start by cloning the CodeBuild Docker git repository.

git clone https://github.com/aws/aws-codebuild-docker-images.git

Now, locate the Dockerfile for the CodeBuild image you are interested in using. I wanted to use the ubuntu standard 3.0 image. i.e. ubuntu/standard/3.0/Dockerfile.

Edit the Dockerfile to remove the ENTRYPOINT directive at the end.

# Remove this -> ENTRYPOINT ["dockerd-entrypoint.sh"]

Now run a docker build in the relevant directory.

docker build -t aws/codebuild/standard:3.0 .

The image will take a while to build and once done will of course be available to run locally.

Now grab a copy of this codebuild_build.sh script and make it executable.

curl -O https://gist.githubusercontent.com/Shogan/05b38bce21941fd3a4eaf48a691e42af/raw/da96f71dc717eea8ba0b2ad6f97600ee93cc84e9/codebuild_build.sh
chmod +x ./codebuild_build.sh

Place the shell script in your local project directory (alongside your buildspec.yml file).

Now it’s as easy as running this shell script with a few parameters to get your build going locally. Just use the -i option to specify the local docker CodeBuild image you want to run.

./codebuild_build.sh -c -i aws/codebuild/standard:3.0 -a output

The following two options are the ones I found most useful:

  • -c – passes in AWS configuration and credentials from the local host. Super useful if your buildspec.yml needs access to your AWS resources (most likely it will).
  • -b – use a buildspec.yml file elsewhere. By default the script will look for buildspec.yml in the current directory. Override with this option.
  • -e – specify a file to use as environment variable mappings to pass in.

Testing it out

Here is a really simple buildspec.yml if you want to test this out quickly and don’t have your own handy. Save the below YAML as simple-buildspec.yml.

version: 0.2

phases:
  install:
    runtime-versions:
      java: openjdk11
    commands:
      - echo This is a test.
  pre_build:
    commands:
      - echo This is the pre_build step
  build:
    commands:
      - echo This is the build step
  post_build:
    commands:
      - bash -c "if [ /"$CODEBUILD_BUILD_SUCCEEDING/" == /"0/" ]; then exit 1; fi"
      - echo This is the post_build step
artifacts:
  files:
    - '**/*'
  base-directory: './'

Now just run:

./codebuild_build.sh -b simple-buildspec.yml -c -i aws/codebuild/standard:3.0 -a output /tmp

You should see the script start up the docker container from your local image and ‘CodeBuild’ will start executing your buildspec steps. If all goes well you’ll get an exit code of 0 at the end.

aws codebuild test run output from a local Docker container.

Good job!

This post contributes to my effort towards 100DaysToOffload.

Ingest CloudWatch Logs to a Splunk HEC with Lambda and Serverless

cloudwatch logs to splunk HEC via Lambda

I recently came across a scenario requiring CloudWatch log ingestion to a private Splunk HEC (HTTP Event Collector).

The first and preferred method of ingesting CloudWatch Logs into Splunk is by using AWS Firehose. The problem here though is that Firehose only seems to support an endpoint that is open to the public.

This is a problem if you have a Splunk HEC that is only available inside of a VPC and there is no option to proxy public connections back to it.

The next thing I looked at was the Splunk AWS Lambda function template to ingest CloudWatch logs from Log Group events. I had a quick look and it seems pretty out of date, with synchronous functions and libraries in use.

So, I decided to put together a small AWS Lambda Serverless project to improve on what is currently out there.

You can find the code over on Github.

The new version has:

  • async / await, and for promised that wrap the synchronous libraries like zlib.
  • A module that handles identification of Log Group names based on a custom regex pattern. If events come from log groups that don’t match the naming convention, then they get rejected. The idea is that you can write another small function that auto-subscribes Log Groups.
  • Secrets Manager integration for loading the Splunk HEC token from Secrets Manager. (Or fall back to a simple environment variable if you like).
  • Serverless framework wrapper. Pass in your Security Group ID, Subnet IDs and tags, and let serverless CLI deploy the function for you.
  • Lambda VPC support by default. You should deploy this Lambda function in a VPC. You could change that, but my idea here is that most enterprises would be running their own internal Splunk inside of their corporate / VPC network. Change it by removing the VPC section in serverless.yml if you do happen to have a public facing Splunk.

You deploy it using Serverless framework, passing in your VPC details and a few other options for customisation.

serverless deploy --stage test \
  --iamRole arn:aws:iam::123456789012:role/lambda-vpc-execution-role \
  --securityGroupId sg-12345 \
  --privateSubnetA subnet-123 \
  --privateSubnetB subnet-456 \
  --privateSubnetC subnet-789 \
  --splunkHecUrl https://your-splunk-hec:8088/services/collector \
  --secretManagerItemName your/secretmanager/entry/here

Once configured, it’ll pick up any log events coming in from Log Groups you’ve ‘subscribed’ it to (Lambda CloudWatch Logs Triggers).

add your lambda CloudWatch logs triggers and enabled them for automatic ingestion of these to Splunk

These events get enriched with extra metadata defined in the function. The metadata is derived by default from the naming convention used in the CloudWatch Log Groups. Take a close look at the included Regex pattern to ensure you name your Log Groups appropriately. Finally, they’re sent to your Splunk HEC for ingestion.

For an automated Log Group ingestion story, write another small helper function that:

  • Looks for Log Groups that are not yet subscribed as CloudWatch Logs Triggers.
  • Adds them to your CloudWatch to Splunk HEC function as a trigger and enables it.

In the future I might add this ‘automatic trigger adding function’ to the Github repository, so stay tuned!