Quick and Easy Local NPM Registry With Verdaccio and Docker

container storage

Sometimes it can be useful to be able to npm publish libraries or projects you’re working on to a local npm registry for use in other development projects.

This post is a quick how-to showing how you can get up and running with a private, local npm registry using Verdaccio and docker compose.

Verdaccio claims it is a zero config required NPM registry, and that is pretty much correct. You can have it up and running in under 5 minutes. Here’s how:

Local NPM Registry Quick Start

Clone verdaccio docker-examples and then change directory into the docker-examples/docker-local-storage-volume directory.

git clone https://github.com/verdaccio/docker-examples.git
cd docker-examples/docker-local-storage-volume

This particular sample docker-compose configuration gives you a locally run verdaccio instance along with persistence via local volume mount.

From here you can be up and running by simply issuing the following docker-compose command:

docker-compose up -d

However if you do want to make a few tweaks to the configuration, simply load up the conf/config.yaml file in your editor.

I wanted to change the max_body_size to a higher value to allow for larger npm packages to be published locally, so I added:

max_body_size: 500mb

If you haven’t yet started the local docker container, start it up with docker-compose up.

Usage

Now all you need to do is configure your local npm settings to use verdaccio on http://localhost:4873. This is default host and port that verdaccio is configured to listen on when running in docker locally).

Then add an npm user for local development:

npm adduser --registry http://localhost:4873

To use your new registry at a project level, you can create a .npmrc file in your local projects with the following content:

@shogan:registry=http://localhost:4873

Of course replace the scope of @shogan with the package scope of your choosing.

To publish a module / package locally:

npm publish --registry http://localhost:4873

Other Examples

There are lots more verdaccio samples and configurations that you can use in the docker-examples repository. Take a look to find these, including Kubernetes resources to deploy if you prefer running there for a local development setup.

Also refer to the verdaccio configuration page for more examples and documentation on the possible config options.

AWS CodeBuild local with Docker

AWS have a handy post up that shows you how to get CodeBuild local by running it with Docker here.

Having a local CodeBuild environment available can be extremely useful. You can very quickly test your buildspec.yml files and build pipelines without having to go as far as push changes up to a remote repository or incurring AWS charges by running pipelines in the cloud.

I found a few extra useful bits and pieces whilst running a local CodeBuild setup myself and thought I would document them here, along with a summarised list of steps to get CodeBuild running locally yourself.

Get CodeBuild running locally

Start by cloning the CodeBuild Docker git repository.

git clone https://github.com/aws/aws-codebuild-docker-images.git

Now, locate the Dockerfile for the CodeBuild image you are interested in using. I wanted to use the ubuntu standard 3.0 image. i.e. ubuntu/standard/3.0/Dockerfile.

Edit the Dockerfile to remove the ENTRYPOINT directive at the end.

# Remove this -> ENTRYPOINT ["dockerd-entrypoint.sh"]

Now run a docker build in the relevant directory.

docker build -t aws/codebuild/standard:3.0 .

The image will take a while to build and once done will of course be available to run locally.

Now grab a copy of this codebuild_build.sh script and make it executable.

curl -O https://gist.githubusercontent.com/Shogan/05b38bce21941fd3a4eaf48a691e42af/raw/da96f71dc717eea8ba0b2ad6f97600ee93cc84e9/codebuild_build.sh
chmod +x ./codebuild_build.sh

Place the shell script in your local project directory (alongside your buildspec.yml file).

Now it’s as easy as running this shell script with a few parameters to get your build going locally. Just use the -i option to specify the local docker CodeBuild image you want to run.

./codebuild_build.sh -c -i aws/codebuild/standard:3.0 -a output

The following two options are the ones I found most useful:

  • -c – passes in AWS configuration and credentials from the local host. Super useful if your buildspec.yml needs access to your AWS resources (most likely it will).
  • -b – use a buildspec.yml file elsewhere. By default the script will look for buildspec.yml in the current directory. Override with this option.
  • -e – specify a file to use as environment variable mappings to pass in.

Testing it out

Here is a really simple buildspec.yml if you want to test this out quickly and don’t have your own handy. Save the below YAML as simple-buildspec.yml.

version: 0.2

phases:
  install:
    runtime-versions:
      java: openjdk11
    commands:
      - echo This is a test.
  pre_build:
    commands:
      - echo This is the pre_build step
  build:
    commands:
      - echo This is the build step
  post_build:
    commands:
      - bash -c "if [ /"$CODEBUILD_BUILD_SUCCEEDING/" == /"0/" ]; then exit 1; fi"
      - echo This is the post_build step
artifacts:
  files:
    - '**/*'
  base-directory: './'

Now just run:

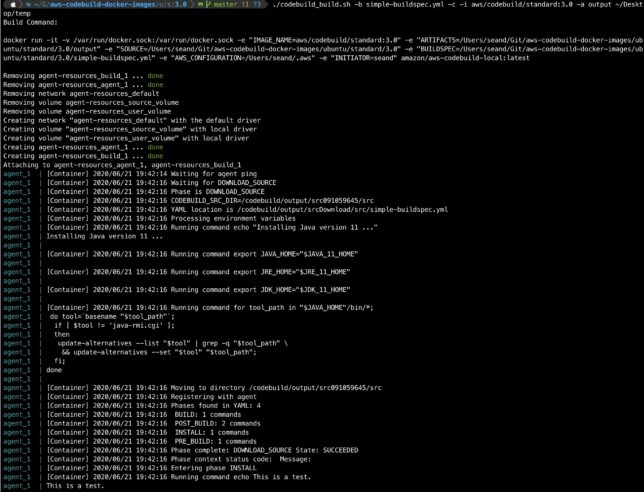
./codebuild_build.sh -b simple-buildspec.yml -c -i aws/codebuild/standard:3.0 -a output /tmp

You should see the script start up the docker container from your local image and ‘CodeBuild’ will start executing your buildspec steps. If all goes well you’ll get an exit code of 0 at the end.

aws codebuild test run output from a local Docker container.

Good job!

This post contributes to my effort towards 100DaysToOffload.