DTrace/dtruss – an alternative to strace on macOS

dtruss/DTrace output

If you’re on macOS and wanting to find out what system calls (syscalls) are being made by a process or application, you may have found that strace is not an option.

This is a quick post to demonstrate how to use DTrace to monitor system calls made by a process on macOS.

System Integrity Protection

First things first, you may find that newer mac systems have SIP (System Integrity Protection) enabled and that running dtruss will give you a warning about this. You’ll also likely not see much output at all.

It’s possible to disable this, but first be mindful of the security implications of disabling SIP, and second, be sure to set things back again once you’re done.

To disable SIP for DTrace, reboot your system into recovery mode (on my Apple M2 system I needed to shutdown completely, then power on, holding the button in until the recovery and startup options appeared).

Then I booted into the recovery tools, entered my usual user login, and used the menu bar at the top of the screen to open Utilities -> Terminal

Then ran:

csrutil enable --without dtrace

Tracing with DTrace/dtruss

dtruss is a DTrace version of truss, which is a Unix-specific command that prints out system calls made by a program.

We’ll use dtruss to see the syscalls made by a simple node application.

After this, a reboot back into the normal OS had me back at the terminal and ready to run dtruss.

Here’s a simple nodeJS program that we’ll trace.

const fs = require("fs");

const fd = fs.openSync("foo.txt", "r+");
fs.writeSync(fd, "foo", "utf8");
const test = fs.readFileSync("foo.txt");
console.log(test);

We load the fs module (used to make file operations), create a file descriptor pointing to existing file foo.txt in write mode, write the text “foo” to it, read it back by opening the file, and then write the result to stdout.

Let’s trace this program now.

sudo dtruss node example.js &> dtruss.log

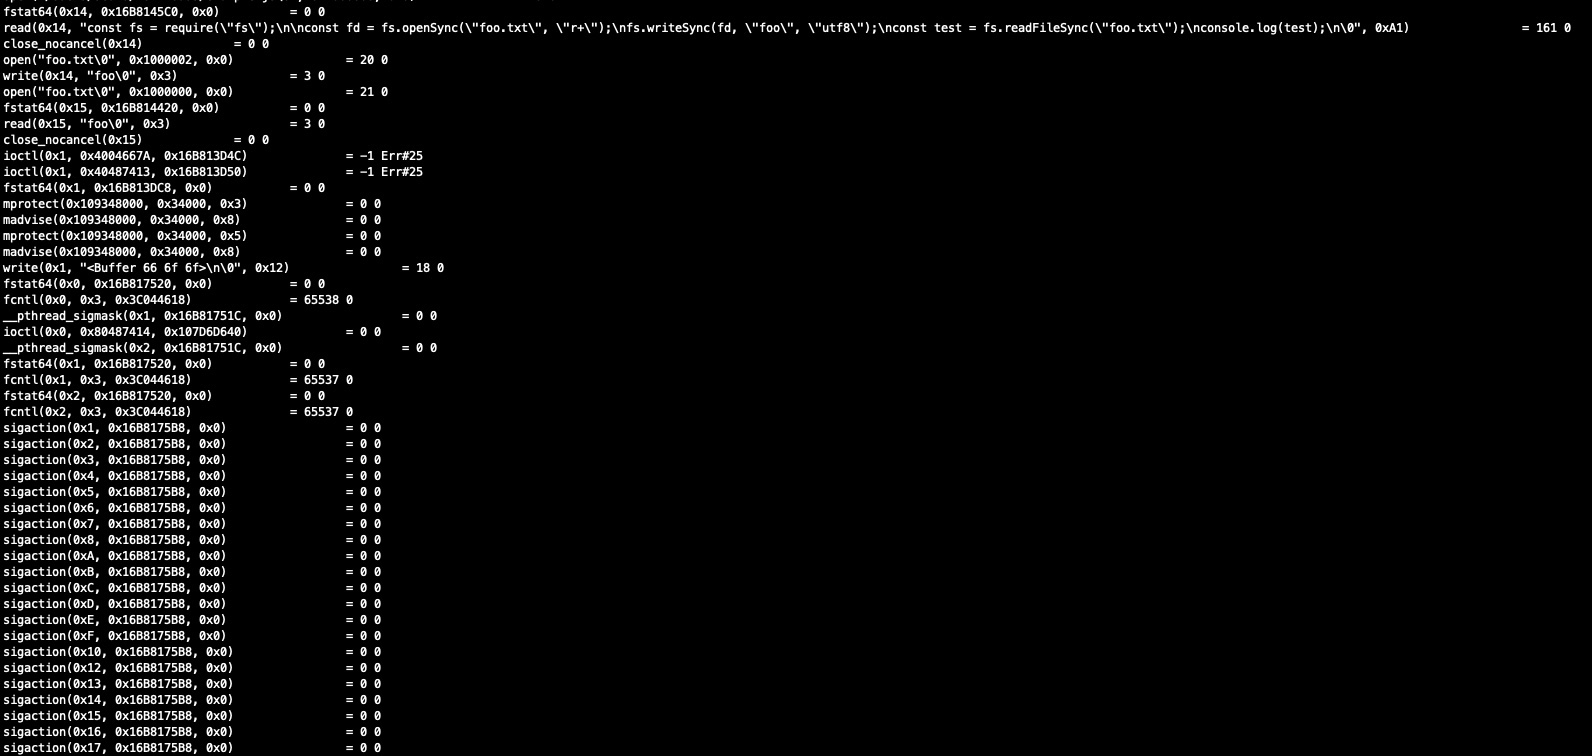
Once that completes, you’ll see a lot of output detailing various system calls in the dtruss.log file. Much of this is made by the node environment itself, and a small part will be the actual example.js program. Scroll through until you find the part where the example.js script is loaded. It should start with

read(0x14, "const fs = require

Shortly after that you’ll see the syscalls made by the node program.

  • open (to open foo.txt)
  • write (to write the string ‘foo’ into the foo.txt file)
  • open (to again open foo.txt and read the content)
  • fstat64 which gets file status
  • write (with Buffer containing hexadecimal value for foo 66 6f 6f) to write the value to stdout.
read(0x14, "const fs = require(\"fs\");\n\nconst fd = fs.openSync(\"foo.txt\", \"r+\");\nfs.writeSync(fd, \"foo\", \"utf8\");\nconst test = fs.readFileSync(\"foo.txt\");\nconsole.log(test);\n\0", 0xA1)                = 161 0
close_nocancel(0x14)             = 0 0
open("foo.txt\0", 0x1000002, 0x0)                = 20 0
write(0x14, "foo\0", 0x3)                = 3 0
open("foo.txt\0", 0x1000000, 0x0)                = 21 0
fstat64(0x15, 0x16B814420, 0x0)          = 0 0
read(0x15, "foo\0", 0x3)                 = 3 0
close_nocancel(0x15)             = 0 0
ioctl(0x1, 0x4004667A, 0x16B813D4C)              = -1 Err#25
ioctl(0x1, 0x40487413, 0x16B813D50)              = -1 Err#25
fstat64(0x1, 0x16B813DC8, 0x0)           = 0 0
mprotect(0x109348000, 0x34000, 0x3)              = 0 0
madvise(0x109348000, 0x34000, 0x8)               = 0 0
mprotect(0x109348000, 0x34000, 0x5)              = 0 0
madvise(0x109348000, 0x34000, 0x8)               = 0 0
write(0x1, "<Buffer 66 6f 6f>\n\0", 0x12)                = 18 0
fstat64(0x0, 0x16B817520, 0x0)           = 0 0
fcntl(0x0, 0x3, 0x3C044618)              = 65538 0
__pthread_sigmask(0x1, 0x16B81751C, 0x0)                 = 0 0
ioctl(0x0, 0x80487414, 0x107D6D640)              = 0 0
__pthread_sigmask(0x2, 0x16B81751C, 0x0)                 = 0 0
fstat64(0x1, 0x16B817520, 0x0)           = 0 0
fcntl(0x1, 0x3, 0x3C044618)              = 65537 0
fstat64(0x2, 0x16B817520, 0x0)           = 0 0
fcntl(0x2, 0x3, 0x3C044618)              = 65537 0

Finally, don’t forget to reboot into recovery mode and set SIP back to the default.

Saving £500 on a new Apple Mac Mini with 32GB RAM

mac mini internals

I purchased a new Apple Mac Mini recently and didn’t want to fall victim to Apple’s “RAM Tax”.

I used Apple’s site to configure a Mac Mini with a quad core processor, 32GB RAM, and a 512GB SSD.

I was shocked to see they added £600.00 to the price of a base model with 8GB RAM. They’re effectively charging all of this money for 24GB of extra RAM. This memory is nothing special, it’s pretty standard 2666MHz DDR4 SODIMM modules. The same stuff that is used in generic laptops.

I decided to cut back my order to the base model with 8GB of RAM. I ordered a Crucial 32GB Kit (2 x 16GB DDR4-2666 SODIMM modules running at 1.2 volts with a CAS latency of 19ns). This kit cost me just over £100.00 online.

The Crucial 2 x 16GB DDR4-2666 SODIMM kit

In total I saved around £500.00 for the trouble of about 30 minutes of work to open up the Mac Mini and replace the RAM modules myself.

The Teardown Process

Use the iFixit Guide

You can use my photos and brief explanations below if you would like to follow the steps I took to replace the RAM, but honestly, you’re better off following iFixit’s excellent guide here.

Follow along Here

If you want to compare or follow along in my format, then read on…

Get a good tool kit with hex screw drivers. I used iFixit’s basic kit.

iFixit basic tool kit

Flip the Mac Mini upside down.

Pry open the back cover, carefully with a plastic prying tool

Undo the 6 x hex screws on the metal plate under the black plastic cover. Be careful to remember the positions of these, as there are 2 x different types. 3 x short screws, and 3 x longer.

opening the mac mini

Very carefully, move the cover to the side, revealing the WiFi antenna connector. Unscrew the small hex screw holding the metal tab on the cable. Use a plastic levering tool to carefully pop the antenna connector off.

Next, unscrew 4 x screws that hold the blower fan to the exhaust port. You can see one of the screws in the photo below. Two of the screws are angled at a 45 degree orientation, so carefully undo those, and use tweezers to catch them as they come out.

Carefully lift the blower fan up, and disconnect it’s cable using a plastic pick or prying tool. The trick is to lift from underneat the back of the cable’s connector and it’ll pop off.

mac mini blower fan removal

Next, disconnect the main power cable at the top right of the photo below. This requires a little bit of wiggling to loosen and lift it as evenly as possible.

Now disconnect the LED cable (two pin). It’s very delicate, so do this as carefully as possible.

There are two main hex screws to remove from the motherboard central area now. You can see them removed below near the middle (where the brass/gold coloured rings are).

With everything disconnected, carefully push the inner motherboard and it’s tray out, using your thumbs on the fan’s exhaust port. You should ideally position your thumbs on the screw hole areas of the fan exhaust port. It’ll pop out, then just very carefully push it all the way out.

The RAM area is protected by a metal ‘cage’. Unscrew it’s 4 x hex screws and slowly lift the cage off the RAM retainer clips.

Carefully push the RAM module retainer clips to the side (they have a rubber grommet type covering over them), and the existing SODIMM modules will pop loose.

mac mini SODIMM RAM modules and slots

Remove the old modules and replace with your new ones. Make sure you align the modules in the correct orientation. The slots are keyed, so pay attention to that. Push them down toward the board once aligned and the retainer clips will snap shut and lock them in place.

Replace the RAM ‘cage’ with it’s 4 x hex screws.

Reverse the steps you took above to insert the motherboard tray back into the chassis and re-attach all the cables and connectors in the correct order.

Make sure you didn’t miss any screws or cables when reconnecting everything.

Finally boot up and enjoy your cheap RAM upgrade.

My first iOS game released on the App Store – Cosmosis

So I finally got my first game (and app) released on the App Store the other day. It is a 2D Space shooter called Cosmosis. Here is a feature / gameplay video and a link to the official App Store page. Check it out if you are into iOS games. It is compatible with the iPhone, iPod Touch and iPad!

The Official Game Page

httpv://www.youtube.com/watch?v=pnJCuaCOJzo

Here are a couple of screenshots:

Cosmosis - Gameplay screenshot

Cosmosis - Gameplay screenshot 2

http://itunes.apple.com/us/app/cosmosis/id404662019?mt=8

Mac vs PC Parody

This is quite old but I still find it hilarious the way the majority of Mac users love to brag about their Apple products. Don’t get me wrong, I have nothing against Apple. I even own an Apple Powermac G3, running Mac OS 9 which I used to use for design. They are however just PCs running Mac OS with different looking peripherals in the end.

The fan boys are the people that ruin Apple products though. These clips below illustrate this “fanboism” quite well…

httpv://uk.youtube.com/watch?v=JixbzFjv_cU]

httpv://uk.youtube.com/watch?v=4Tq7yykR-DM&eurl=http://www.thebestpageintheuniverse.net/c.cgi?u=macs_cant]