My workspace and hardware zen

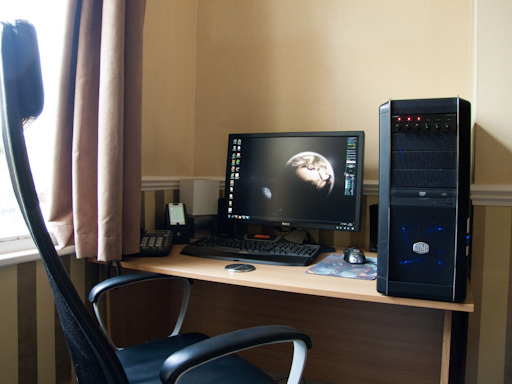
Everyone has their own relax or zen area where they like to spend time getting away from reality and de-stressing. One of mine just happens to be the same place where I get a lot of work done – my main gaming platform and home office area! Since we moved into our new flat, I found that there wasn’t much space to set up my PC. Last weekend I whipped out the old jigsaw and sliced a couple of inches off the side of my PC desk in order to get it to fit into this corner.

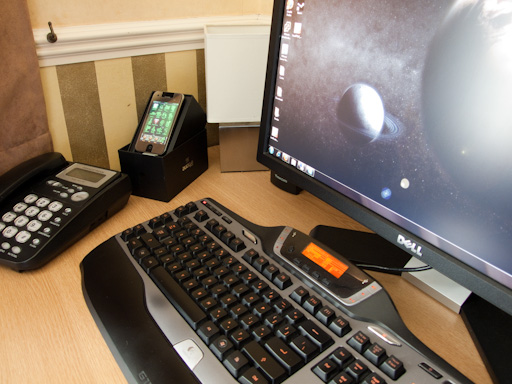
I then decided to neaten up and organise everything a bit to enhance my working conditions when I do work from home. I made a “ghetto” iPhone dock out of the packaging the phone came in, using the plastic dish the phone is cradled in. I cut out a small area at the bottom for the iPhone connector to fit in, then routed the cabling into the box itself, which sits diagonally in the lid of the box, flipped upside down. The cable then comes out the back and plugs in to the power socket behind my desk. This keeps the cabling nice and neat and I just plonk the phone down into the dock when I get home for a charge. I don’t need a USB connection to the PC as I have SSH enabled via a jailbreak – I therefore use Wifi access and WinSCP or SCP from Putty to transfer files between PC and phone.

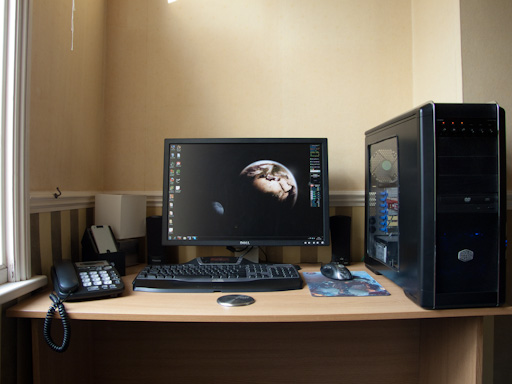
Behind this is my touch sensitive desk lamp, in front of the dock is my work IP phone which connects up to our VOIP server. Then we have my main PC which consists of the following: Asus P45 P5Q motherboard, E8400 3.0GHz Core2Duo CPU overclocked to 3.6GHz in Summer and 4.0GHz in Winter. 4GB OCZ DDR800 RAM running at DDR1000 speeds and an ATI HD 4870 graphics card which has a custom flashed bios which overvolts the GPU and applies a generous overclock. I used to have a nice quiet watercooling loop in the PC, but sold it recently and went back to air cooling. I plan on doing another Watercooling build soon and will hopefully post the process and worklog here when I do. The other peripherals consist of a Dell 24″ LCD (1920×1200), G15 Keyboard and Logitech MX518 mouse.

I use this PC for just about everything – all my PC gaming, Web browsing, a little bit of programming and Virtualisation (On top of Windows 7 Professional it is running VMWare Server 2.0) with a variety of guest VMs that I use for testing and practising various Windows and Linux server technologies.

Other hardware I have lying around is an old Dell Poweredge 2U server which I run VMWare ESX 3.5 and a Dell Optiplex machine running uBuntu 8.04, with VMWare Server 2.0 for linux and a guest VM operating system running on top of that which runs uBuntu Server 9.04 and this very website.

Anyway here are a few photos of my nice clean new workspace.

E8400 Gaming rig build

This is an old post from my other site. I thought as it was IT relevant I would clone the small write up I did across to this blog…

I recently bought myself a new rig, consisting of a Coolermaster CM-690 and the following hardware:

Asus P5Q P45 Pro motherboard
Intel E8400 overclocked to 3.6GHz 24/7
OCZ 2GB ATI Heatspreader RAM DDR800 4-4-4-12
Sapphire ATI HD 4870 512MB GDDR5 Graphics card
OCZ GameXstream 600w Power supply
Western Digital 750GB SATAII Hard drive
Logitech G15 Keyboard (orange backlight model)
Logitech MX518 (5 year old mouse that has travelled the world with me!)

For display I chose a 24″ Dell LCD with a native resolution of 1920×1200 and 6ms response time.

My ultimate goal was to build a faster, cooler and quieter PC than the previous one I had in S.A.

Right, so in my last rig I had the pre-built CM-690 L-shaped window panel. This came with the chassis when I bought it, so I was pretty lazy and didn’t change anything. I also had a Coolermaster Aquagate watercooling unit that fitted in 2 x optical drive bays, which had the pump, radiator and everything incorporated, cooling my E8200 on the old rig. Temperatures were not much better than the Zalman 9700LED that I used to have on it and it was quite messy. I also didn’t enjoy the tiny tubing that this unit used, hence my custom kit choice with 1/2″ diameter tubing for this project. I had never built myself a custom watercooling system, so this will be my first. It will also be the first batch of modding I have done in about 10 years! (The last mod I did was on an AMD K6-2 333MHz in an AT case many, many years ago)! That is barring some odd LED, and minor case mods here and there.

Anyway, here is an image of the final product (Case cut, window installed, hardware assembled and modded to fit the watercooling gear. Cables neatened and basically everything finished, barring the watercooling of the graphics card.

final-1

night-shot

I cut a rough pattern out of the top with my jigsaw, this is where the radiator is to be fit:

case-cut

I cabled-sleeved most of the loose / visible wiring throughout the chassis:

cable-sleeving

Next to be cut was the side panel – Masked off the area to be cut, and used the jigsaw once again:

perspex

This is the box of goodies (watercooling hardware) I ordered from Specialtech:

goodies

The waterblock for cooling the CPU:

cpu-block

Shortly after finishing the water components, and tubing, I started the system up for leak testing…

test-run

A few weeks later the graphics card was ready to be added to the watercooling system. This is a Sapphire ATI HD 4870 512MB (GDDR4) card. I had to remove the stock air cooler, and re-apply some new thermal compound. I used Zalman STG-1 thermal paste for this.

4870-air

Here the card is naked, with the old thermal compound applied to the GPU. The card still needed to be cleaned with some pure alcohol to remove the old thermal paste.

4870-naked

Everything installed, Feser one non-conductive cooling fluid in the loop with the system up and running :

final-2

A small update on this build.

Since the original work was finished, I have now upgraded the RAM. I added another 2GB OCZ RAM to give a total of 4GB. I also pushed my original overclock a bit further, and now run the FSB at 445MHz with a CPU multiplier of 9x giving me a total of 4.0GHz on the E8400. The RAM is running a multiplier of 2x overclocking the four modules to 890MHz each, with timings of 4-4-4-12. My Vcore setting for the processor is on around about 1.375 volts, and my RAM is sitting at 2.2 volts which is what I consider a safe 24/7 setting for RAM modules cooled by passive heatsinks. The FSB is set to 1.16 volts for the increase FSB speed to hold stable. I also flashed the 4870’s bios with a custom image, that sets the card’s default core speed to 795mhz (from a default of 750mhz) and the memory to 1100mhz (from a default of 900mhz). I then use Catalyst Control Centre to up the core speed to a further 830mhz for gaming. The PC now runs at these speeds 24/7 and has no stability issues.