
Nim is a statically typed compiled systems programming language. I’ve seen a few posts about Nim popping up on HackerNews recently and was curious enough to give it a go.
My go-to tool / application to implement when trying out a new language these days is a simple CLI tool.
Recently I had a go at trying Rust – creating fstojson-rust. Sticking to systems programming languages, Nim came up next.
Here are the things I initially liked about Nim:
- Statically typed, compiled language.
- The Nim compiler and generated executables work on all the major operating systems. i.e. Linux, macOS, Windows, BSD.
- Lots of documentation and tutorials.
- An online Playground.
Getting Started With Nim
Installation is really simple regardless of your OS. On macOS I chose to run the choosenim installation script. (Remember, always check and inspect scripts that you cURL / run directly from online sources):
curl https://nim-lang.org/choosenim/init.sh -sSf | sh
You can also download pre-built binaries for your OS at the main Nim Download page, or use a myriad of other methods to get it running such as Homebrew, Docker images, etc…
Nimble is a package manager that is bundled with Nim (since version 0.15.0). It is very similar in what it does as what npm does for node for example.
If you wanted to upgrade nimble itself, you can simply do:
nimble install nimble
Just like an npm update!
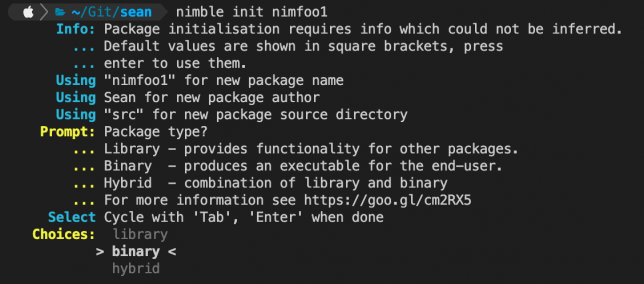
To create a new project, you can use the init command. An interactive CLI wizard guides you through creating a Library, Binary, or Hybrid project type.
nimble init [pkgname]
A Nim project can use a .nimble file, which is equivalent to package.json in the Node.js world. Nimble is used to work with the project’s .nimble file.
To check the validity of your project and dependencies, you can run the check command:
nimble check
Then to install a new package you use the install command with nimble (the default is to install latest, but you can also install a specific version of a package, e.g. one from a git repository):
$ nimble install package@#head
Getting Acquainted with Nim
I started off with a really simple program that simply reads from stdin and then echos back a message.
echo "What's your name? "
var name: string = readLine(stdin)
echo "Hi, ", name, "!"
Building and running locally is simple. You can run nimble build or nimble install. The build command will create a debug version of your program which includes stack traces, while install will create a release version.
You can also pass Nim flags to these commands, though for anything permanent you can add a configuration file and specify them there.
You use nimble run to build and run your program in one go.
There are many more command options available for nimble. Just run the command without anything else to access the list.
fstojson-nim
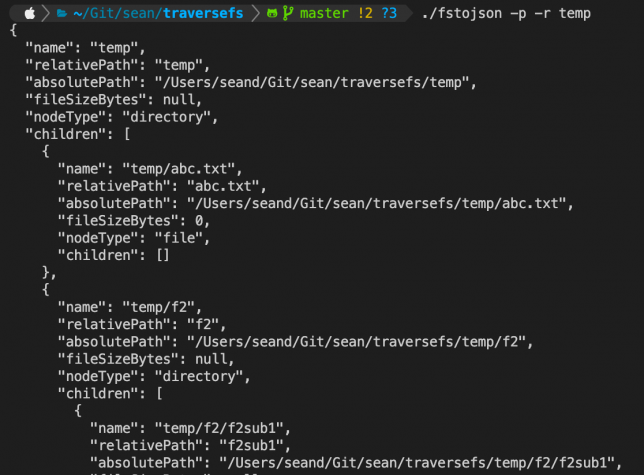
Next, I jumped into writing my go-to application for traversing the file system and collecting directory and files in a designated path to output to a JSON hierarchy.
You can take a look at my code in GitHub.
My overall experience was that I found Nim to be a lot more foregiving in terms of safety checks and recursive functions than what Rust was.
I was able to use a single function (in Nim these are called procedures and are defined with the proc keyword), which could recursively call itself for traversing a nested directory hierarchy.
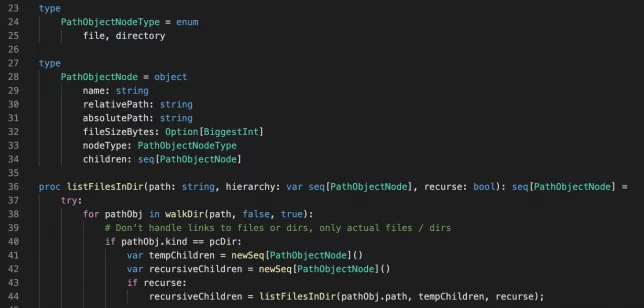
I created a simple object (PathObjectNode) which would store the information about each file or directory, with a children property that is used to hold a list (seq) of more PathObjectNode objects if they object is a directory (files of course do not have children).
A single hierarchy is created at the start of traversal and all directory or file object nodes are added to this.
var hierarchy = newSeq[PathObjectNode]()
At the end of traversal I simply echo out the JSON representation of the root hierarchy node (along with all children). Optionally, this can be prettified JSON.
Speaking of options, I used a handy package called docopt to provide the CLI interface. It was a case of simply adding this to my project’s .nimble file dependencies.
The interface can then be specified by providing a docopt string. For example:
let doc = """
traversefs

Usage:
  traversefs [-p | --pretty] [-r | --recurse] PATH

Arguments:
  PATH          The path to begin traversing

Options:
  -h --help     Show this screen.
  --version     Show version.
  -p --pretty   Pretty print JSON
  -r --recurse  Recusively traverse paths.
"""
With that done, and a simple nimble build later, I could run the binary directly to use it.
Closing Thoughts
Nim feels like an easily accessible systems programming language to me. Although I haven’t really used it enough to have an informed opinion, my thoughts are that it strikes a nice balance between usablity, ease of entry, performance, and type safety.
I’ll definitely consider exploring it further for other projects when I get the chance.