This is a quick note as a pointer to anyone running into type errors like error TS2582. You might be working with Jest, TypeScript, and a monorepo setup, using something like lerna. I was porting over some projects into a monorepo and had a tsconfig.json issue which was cause for this error. You might be seeing errors similar to: error TS2582: Cannot find name 'test'. Do you need to install type definitions for a test runner? Try npm i --save-dev @types/jest or npm i --save-dev @types/mocha.
As it turns out, my issue was that I had a tsconfig.json file with typeRoots configured to point to the package’s own node_modules directory. Like this:
As this was a monorepo, common types such as those from jest were installed in the repository root. Meaning a package tsconfig.json file under package/example-package, referencing the location of “./node_modules/@types” was incorrect.
The fix was to simply remove the typeRoots setting from the package, or change it to point a further level down to the root: “../../node_modules/@types“.
To quote the docs on typeRoots, if you explicitly set typeRoots, then you’re narrowing down the locations that these will be pulled in from (compared to the default of not setting them).
By default all visible ”@types” packages are included in your compilation. Packages in node_modules/@types of any enclosing folder are considered visible. For example, that means packages within ./node_modules/@types/, ../node_modules/@types/, ../../node_modules/@types/, and so on.
My first steps in programming as a child were with QBasic on an older 486 system that only had DOS 6.22 and Windows 3.1. A group of friends and I discovered QBasic (probably via a bunch of old paper manuals that came with our parent’s PCs) and began writing primitive programs that would prompt for input, save the answer in variables and lead the user through a series of questions, printing out answers in return.
For fun, I decided to look into the effort required to write a simple screen saver (remember those) using QBasic. It turns out there is not much effort required at all.
QBasic on a Modern System
The easiest approach is to use DOSBox. I installed it on my Windows 10 machine. From there, I configured it using the DOSBox configuration file to run in a larger sized window. It is as simple as adding this to the .conf file:
windowresolution=1920x1080
output=ddraw
Next, I setup automatic mounting of a “DOS Apps” folder I setup on my D: drive. Locate the [autoexec] section in the DOSBox conf file and add something like this:
mount C D:\Tools\DOS_APPS
C:
cd QB45
qb.exe
This will mount everything under D:\Tools\DOS_APPS to the C:\ drive of your DOSBox machine. It then changes directory to the contained QB45 directory to run the QBasic executable.
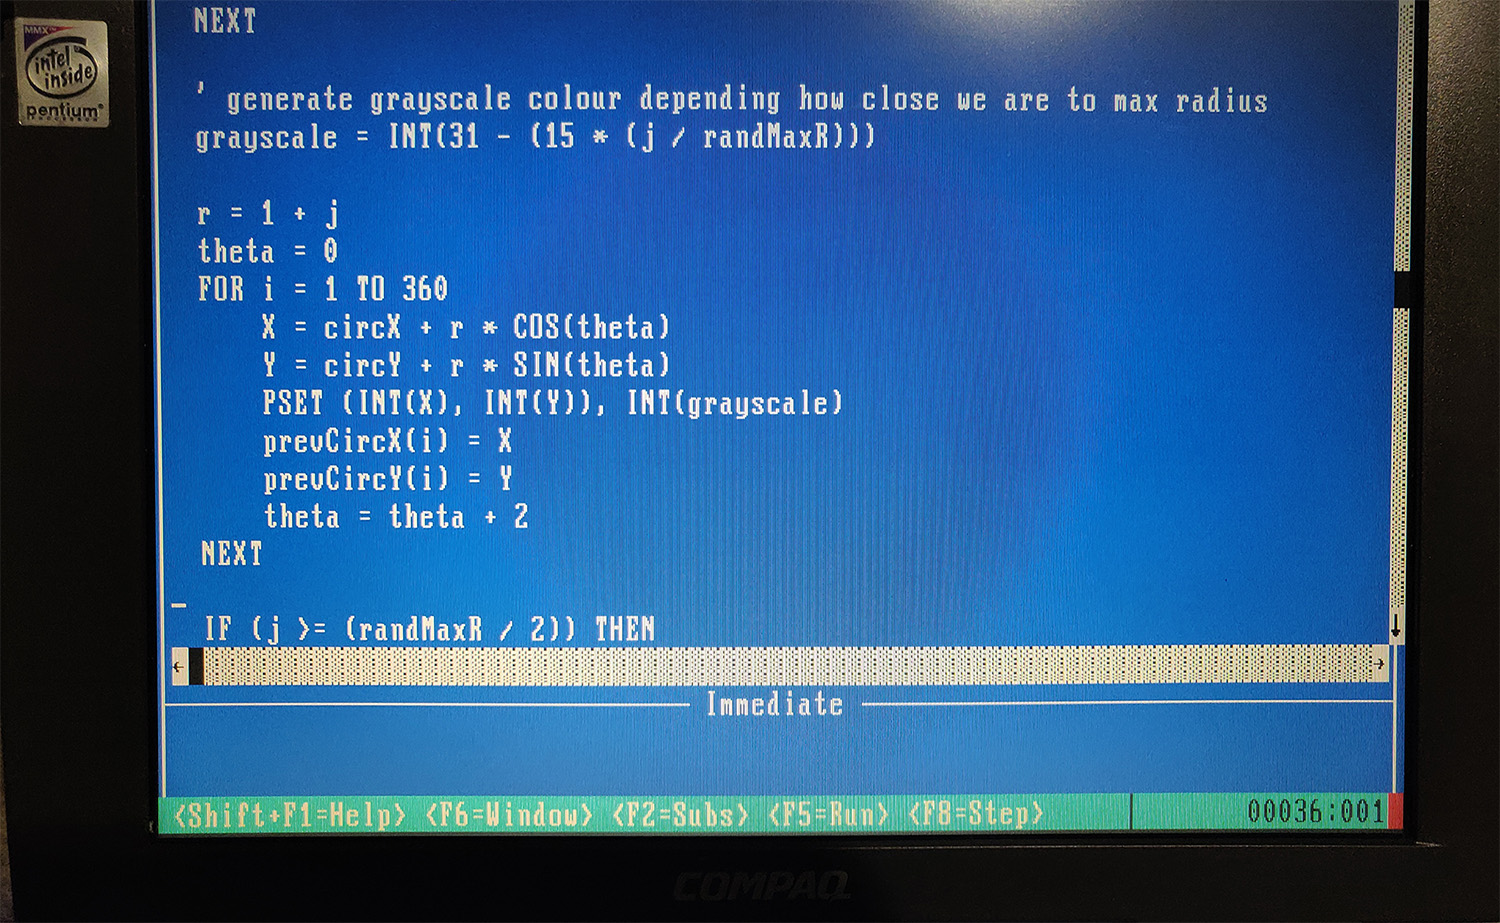
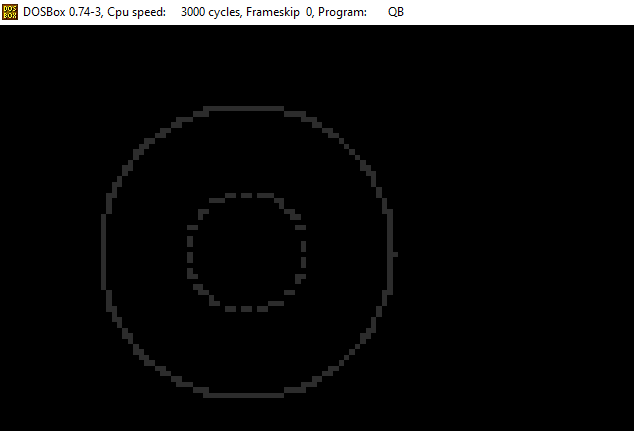
Ripples, The Retro QBasic Screensaver
I wrote a simple SCREEN 13 mode (320×200 VGA) screensaver that I named Ripples. It simply draws outer and inner circles which expand and fade out at random locations. I’ve used a basic circle drawing algorithm, and POKE to set values at specific locations in memory. (In SCREEN 13 mode, each pixel is represented by 1 byte).
The reason I didn’t use the much simpler CIRCLE routine, is because I wanted to have multiple circles drawn out (inner loops) and also prevent screen clears after every concentric circle. (Also, the added complexity of the circle creation routine itself was fun to add).
You can take a look at the quickly hacked together source code here. I’m sure there are far more efficient ways of doing some of these things, but I didn’t want to spend too long digging deep into screen drawing. (Maybe using DATA could improve things, or perhaps even writing inline machine code to perform the loops and pixel setting that POKE does).
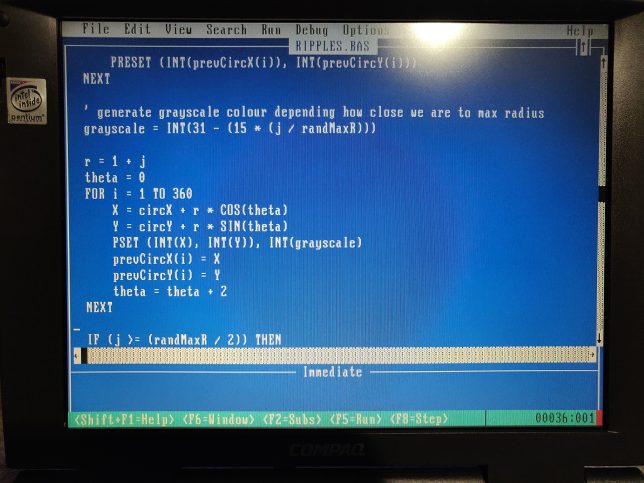
Running it on an actual Retro System
I copied QBasic and the source code across to my actual retro system (the old Pentium laptop).
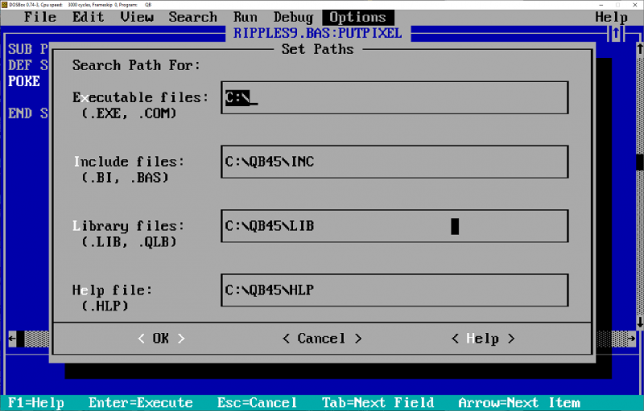
Next I configured QBasic to be able to use a linker to compile an executable. It’s a case of simply ensuring your Paths are set correctly under Options.
I opened and compiled the source, disabling debug symbols to vastly improve speed too. Windows 98 has a DOS mode built-in that can execute DOS applications directly from Windows. QBasic and the program ran perfectly like this. After booting into MS-DOS mode I confirmed that the compiled source ran perfectly there too.
This was a mostly pointless exercise, other than to experience a bit of nostalgia. It certainly was a blast from the past. The experience also helps me to appreciate the modern tooling and IDEs we use today. Having said that though, I did find myself quickly iterating through edits in QBasic using the edit and search options. It wasn’t too bad after all.
Nim is a statically typed compiled systems programming language. I’ve seen a few posts about Nim popping up on HackerNews recently and was curious enough to give it a go.
My go-to tool / application to implement when trying out a new language these days is a simple CLI tool.
Recently I had a go at trying Rust – creating fstojson-rust. Sticking to systems programming languages, Nim came up next.
Here are the things I initially liked about Nim:
Statically typed, compiled language.
The Nim compiler and generated executables work on all the major operating systems. i.e. Linux, macOS, Windows, BSD.
Installation is really simple regardless of your OS. On macOS I chose to run the choosenim installation script. (Remember, always check and inspect scripts that you cURL / run directly from online sources):
curl https://nim-lang.org/choosenim/init.sh -sSf | sh
You can also download pre-built binaries for your OS at the main Nim Download page, or use a myriad of other methods to get it running such as Homebrew, Docker images, etc…
Nimble is a package manager that is bundled with Nim (since version 0.15.0). It is very similar in what it does as what npm does for node for example.
If you wanted to upgrade nimble itself, you can simply do:
nimble install nimble
Just like an npm update!
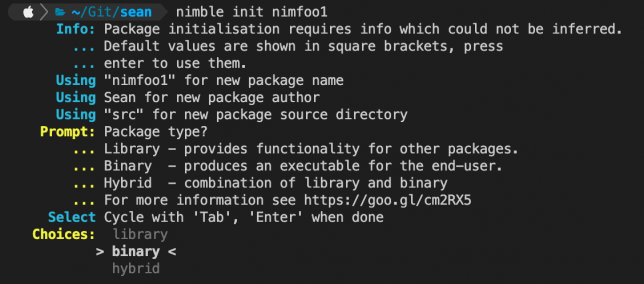
To create a new project, you can use the init command. An interactive CLI wizard guides you through creating a Library, Binary, or Hybrid project type.
nimble init [pkgname]
nimble init guide for new projects
A Nim project can use a .nimble file, which is equivalent to package.json in the Node.js world. Nimble is used to work with the project’s .nimble file.
To check the validity of your project and dependencies, you can run the check command:
nimble check
Then to install a new package you use the install command with nimble (the default is to install latest, but you can also install a specific version of a package, e.g. one from a git repository):
$ nimble install package@#head
Getting Acquainted with Nim
I started off with a really simple program that simply reads from stdin and then echos back a message.
echo "What's your name? "
var name: string = readLine(stdin)
echo "Hi, ", name, "!"
Building and running locally is simple. You can run nimble build or nimble install. The build command will create a debug version of your program which includes stack traces, while install will create a release version.
You can also pass Nim flags to these commands, though for anything permanent you can add a configuration file and specify them there.
You use nimble run to build and run your program in one go.
There are many more command options available for nimble. Just run the command without anything else to access the list.
fstojson-nim
Next, I jumped into writing my go-to application for traversing the file system and collecting directory and files in a designated path to output to a JSON hierarchy.
My overall experience was that I found Nim to be a lot more foregiving in terms of safety checks and recursive functions than what Rust was.
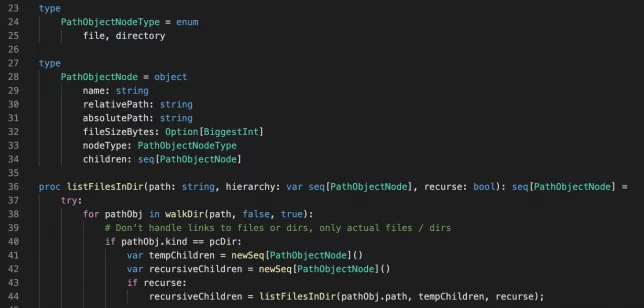
I was able to use a single function (in Nim these are called procedures and are defined with the proc keyword), which could recursively call itself for traversing a nested directory hierarchy.
I created a simple object (PathObjectNode) which would store the information about each file or directory, with a children property that is used to hold a list (seq) of more PathObjectNode objects if they object is a directory (files of course do not have children).
A single hierarchy is created at the start of traversal and all directory or file object nodes are added to this.
var hierarchy = newSeq[PathObjectNode]()
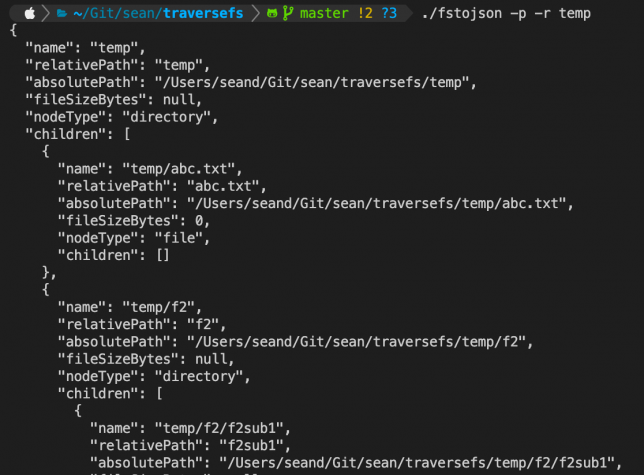
At the end of traversal I simply echo out the JSON representation of the root hierarchy node (along with all children). Optionally, this can be prettified JSON.
Speaking of options, I used a handy package called docopt to provide the CLI interface. It was a case of simply adding this to my project’s .nimble file dependencies.
The interface can then be specified by providing a docopt string. For example:
let doc = """
traversefs

Usage:
  traversefs [-p | --pretty] [-r | --recurse] PATH

Arguments:
  PATH          The path to begin traversing

Options:
  -h --help     Show this screen.
  --version     Show version.
  -p --pretty   Pretty print JSON
  -r --recurse  Recusively traverse paths.
"""
With that done, and a simple nimble build later, I could run the binary directly to use it.
Closing Thoughts
Nim feels like an easily accessible systems programming language to me. Although I haven’t really used it enough to have an informed opinion, my thoughts are that it strikes a nice balance between usablity, ease of entry, performance, and type safety.
I’ll definitely consider exploring it further for other projects when I get the chance.
I currently use an Intel Apple Mac Mini that I upgraded as a daily driver for my work. I’ve been quite excited about the prospect of the M1 processor and the performance and power efficiency it has on offer.
However, I just can’t bring myself to buy one of these yet. Why? It’s like those older Windows Service Pack updates you would always hold off on installing. Sometimes you’re setting yourself up for disaster by adopting something new and shiny without it proving itself first.
Edit (8/7/2022): Apple M2 hardware is now releasing, and many of the issues I describe below for M1 will hopefully no longer be relevant. The platform is more mature now, and many issues have been ironed out. Node 16 is more prevalent everywhere too. I still stand by my views aroud the right to repair issues though.
Apple M1 turns 1, but still has room for improvement
Tomorrow, the Apple M1 will have officially been on the market for exactly 1 year (Apple M1 was officially released on November 11, 2020). I still don’t think it has proven itself yet, or had the kind of mass adoption needed to bring about software maturity.
I’ve read countless threads, articles, and comments around the interweb that highlight problems and shortfalls that I just don’t see on my Intel based Mac Mini 2018 model. Here are some examples:
Docker support lagged with M1. Early adopters soon realised that many of their favourite day-to-day Docker images were not built with the M1 architecture/platform. Support lagged in many places, (and still does for more niche software). Some users were caught off guard as they didn’t think about this when “pulling the trigger” on Apple Mac M1 purchases.
I’ve also spoken with colleagues who upgraded to M1 and have reported that certain Node.js applications are much slower on M1 than they were on their older, Intel based macOS systems.
I use node a lot for work, and this is a worrying thing to hear. I looked it up, and sure enough there are plenty of experiences from others that report issues with Node, and NVM on Apple silicon.
I am not convinced about Apple’s Unified Memory Architecture (UMA) being all sunshine and roses. The memory bandwidth up for offer sure is enticing, but what about upgradeability and repair?
Apple is making sacrificing one thing for another. Now, if the memory built into the logic board fails, the entire board needs replacing.
What about upgradeability? With my Mac Mini 2018, I bought the (much cheaper) 8GB model. I then purchased 32GB SODIMM RAM modules at half the price of what Apple wanted to charge me. I performed the RAM upgrade myself.
With M1 I cannot do that anymore.
Intel is where it’s at for me
My current Mac Mini is great in terms of memory and SSD performance. However it has an anaemic Core i3 processor that is crippling overall performance. For example, Slack’s renderer process brings all 4 logical cores to their knees if I do a screenshares.
I definitely should have opted for the i5 when I purchased this model.
However, there is light at the end of the tunnel. Apple still sell Intel-based Mac Minis. They do hide it out of sight where you need to scroll to the bottom of their product page, but at least they’re there.
As a society we should be more cautious with early adoption and “jumping on the band wagon”. We should wait for issues to be resolved, or at least “day 1” patches to be released in the case of software. Assess the severity of problems at launch and wait for product maturity before taking the plunge. I try to use this same philosophy with games. The industry has moved to “early access” and we’re all being taken along for the bumpy ride.
For now my hardware upgrade path is clear – an Intel-based Mac Mini with a 3.0GHz 6-core 8th-generation Intel Core i5 processor.
It’s easy enough to add extra targets using the cargo command when building your Rust project. However, the Rust cross compile process gets a little tricker when linking is done for platforms different to the host platform.
I wanted to setup a GitHub Actions workflow that would build binaries for different platforms from the same actions runner.
While it might be possible to use GitHub Actions Matrix to run a build across multiple operating systems and install Rust / rustup / cargo on each, performing the build in each place, I opted for a different strategy.
Using a base Rust musl build container, on top of Debian Buster, I’ve added osxcross and the required build tools. This supports building and linking macOS binaries from the Linux container.
Rust Cross Compile GitHub Action
I’ve built a Docker image for GitHub Actions to use. It is based on the popular rustup image. Currently I’ve built a musl-1.0.53 variant. My version copies in and sets up osxcross. This bakes all the heavy lifting into the image so that GitHub actions can quickly build targets for linux and macOS (x86).
Set up a .cargo/config file to designate the target to linker mapping. For example macOS x86:
[target.x86_64-apple-darwin]
linker = "x86_64-apple-darwin14-clang"
ar = "x86_64-apple-darwin14-ar"
Add a GitHub Actions workflow:
name: Rust static build macOS and Linux
on:
  push:
    branches:
      - main
jobs:
  build:
    name: build for all platforms
    runs-on: ubuntu-latest
    env:
      CARGO_TERM_COLOR: always
      BINARY_NAME: rust-test1
    steps:
    - uses: actions/checkout@v2
    - name: Build-musl macOS x86
      uses: Shogan/rust-musl-action@v1.0.2
      with:
        args: cargo build --target x86_64-apple-darwin --release
    - name: Build-musl Linux x86
      uses: Shogan/rust-musl-action@v1.0.2
      with:
        args: cargo build --target x86_64-unknown-linux-musl --release
Release binaries can now easily be built from a single ubuntu linux GitHub actions runner. For example, get the Cargo.toml version and create a release with the built binaries by adding a couple of extra steps:
There are many ways to achieve an automated CI process that can do Rust cross compile and linking. It was an interesting investigation into custom Docker containers for GitHub actions and the Rust tool chain setting up this GitHub Action package.