A quick vim cheatsheet for those of us who enjoy using vim, but don’t use it often enough to have the command sequences committed to memory.
Starting with the simplest operations, and then moving on to a few more complex and difficult to remember ones.
Remember that you always start in normal/visual mode. To enter insert mode to start entering text, you can use i or I.
Quit without saving: :q!
Quit and write changes: :wq
Enter insert mode at beginning or end of current line: I
Enter insert mode at the current position of the cursor: i
Escape current mode: Esc
Search forward for text pattern: /text
Search backward for text pattern: ?text
Go to bottom of page: G
Go to top of page: gg
Copy/paste style vim operations:
Copy and line (yank): yy
Paste a ‘yanked’ line: p (after) or P (before) cursor.
Delete character before cursor: X and after cursor: x
Delete current line: dd
Delete current line and start insert mode: cc
Deleting
Delete all lines in file: ddgD
Sorting
Sort all lines (no range): :sort
Sort all lines (no range, reversed): :sort!
Add options to the sort command:
i – ignore case
n – sort based on the first decimal on the line
f – sort based on the first float on the line
Some useful, yet more arcane vim operations:
Clear all lines in a file (1 is the first line, $ is the last line, and d is delete): :1,$d
Insert the result of Vimscript expressions into your file:
Enter Vim’s command line: Enter INSERT mode, and type CTRL + R =
Type a Vimscript expression, for example system("ls") and press ENTER
The output of the command ls will be inserted into the buffer.
Example of the above vimscript expression register result insert:
This of course only scratches the surface of the surface of what can be done. It’s just a quick little vim cheatsheet that I’ll refer back to when I get a little rusty.
The advanced or more arcane commands are the useful ones that I tend to forget when I’m not using them on a daily basis. I’ll certainly be recalling this post and updating those with new ones that I find useful in the future.
This blog tends to ocassionally crossover to some of my other hobbies, and that is definitely the case for this post. I have been learning to fly. Specifically, I’m looking at getting my private pilot’s license (PPL).
Moving from England to West Wales (Pembrokeshire) toward the end of last year, we now find ourselves in a much more rural location. We’re living on the edge of a small village in Pembrokeshire, bordering some local farms.
Nearby (~10 minutes drive) is Haverfordwest Airport (IATA: HAW, ICAO: EGFE). After moving and noticing that a local company offered flight experiences as well as pilot training, the logical next step was to sign up for a flight experience. The goal was using this as the impetus and first stepping stone to pilot training.
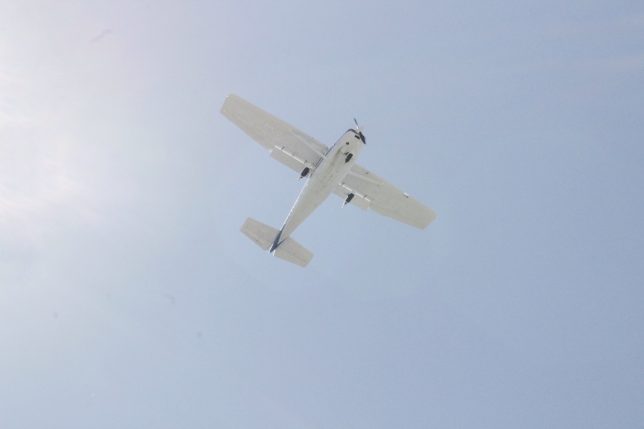
Having now accumulated 10 hours of flight experience, I find myself infatuated with flying. The freedom you feel up in the air combined with the views that Pembrokeshire offers are simply mind blowing. Just a few minutes after take-off I usually find myself flying over the coastline, with panoramic views of Newgale beach, Nolton Haven, and off in the distance Ireland sometimes makes an appearance.
I don’t have any photos from the air (can’t be taking photos when I’m learning to fly!) so this one off the coastal path will have to do.
Where the passion started
Growing up I loved anything to do with aviation. I built model aircraft (those Airfix 1:72 scale models), read aviation related magazines and dreamed of being a pilot. My bedroom ceiling was covered in fishing-line-suspended model aircraft which I had built and painted myself.
Completing school and tertiary education, I followed a path straight into a job in graphic design. I didn’t get time to entertain the idea of being a pilot. In the back of my mind becoming a pilot always felt like something unachievable to me. (At least it felt like this with a lack of money and a better Mathematics result at the end of school) I grew up with the idea that you needed great mathematics to become a pilot.
Perhaps it was the convenience of the airport to my new location, or maybe it was the realisation with experience in life that we can all achieve (within reason) the goals which we put our minds to, or maybe it was a combination of both that led me to getting stuck in with pilot training.
My first training flight
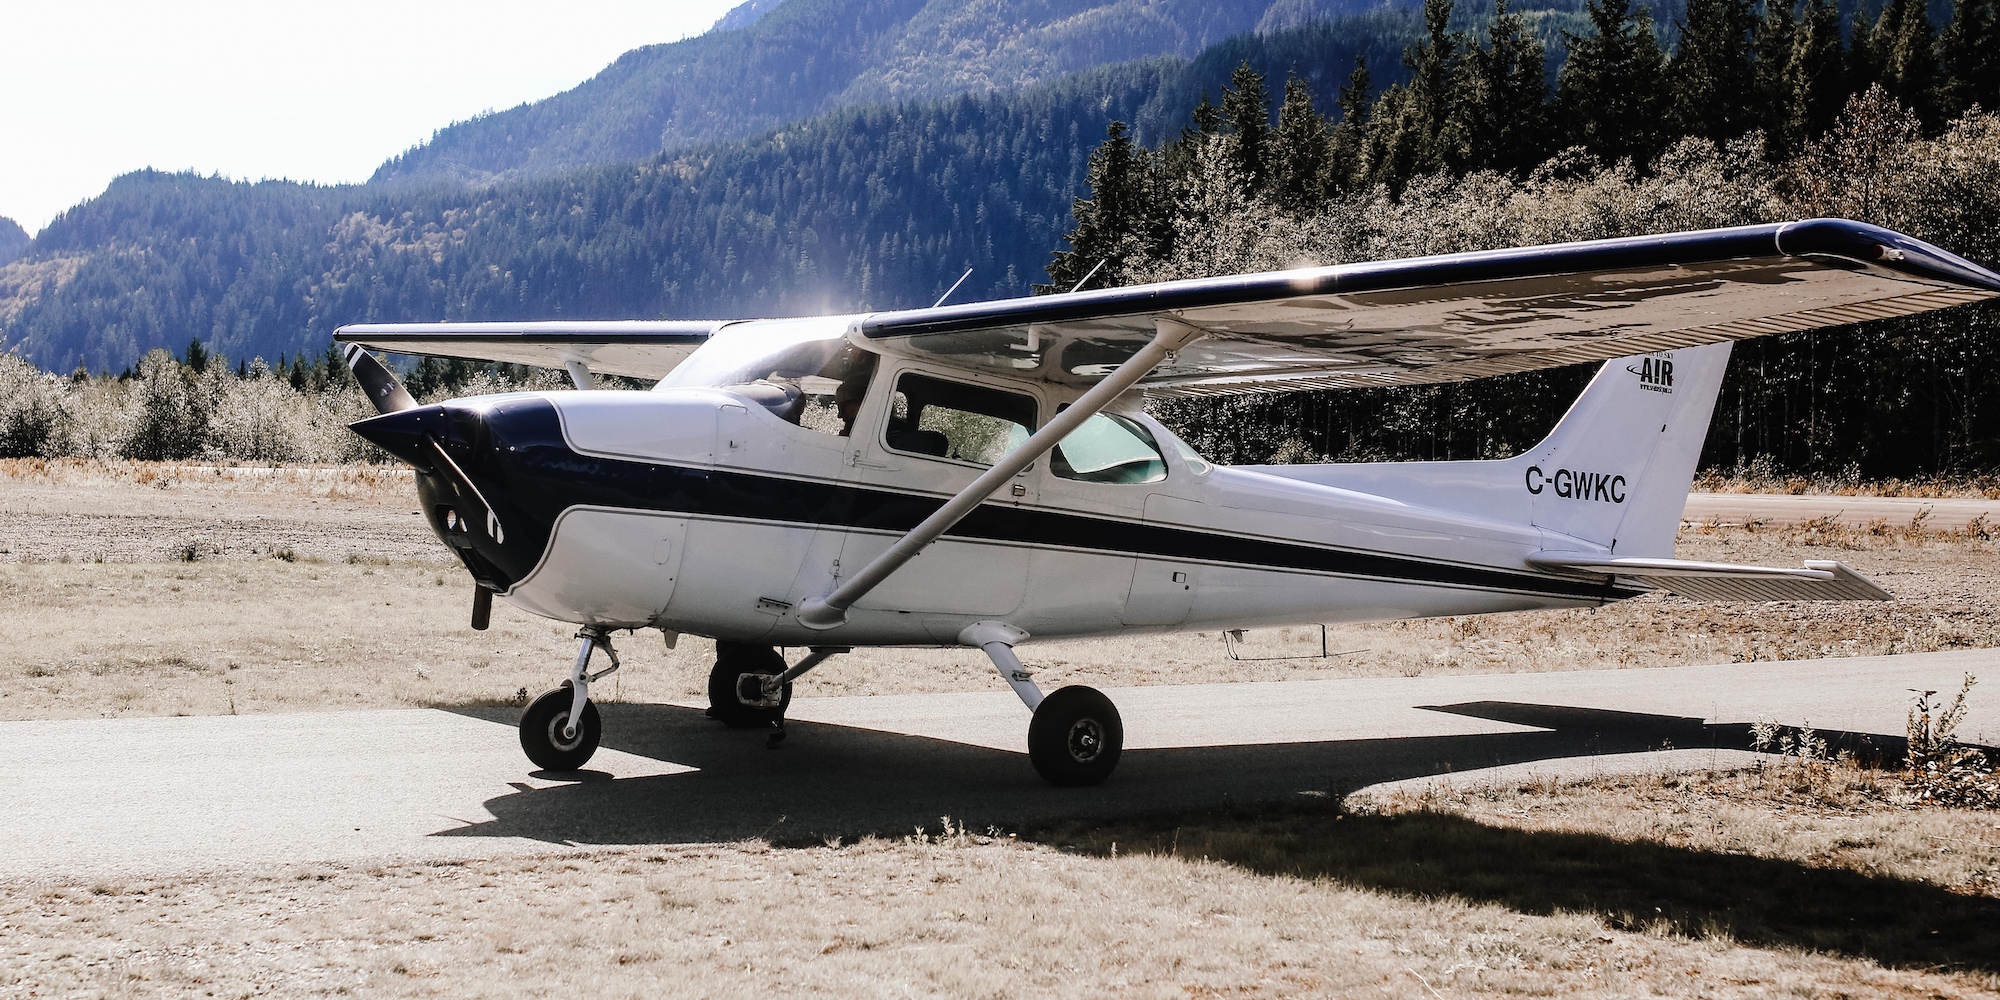
I booked a Cessna 172 for my very first training flight where I got to actually control the aircraft myself. We started out with some basic control theory and covered some of the effects of physics on the aircraft. My initial basic control theory was fine – I’ve played many flight sim games growing up, so everything in this area was logical to me. I did however learn many new things about the effects of various forces.
Physics and effects
I learned right away about some interesting physics and forces in play when you pilot an aircraft (such as a piston-driven single prop aircraft).
I never knew that a twisting helix shaped air force from the prop wash circles back around the fuselage and hits your own tail plane. This has the effect of consistently pushing your aircraft slightly to the side on the tail (countered by applying a little bit of rudder).
Another interesting force is the propeller torque effect. This is the effect of engine torque on the aircraft’s controls and movement. It is apparent in the Cessna 150 that I fly as a left turning tendency, and usually felt in all piston powered, single engine propeller driven aircraft.
I did fairly well on my first lesson and left feeling energised and ready to continue the process of learning to fly. I have since been using a 2 seater Cessna 150 instead of the original 172 I tried (4 seater). Although it has less power, it seems like the better aircraft to train in. It is cheaper to operate and makes sense over the longer term.
Learning to fly – what I’ve learned so far
After roughly 6 months of lessons I now have a about 10 hours of flight experience, and have been getting more comfortable with flying in general.
My log book is slowly accumulating the hours. My target for now is 45 hours for PPL certification.
Here are some highlights from my training and experience so far:
Take off and landing
I am now able to take off and land unaided (including a bit of a cross wind landing). I still have the captain / trainer sitting next to me of course, reminding and guiding me vocally, but I can physically take off and land the aircraft on my own which feels like a great milestone.
Landing is certainly the more involved process where tons of variables come into play. Getting the approach right seems to be key to nailing the landing.
My focus is on making the least number of adjustments and reactive changes on the final approach. This seems to dictate how good your landing ends up being.
After getting the aircraft into the correct configuration for landing, my focus tends to be on maintaining an approach speed of about 65 knots, using visual cues such as a focal point on the runway, keeping it 1/3 of the way up on my cockpit glass view, and watching it’s shape form as I make my approach.
I have found that using throttle and aircraft attitude here is key. Being too low, too soon can be corrected by increasing engine RPM in small increments, and the opposite with being too high. Watching speed and making sure it doesn’t drop too low is important too of course.
The final drop of engine speed to idle after crossing over the runway threshold is my favourite part. The aircraft still seems to be travelling quite fast as the ground whizzes by to the sides, but that is all sorted out by performing the landing flare manouever, allowing speed to drop as the aircraft gets lower and lower to the runway surface, allowing the rear landing gear to touch down first.
Landings begin and end so quickly for me. Time just seems to fly by (excuse the pun) when going through the procedure. It’s probably because there are so many different variables to consider, and concentration is at an all-time high.
Checks on the ground and in the air
From pre-flight external and internal checks of the aircraft, control surfaces, and instruments, to checks while airborne, there are numerous. Here are two that immediately come to mind:
I am still getting accustomed to all the checks and getting used to performing them at the right times. I feel that these are habits that will stick with practice.
As an example, FREDA checks are performed every 10 minutes or so. Running off the top of my head quickly:
Check fuel levels and that the fuel lever is still open as well as fuel mixture set correctly
Verify the radio is set correctly and any necessary radio calls made
Check engine vitals – set carburettor heat on to ensure the carburretor does not ice up, check engine temperatures, pressures, oil, ammeter, etc…
Then you verify your direction (correct heading and aligned with DR compass), and altitude are as expected / set to correct QNH/QFE.
These checks seem tedious, but are all important to get right and remember early on in the process of learning to fly.
By the way, I use the term “learning to fly” a lot here – however I am fully aware that I will continue to do so even after certification. There is always room for improvement, no matter what your experience.
Controlled stalls
Recently I have been doing controlled stall manouevers. This involves an initial HASELL check, with that being shortened for subsequent runs to a ‘HELL’ check. Following this I enter the aircraft into a forced stall. There are different aircraft configurations that can be used to simulate different stall scenarios.
Basically, it involves (after checks) and starting out in straight and level flight:
Set engine speed down to 1500 RPM
Pull carburettor heat out (directs engine heat to the carburettor to melt away and potential ice build up)
Gradually raise attitude, pointing the nose of the aircraft up to reduce speed
Stall warning buzzer starts sounding louder and louder as the aircraft slows to around 45 knots
Stall!
Nose drops, and potentially a wing drop too (which is bad and can result in a corkscrew tail spin down)
Immediately put carb heat back in, throttle to full power, and guide the nose attitude down with the stall. The aim here is to recover (speed and controls) and enter back into a climb to recover lost altitude.
Next steps
My next training flight will be in a week’s time (as long as the weather is good). I’ll be resuming stalling manouevers and training and then hopefully get into some circuit practice. This is the process of entering the circuit pattern. The circuit being a rectangular pattern around the airfield / airport which aircraft taking off and landing use.
Some more theory and radio work stands in the way, after which I will be ready to go out solo. I’m looking forward to continuing my journey learning to fly!
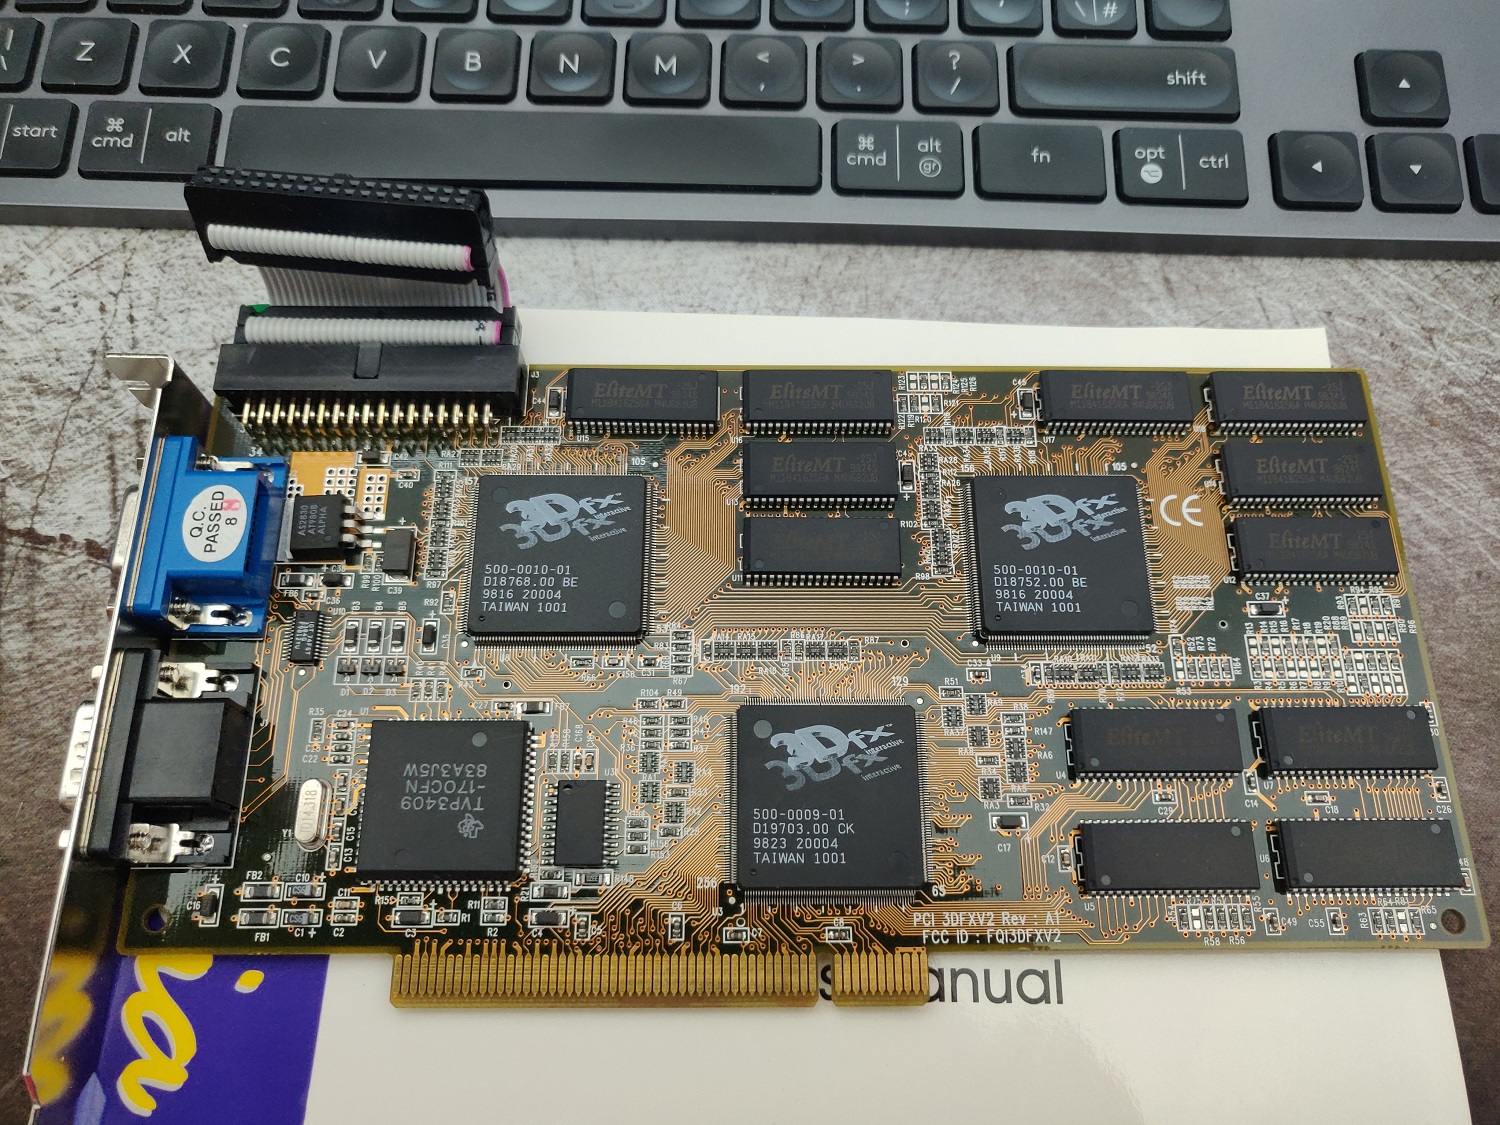
The GeForce 2 MX GPU was a big upgrade milestone for me back in the early 2000s.
I had previously run a 3dfx Voodoo 2 PCI graphics card. Soon though, it was no longer able to cope with the games I was throwing at it. With that, I saved up enough money to shell out for a GeForce 2 MX card.
The MX model was a low end card in the product’s family line, launched later on and surpassed by it’s predecessors the Geforce 2 GTS, Ultra, and Ti. The GeForce 2 generation of GPUs were based on the nvidia NV15 chip (a 180nm process).
The MX variant had two 3D pixel pipelines removed and lower memory bandwidth in order to cut costs. This meant that it was just barely affordable to me as a teenager at the time. To afford the price of my hardware upgrades in my teens I had started trading in used PC hardware, scavenging where I could to build complete systems which I then sold in the local newspaper’s classified ads. The money at the time went into purchasing a brand new GeForce 2 MX AGP graphics card for my personal system.
I still remember quite vividly getting home, installing the card, and firing up a beta version of Counter-Strike. After entering the show fps console command net_graph, my jaw just about hit the floor when I saw the fps counter stuck at 99 fps.
Upgrading the Retro System with a GeForce 2 MX
Fast forward to today and I still find myself craving the nostalgia of those years. What better way to experience it than to run the games on original hardware I used back then?
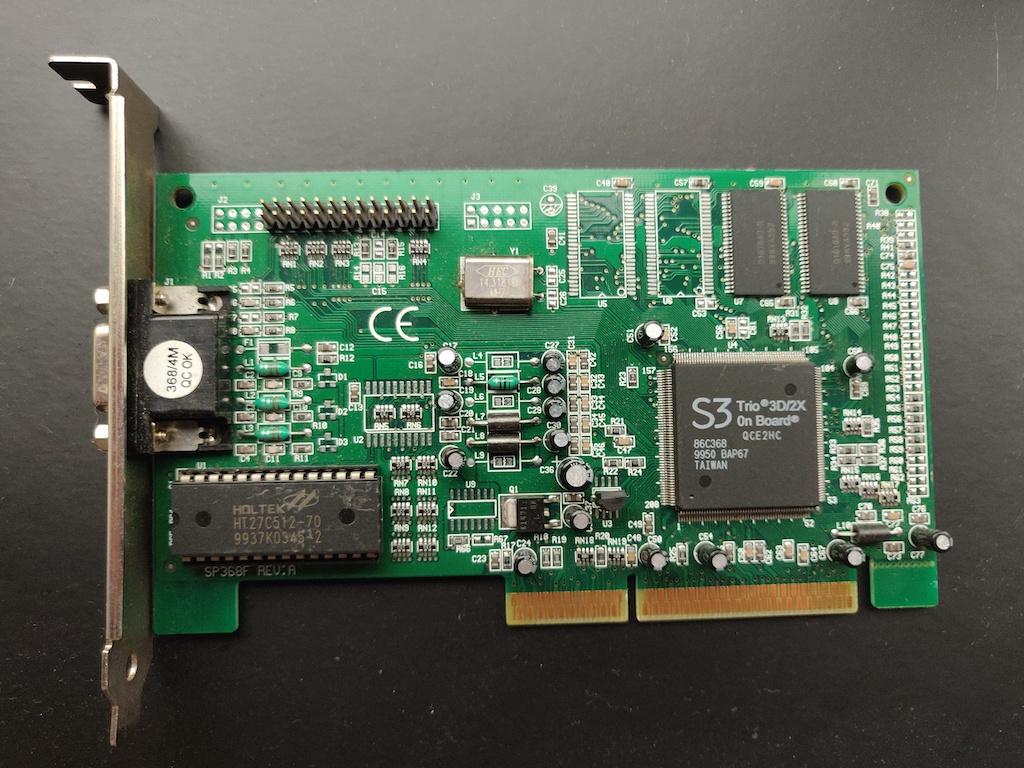
My Retro Gaming PC had a 3dfx Voodoo 2 PCI graphics card paired up with a fairly anaemic S3 Trio 3D/2X AGP card for 2D capability.
So, out with old, and in with the new:
The ‘new’ GeForce 2 MX AGP card ready to be installed
It’s interesting to note how these cards were passively cooled, especially in the case of lower end versions such as the MX. Nowadays the best GPUs are dual or triple slot monsters. They have massive heatsink and fan assemblies (or are water cooled).
The upgrade paid off for retro gaming performance. For the price of £10 on eBay I can now play games like Soldier of Fortune at 1024×768 resolution. Additionally, I can play with all settings bumped up to high. The previous Voodoo 2 card was showing it’s age in these newer games and was not very good at gaming higher than 640×480 or 800×600 at a stretch.
This system is still running Windows 98 SE, and I plan to keep it that way if possible, locking in that ‘era’ of gaming and PC hardware memories. I was lucky to find the nvidia drivers required for this graphics card specifically for Windows 98. If anyone is interested for the latest drivers compatible with Windows 98, you should look for the Forceware 80 version.
I’ve been a Spotify subscriber on and off for at least 12 years now. Things started off pretty great but there have been a number of bumps in the road where I have temporarily cancelled my subscription. These Spotify issues have again put my subscription back into a ‘cancelled’ state. The last time I cancelled (a month ago), my reasoning was two-fold. Price increases, and pushing in-app ads on me as a premium subscriber.
Spotify Issue 1
The ad I’ve been getting is a pop-up in the app trying to get me to listen to certain podcasts, or subscribe to Premium Duo. As a paying customer this is ludicrous. I don’t pay to be served up marketing and up-selling ads.
I’m not the only one getting this. It seems like a wide-spread issue. See:
These forums have numerous threads where people are having Spotify issues like this. The responses from Spotify are mostly always weak, miss the point, or simply suggest raising an ‘idea’.
Spotify Issue 2
The Spotify desktop client is a bit rubbish. It uses Electron / chromium and suffers in terms of performance and the amount of memory it consumes as a result. For those unaware, Electron is essentially a web browser (mostly the engine) used to write cross-platform desktop applications with JavaScript, HTML, CSS, etc… They used to have a much better native client. I’m not sure what happened with the move to electron, but it has resulted in a significantly worse user experience in my opinion.
Here’s a recommendation for anyone who hates the current Spotify Desktop client and it’s massive memory usage (and sluggish performance). Get Psst. You’ll need to have a Spotify Premium account, but this desktop app is far superior if you just want a clean, basic music listening experience.
Psst is written in Rust. It’s lean and performant. You can get a release from the Psst GitHub Releases page, or you can download the source and compile it yourself with Rust. Here’s how I did that (make sure you have the rust tool chain / cargo installed):
Sign in using your Spotify Premium account credentials and you’ll have a clean, native running app where you can listen to your music and playlists without the bad parts of the official Spotify desktop client.
Spotify Issue 3
As with many Software-as-a-Service (SaaS) apps, you don’t own the music you listen to on Spotify. You simply subscribe and get access to the music. As soon as you cancel your subscription, that’s it, no more music, unless you hobble along with a free plan that throws even more advertising your way.
I have slowly been moving my essential services I have previously used in the ‘cloud’ back to my own self-hosted infrastructure. I’m now considering using this approach for my music too. It seems like a better idea to outright purchase any new music from a service like Bandcamp, and then self-host a streaming platform myself. Something like navidrome.
To quote the GitHub page:
Navidrome is an open source web-based music collection server and streamer. It gives you freedom to listen to your music collection from any browser or mobile device. It’s like your personal Spotify!
https://github.com/navidrome/navidrome
Closing thoughts
The Spotify experience has been getting progressively worse, whilst it’s subscription fees have been getting progressively higher. Further Spotify issues have lead to me cancelling my subscription once again.
I will be trying out Navidrome to self-host my own personal music, augmented with music purchased from bandcamp and other indie platforms (or direct from artists).
A while ago I posted my home storage server build which at the time was setup to run FreeNAS. Things have moved on in that space and FreeNAS has been replaced with TrueNAS Core. I thought I would post my FreeNAS to TrueNAS upgrade experience.
First off the recommendation is to ensure you’re on the latest FreeNAS version (the last official release, which was FreeNAS 11.3-U5). I had already been running this version for a while so I was set there.
FreeNAS to TrueNAS Upgrade Process
I started off by creating a full, manual backup of all my storage pools to an external disk. I verified a bunch of files in various locations on the backup disk to be extra sure they looked good.
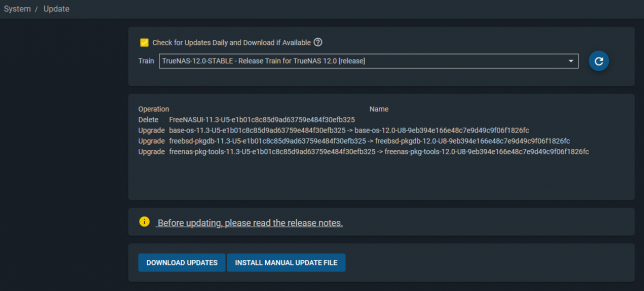
Next was to switch release trains to TrueNAS-12.0-STABLE. At the time of posting, the current release is TrueNAS-12.0-U8.
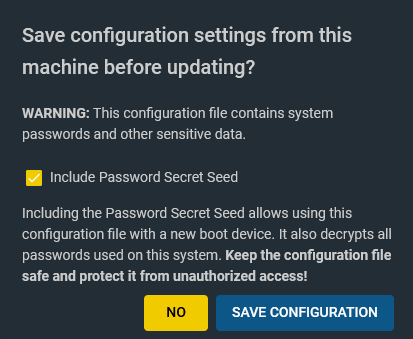
Clicking Download Updates started the download and upgrade process. Before starting you’re offered the chance to download your configuration backup. Definitely do this. It contains all your configuration as well as an optional password secret seed. This is important if you need to re-install the OS or change to a new boot device.
Once the upgrade completes the UI should reconnect after reboot, showing off the shiny new dashboard.
Updating ZFS Feature Flags
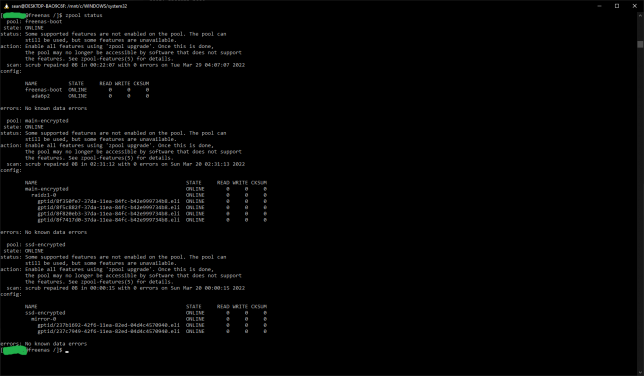
After verifying I could still access my SMB shares and that my NFS provisioner for my Kubernetes cluster was still working as expected I decided to lock in TrueNAS 12.0 by updating my ZFS pool feature flags across all zpools.
In a shell, I ran zpool status to take a look. Each pool is listed and should shows that some new features are not yet enabled. By leaving them as is, you retain the ability to roll back to your old FreeNAS version. Updating them locks you into the ZFS version that they were introduced with.
Updating to use the latest feature flags is something you should personally decide on. Do you need the newer feature flags?
According to this post, TrueNAS 12.0supports the Feature Flags listed below. (Bold are read-only backwards compatible, and italicized flags are very easy to return to the enabled state):
Allocation Classes
Bookmarks v2
Bookmark written
Sequential Rebuilds [device_rebuild]
Encryption
Large dnodes
Livelist
Log Spacemap
Project Quota
Redacted datasets
Redaction bookmarks
Resilver defer
Userobj accounting
zstd compression
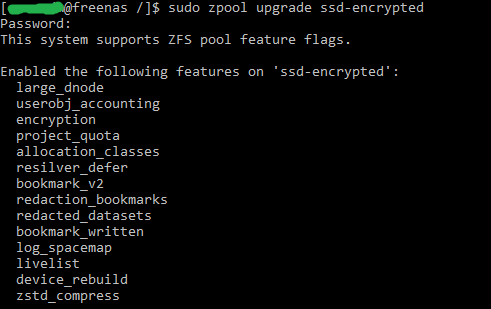
Updating ZFS feature flags is then as simple as running the zpool upgrade command.
E.g. sudo zpool upgrade my-pool
The last step is to upgrade any jails you might be running. Use the iocage upgrade command to get going with.