Editing a webapp or site’s HTTP headers with Lambda@Edge and CloudFront

dark clouds in the sky

Putting CloudFront in front of a static website that is hosted in an S3 bucket is an excellent way of serving up your content and ensuring it is geographically performant no matter where your users are by leveraging caching and CloudFront’s geographically placed edge locations. You can go one step further and customise your HTTP headers with Lambda@Edge and CloudFront.

The basic Cloudfront and S3 origin setup goes a little something like this:

  • Place your static site files in an S3 bucket that is set up for static web hosting
  • Create a CloudFront distribution that uses the S3 bucket content as the origin
  • Add a cache behaviour to the distribution

This is an excellent way of hosting a website or webapp that can be delivered anywhere in the world with ultra low latency, and you don’t even have to worry about running your own webserver to host the content. Your content simply sits in an S3 bucket and is delivered by CloudFront (and can be cached too).

Modifying HTTP headers with Lambda@Edge and CloudFront

But what happens if you want to get a little more technical and serve up custom responses for any HTTP requests for your website content? Traditionally you’d need a custom webserver that you could use to modify the HTTP request/response lifecycle (such as Varnish / Nginx).

That was the case until Lambda@Edge was announced.

I was inspired to play around with Lambda@Edge after reading Julia Evan’s blog post about Cloudflare Workers, where she set up something similar to add a missing Content-Type header to responses from her blog’s underlying web host. I wanted to see how easy it was to handle in an AWS setup with S3 hosted content and CloudFront.

So here is a quick guide on how to modify your site / webapp’s HTTP responses when you have CloudFront sitting in front of it.

Note: you can run Lambda@Edge functions on all these CloudFront events (not just the one mentioned above):

  • After CloudFront receives a request from a viewer (viewer request)
  • Before CloudFront forwards the request to the origin (origin request)
  • After CloudFront receives the response from the origin (origin response)
  • Before CloudFront forwards the response to the viewer (viewer response)
  • You can return a custom response from Lambda@Edge without even sending a request to the CloudFront origin at all.

Of course the only ones that are guaranteed to always run are the Viewer type events. This is because origin request and origin response events only happen when the requested object is not already cached in an edge location. In this case CloudFront forwards a request to the origin and will receive a response back from the origin (hopefully!), and these events you can indeed act upon.

How to edit HTTP responses with Lambda@Edge

Create a new Lambda function and make sure it is placed in the us-east-1 region. (There is a requirement here by AWS that the function must be created in the US East / N. Virginia Region). When you create the function, it is deployed to all regions across the world with their own replication version of the Lambda@Edge function.

Fun fact: your CloudWatch logs for Lambda@Edge will appear in the relevant region where your content is requested from – i.e. based on the region the edge location exists in that ends up serving up your content.

You’ll need to create a new IAM Role for the function to leverage, so use the Lambda@Edge role template.

Select Node 6.10 runtime for the function. In the code editor, setup the following Node.js handler function which will do the actual header manipulation work:

exports.handler = (event, context, callback) => {
    const response = event.Records[0].cf.response;
    const headers = response.headers;
    
    headers['x-sean-example'] = [{key: 'X-Sean-Example', value: 'Lambda @ Edge was here!'}];
    
    callback(null, response);
};
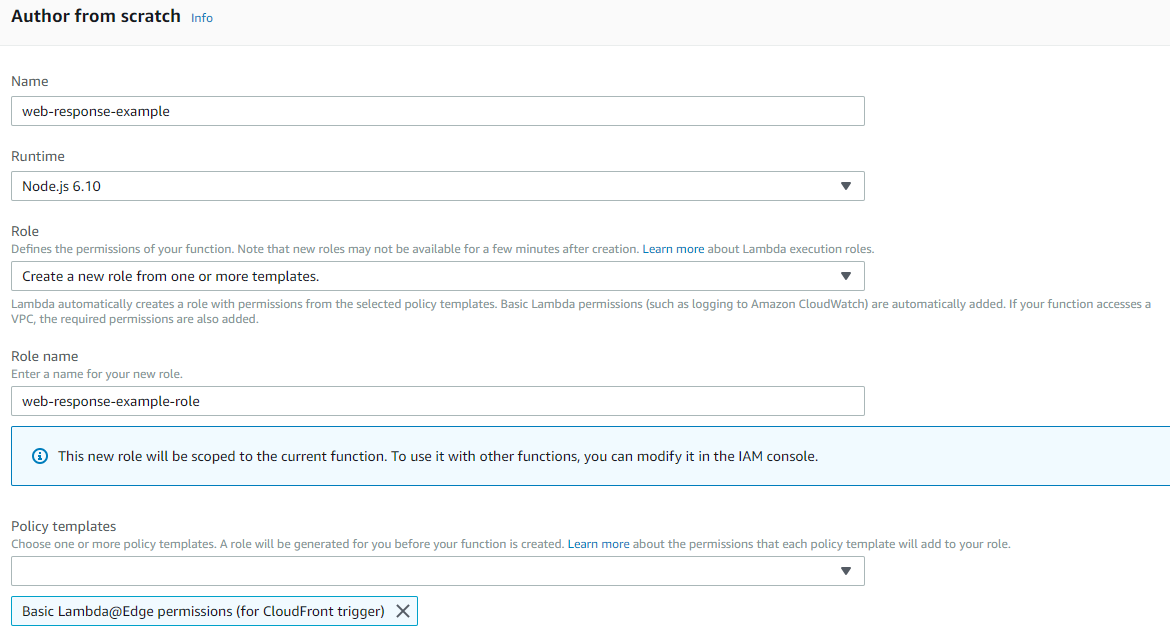
basic lambda function configuration

The function will receive an event for every request passing through. In that event you simply retrieve the CloudFront response event.Records[0].cf.response and set your required header(s) by referencing the key by header name and setting the value.

Make sure you publish a version of the Lambda function, as you’ll need to attach it to your CloudFront behavior by ARN that includes the version number. (You can’t use $LATEST, so make sure you use a numerical version number that you have published).

Now if you make a new request to your content, you should see the new header being added by Lambda@Edge!
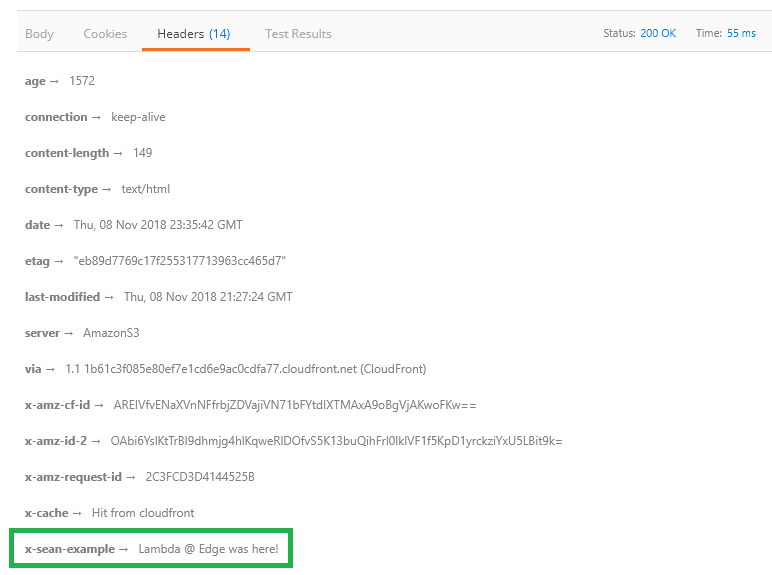
HTTP header view showing modified header and value.

Lambda@Edge is a great way to easily modify CloudFront Distribution related events in the HTTP lifecycle. You can keep response times super low as the Lambda functions are executed at the edge location closest to your users. It also helps you to keep your infrastructure as simple as possible by avoiding the use of complicated / custom web servers that would otherwise just add unecessary operational overhead.

Simple Content Delivery Network (CDN) using Amazon AWS (S3 + CloudFront)


Content Delivery Networks

Having a content delivery network has many benefits for your users or clients. One of the most obvious reasons of having a CDN, is the ability to serve up content to your users from multiple (often the most optimal) locations.  Users access files that originate from one original source location, but the content is delivered by the closest location(s), often with the lowest latency and highest possible speed.

Using Amazon CloudFront, you can share dynamic, static, or even streamed content to users (including full websites), using Amazon’s global network of edge locations. This means that content can be served to users at the highest possible speeds, with the lowest possible latencies. In this blog post, I will cover the steps you need to take to deploy a basic CDN using Amazon AWS. For this purpose, we will leverage a combination of Amazon S3 + CloudFront.


Setting up Amazon S3

Amazon S3 (Amazon Simple Storage Service) is essentially Amazon’s “storage for the Internet”, and as explained above, CloudFront is a content delivery network service. As such, both products sit in Amazon’s “Storage & Content Delivery” stack.


  • To get started you will of course need an Amazon AWS account. Go to http://aws.amazon.com/ and register. You will need to provide credit card details, but most products have some sort of free tier that you can utilise for initial testing (usually free for up to 1 year, based on certain utilisation thresholds).
  • Once you are all signed up, you’ll need to navigate to the AWS Web Console. This is the central location you can use to manage all AWS services (among other options such as the AWS SDK and Command Line).
aws-console-example
The central, AWS Web Management Console
  • To start, we’ll need to define an origin location for our content. This is the location our original files are kept. For this purpose, we will use Amazon S3. It allows us easy access to files that we place in something Amazon call a “bucket”. I like to think of it as a folder, or container. You can have as many buckets as you wish, however each one’s name needs to be completely unique across Amazon S3. Click on “S3” under the “Storage & Content Delivery” heading of your AWS Console to get started.
  • From here, you will be greeted with a welcome page and some explanation of what S3 is. Simply click “Create Bucket” to get going.

create-bucket


  • Provide a unique bucket name, and specify a region to use. Regions have the benefit of allowing organisations to comply with storage regulation rules – for example, if you were storing client data that you were bound legally to keep within the UK, you would specify the Ireland region.

new-bucket


  • Your new bucket will appear in the S3 Management Console after being created. Simply click the name of the bucket to open it. For our simple CDN, we’ll just be serving up one single file – pretend this was a really large file that needed efficient distribution to many people – for example a large media file. At the top left, you’ll see an “Upload” button. Click this, and choose a file to upload as your test file. I will be using a simple image file. (By the way, Amazon have a service called “Amazon Import/Export”, which allows you to send really large amounts of data via post on portable media to Amazon for them to upload directly to your Amazon S3 or Glacier services).
  • Click “Start Upload” once you have chosen a file to test with.
  • After the file is finished uploading, it will appear in the console under your bucket name. (I called mine “image-for-distribution.png”).

example-file-in-bucket


  • Right-click the file, and choose the option “Make Public” for this test. This choice would be affected by the nature of the files you would want to deliver to users in your own configuration, but for this simple example, this is what I am choosing.
  • Right-click the file again, and choose “Properties“. Here you can get the direct, public link to your file and test access to it in your web browser. This is simple, direct access, and is not the access we are aiming for, as we will utilise our CDN with CloudFront to serve the file in our final configuration. This is just to test that the direct link is working.

aws-file-properties


Setting up CloudFront and your Distribution

  • Now that we know our basic file is being correctly served from Amazon S3, we’ll navigate to “CloudFront” from the main AWS Console (aws.amazon.com). A quick way to get there is by clicking the orange cube icon in the top left of your AWS page – wherever you are in the console, it’ll take you back to the main AWS console. From there just click “CloudFront“.
  • In CloudFront, we’ll want to create something called a “Distribution“. Click the “Create Distribution” button to get started.

create-distribution


  • Make sure you select “Download” type for the “delivery method” when asked on the next page, then click “Continue“.

cloudfront-delivery-method


  • We’ll now select various options for our CloudFront Distribution.
    • For “Origin Domain Name“, click the text box and you’ll see a populated list of Amazon S3 buckets. Your bucket you created earlier should feature here. Click it to select it.
    • The “Origin ID” should auto populate based on your S3 bucket name you chose.
    • If you wish to restrict users to only access your content via CloudFront URLs, and not direct by S3 URLs, then choose “Yes” for “Restrict Bucket Access“.
    • If you chose “Yes” for restricting bucket access, you’ll also need to create a “Comment” and “Grant Read Permissions” on the bucket for CloudFront’s access to the S3 bucket. Click “Yes, Update Bucket Policy” to have CloudFront get read access automatically to the S3 bucket.
    • Select “HTTP and HTTPS” for “Viewer Protocol Policy“.
    • You can customise the object caching properties if you wish, but for this example, just leave the “Default Cache Behavior Settings” on their defaults.
    • Now you can set your “Distribution Settings“. Choose “Use All Edge Locations (Best Performance)” for “Price Class“. This will ensure that all edge locations around the world are used to distribute your content in the fastest, most efficient way to your users. You could also restrict this to other groups of regions e.g. only the US and Europe for example – this would be a cheaper option, but not as efficient for all users globally.
    • Next, we can add an alternate CNAME for the distribution. This is highly recommended so that you can provide your own domain name formatted URLs to users, instead of a long, ugly default Amazon CloudFront URL. Enter something now, (for example I will use cdn.shogan.co.uk as I own the domain and can create this CNAME record myself in DNS). Once you are complete with this distribution setup, you should get the Distribution URL, and point a new CNAME record to the full URL that CloudFront assigns to your distribution.
    • Leave all other options at their defaults for now, and make sure that the last option “Distribution State” is “Enabled“, then click the “Create Distribution” button at the very bottom.

example-distribution-settings1 example-distribution-settings2

  • Your Distribution should now be created. Use the Navigation menu on the left side of the screen and click “Distribution” to see a list of your CloudFront Distributions.

cloudfront-distributions


  • At first the “Status” will show “InProgress“. After a few minutes this should change to “Deployed“.
  • In the mean time, look for your “Domain Name” that this Distribution has been assigned, and go and create a CNAME record pointing the CNAME you specified when creating this distribution, to the domain name. For example, you may have something like dxxxxxxxxxm.cloudfront.net. In my case, I specified a CNAME of cdn.shogan.co.uk, so I will create a CNAME record linking these together.


Testing

Once your CNAME record is created, type in your new CNAME record, followed by a forward slash, and then the name of the file you originally uploaded to your S3 bucket that is linked to by this CloudFront distribution. For example, my file was called “file-for-distribution.png” and my CNAME record I made is cdn.shogan.co.uk. So to utilise my CloudFront CDN, I would simply access the file as “cdn.shogan.co.uk/image-for-distribution.png”. If your DNS takes a while to apply/propagate, then you can simply use the CloudFront domain name assigned to your Distribution (for example dxxxxxxxxxxm.cloudfront.net/yourfilename.extension) to test out your distribution. Remember to ensure your distribution is in a deployed state before testing. You should now see your file served up in your web browser via your brand spanking new Amazon AWS powered CDN!


Conclusion

That concludes the basic setup of a Amazon S3 + CloudFront powered Content Delivery Network. I hope this was useful for some. In forthcoming blog posts I will delve into setting up custom logging and monitoring / alerting for your CDN. Please remember to like/share/tweet this post out to friends if you thought it was useful.