To check that your VMs have loaded and are running the VMware Memory Balloon driver in the guest OS, you can use esxtop.
Connect to your ESXi host using vMA, the DCUI or PuTTy (needs SSH service running) and run esxtop.
Switch to the Memory page (press M)
Press F to add a field
Press J to add the field “MCTL = MEM Ctl (MB)”
Press space to return to the main memory view page of esxtop.
In the new MCTL? column, look at the list of VMs – a “Y” means that the driver is loaded and running whereas a “N” means that the balloon driver is not present.
This can be useful to double check things if you run into a problem troubleshooting memory ballooning issues as I have seen cases where VMware Tools reports as “OK” for the VM but the balloon driver is not running when viewed in esxtop.
Trying to apply a Host profile created from another Host in a cluster today I got an error message which resulted in only some of the host profile actually being applied.
A specifed parameter was not correct. changedValue.key
Error message received after trying to apply profile to Host
I thought that the error message looked familiar, but couldn’t quite remember at the time, so I left what I was doing to take a look at again later. On my way home this evening I had a bit of a brainwave – the ESX host I had taken the original profile from was a slightly different update level (2) as opposed to the update level of the newer host I was applying the profile to. I also remembered where I had seen the text “changedValue.key” in the error message before – changing Advanced Settings on a Host using PowerCLI! This gave me a good idea as to where to look for the issue I was having with this Host Profile – the Advanced Settings in the Host Profile.
I knew it was probably to do with a value that was different between hosts because of their differing update levels, but to gather more information I decided to hit the log files to find out more… Opening up /var/log/vmware/hostd.log on the Host and navigating down to the time I tried to apply the Host Profile I found this (interesting bit in the screenshot below, full log text in the section after that):
Interesting bits of information that help point to the issue in hostd.log
[2012-02-20 19:50:07.849 F66966D0 info 'TaskManager'] Task Created : haTask-ha-host-vim.option.OptionManager.updateValues-896
[2012-02-20 19:50:07.853 F66966D0 verbose 'VersionOptionProvider'] Attempt to set readonly option
[2012-02-20 19:50:07.853 F66966D0 info 'App'] AdapterServer caught exception: vmodl.fault.InvalidArgument
[2012-02-20 19:50:07.853 F66966D0 info 'TaskManager'] Task Completed : haTask-ha-host-vim.option.OptionManager.updateValues-896 Status error
[2012-02-20 19:50:07.853 F66966D0 info 'Vmomi'] Activation [N5Vmomi10ActivationE:0x5cf27a98] : Invoke done [updateValues] on [vim.option.OptionManager:ha-adv-options]
[2012-02-20 19:50:07.853 F66966D0 verbose 'Vmomi'] Arg changedValue:
(vim.option.OptionValue) [
   (vim.option.OptionValue) {
      dynamicType = <unset>,
      key = "Misc.HostAgentUpdateLevel",
      value = "2",
   },
   (vim.option.OptionValue) {
      dynamicType = <unset>,
      key = "Misc.HostAgentUpdateLevel",
      value = "2",
   }
]
[2012-02-20 19:50:07.853 F66966D0 info 'Vmomi'] Throw vmodl.fault.InvalidArgument
[2012-02-20 19:50:07.853 F66966D0 info 'Vmomi'] Result:
(vmodl.fault.InvalidArgument) {
   dynamicType = <unset>,
   faultCause = (vmodl.MethodFault) null,
   invalidProperty = "changedValue.key",
   msg = "",
}
[root@hostnamehere vmware]#
The cause:
So we can see that the Host Profile did a “change value” (changedValue) on the key “Misc.HostAgentUpdateLevel” and this is where our error was thrown with an “invalidProperty” (changedValue.key). If we google the message “vmodl.fault.InvalidArgument” we’ll arrive at the VMware SDK Reference Guide which states that “An InvalidArgument exception is thrown if the set of arguments passed to the function is not specified correctly.” In this case we’ll soon see that this is happening because the value that is trying to be changed is actually a read-only value for the Host – as it should be, as it just references the update level of the host – this wouldn’t normally be something you want to change.
The issue here was of course that original host off which the profile was based is update 2, whereas the new host having the profile applied is update 4. The two settings differ, therefore Host Profiles tries to change this value on the new Host. The setting is really read-only, therefore Host Profiles fails to apply the value and throws this error message at us, which also results in the rest of our host profile (annoyingly) not being applied. Ideally if Host Profiles found a read-only value that shouldn’t be changed, it would not change this value.
Solution:
So the simple solution is to either:
Take a Host Profile from a Host with the settings you need which is on the same update level as the Hosts you will be applying this profile to.
Modify this Host Profile (edit) and remove the Advanced Setting for “Misc.HostAgentUpdateLevel“.
In my case, I was testing the host profile on a clean ESX Host before using it for other Hosts – that meant I also only had one new ESX host of this particular update level and therefore couldn’t use the first option (take the profile from an existing host). So I therefore just went to Home -> Host Profiles and edited this Host Profile to get rid of the unnecessary key called “Misc.HostAgentUpdateLevel” like so:
Remove the two entries for "Misc.HostAgentUpdateLevel" from the Host Profile
After removing the entries referring to this read-only key, I simply re-applied the profile and this time around all the settings went on as expected and there was no more error message. So to sum it all up, check that you aren’t first of all taking a Host Profile from a reference host of a different update level as your target hosts (and if you have to you can then resort to manually editing your profile as I did). If you get cryptic errors applying your Host Profiles, check your Host log files for more info and clues as to where the issue may lie.
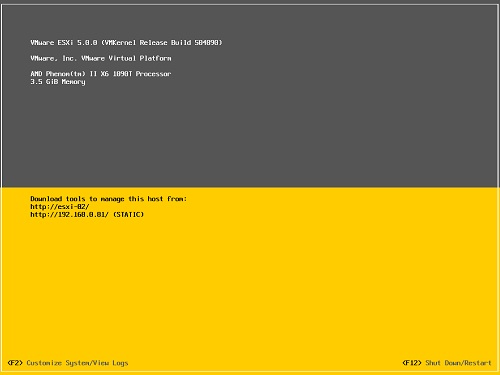
Messing around with ESXCLI the other day I came across the commands to get / set the welcome message for your ESXi host. By default you are greeted with the following familiar splash screen for your ESXi hosts:
Standard DCUI Splash Screen / Welcome Message
Well, with esxcli, it turns out you can very easily change this to your own custom welcome message / splash screen. I personally don’t see any practical gains by doing this, but just thought I would show the command to set it. Using esxcli, enter the following (of course the bit between quotes is up to you):
esxcli system welcomemsg set -m="My Custom Welcome Screen. Press F2 to Customize System/View Logs or F12 to Shutdown/Restart."
To see what the current custom message is set to simply use the same command, but this time use “get” –
esxcli system welcomemsg get
Finally, to set it back to the default (No welcome message), simply set your welcome message to nothing –
esxcli system welcomemsg set -m=
Here is an example of a custom welcome message for an ESXi host in my lab I tested this with:
Today I was creating an upgrade baseline for some old ESX 4.x hosts to be patched up to a newer update level. I ran into an error whilst uploading an ESX ISO with the new update version and subsequently found myself troubleshooting the issue. I thought I would do a quick post on general things to check when troubleshooting VMware Update Manager.
First of all check you are of course uploading the correct file / ISO! Note that ESX upgrade baselines work with ISO files and ESXi deal with .zip files. Ensure you are using the correct file and build of ESX or ESXi depending on which you are planning on using.
Consult the log files! Logs are kept in different locations depending on your OS that VUM is running on.
Windows XP, 2000, and 2003 – C:\Documents and Settings\All Users\Application Data\VMware\VMware Update Manager\Logs
Windows Server 2008 and above – C:\ProgramData\VMware\VMware Update Manager\Logs\
ESX update manager logs are kept in – /var/log/vmware/esxupdate.log
use cat /var/log/vmware/esxupdate.log | more to view the log file in ESX from the shell / PuTTy SSH session.
The log file in Windows should be named something similar to “vmware-vum-server-log4cpp.log”
You should be able to locate an issue that has occurred by noting the time the issue happened in Update Manager. Open up the relevant log file and navigate down to the time it happened in your logs. Hopefully the description / entry will point you in the right direction.
In my case today, I was trying to upload an ESX 4.0 Update 4 ISO (Complete) to create a new Upgrade Baseline for some older ESX 4.0 hosts. I got an error after uploading the ISO using the new baseline upgrade wizard. See below:
Error message after uploading ISO for Host Upgrade Baseline
Although the message above in the GUI is not very descriptive, after looking at the log files on the Update Manager server I found an entry which explained what my problem was:
The problem was that my ISO file was corrupt – the download had seemed to complete just fine when downloading from vmware.com, but there must have been an issue. A quick check of the ISO using my md5sum command line utility in Windows confirmed that the MD5 hash for this ISO file did not match the MD5 hash listed for the ISO on vmware.com (as pointed out in the log files above).
I downloaded a fresh copy of the ISO, checked the MD5 again to ensure it matched this time, and re-uploaded to create a new baseline. Everything worked as expected this time around.
This is a little bit of a fun project I have been working on in bits of spare time I find. It is all written in PowerCLI 5.0 / 5.1 / PowerShell and the GUI was laid out using Primal Forms Community Edition.
Updates (17-02-2013) – version 1.3:
Hosts are retrieved using a new method (for both backup and restore options)
Updates (29-12-2012) – version 1.2:
Added ESX/ESXi host validation into utility – will now test that the host is valid and either connected or in maintenance mode before attempting backup or restore (See the script’s new “Check-VMHost” function for those interested)
Minor UI improvements
Updates (29-10-2012) – version 1.1:
This utility has been tested on ESXi 5.1 Hosts and confirmed to be able to successfully create a backup archive file of these.
Be sure your DNS is working correctly on the system you run the Backup utility on – it relies on DNS to find your ESXi hosts as they are named in the dropdown when you select the host to backup. (See comments for troubleshooting)
Restore to new hardware (force restore) option added
Fixed labels and connection box label description
What it is essentially, is a GUI that allows you to Backup ESXi 5.0 or ESXi 5.1 hosts to a destination of your choice on a local drive. It also allows you to restore ESXi Host configuration bundle backups taken, to other Hosts. I had other plans to integrate cloud storage options in (Amazon S3) as a backup target, but I thought that this doesn’t really offer anything valuable and I would just keep it relatively simple for now – therefore I have disabled this functionality. The PowerCLI script is fairly long – and I know there are plenty improvements I could make to better it and shorten the code, but for now it does the job. I have added various catches for exceptions / errors so you should get visual feedback if you have entered an invalid path, or username for example.
Anyway, hopefully this proves useful to some! As always, take care using the backup / restore functionality of this utility. The restore functionality works by first putting the ESXi host into Maintenance mode (if it isn’t already in this mode) and then applying a backup bundle to the host (Restore). The Host will reboot immediately following this. The Backup and Restore is implemented using Get-VMHostFirmware and Set-VMHostFirmware cmdlets so you can read the help descriptions for an idea on how exactly these work. The Host Backup Bundles are stored in a path of your choice and when restoring from a path the cmdlet works by looking for a bundle filename that matches the name of your ESXi host selected to restore to. Note that the file browser module I have implemented here (used to select paths) is a modification of the work done by Ravikanth Chaganti on his PowerShell Help Browser GUI. I simply adapted his code to list the contents of local drives in a tree view instead of PowerShell Help cmdlets. The only limitation here is that I have not implemented code to browse further than one level into the root of each drive. If you can provide this modification yourself, please feel free to contribute in the comments! I have just not spent the extra time to do this myself yet.
Here are a couple of quick screenshots of the Utility / GUI: