Using Node.js Streams to Create a Toy Version of jq

To play around with Node.js streams, I made a simple ‘toy’ version of jq, a handy command line JSON processor.

To be clear, the real jq utility is very lightweight and has a ton of functionality. In this post I’ll be mimicking some of it’s functionality and using Node.js to do so.

This will of course result in a bloated tool with way more bundled in than what we actually need.

That being said, it’ll be a useful exercise to go through to learn a little bit about Node.js streams.

In the github repository, you’ll see how easy it is to hack together a very simple command-line tool to process data streamed in from stdin.

node.js stream transform example with PowerShell pipeline processing.
JSON going in to the tool, being filtered, and then converted to an object in PowerShell through the pipeline.

Node.js Streams

The stream documentation describes them as as:

A stream is an abstract interface for working with streaming data in Node.js. The stream module provides an API for implementing the stream interface.

For this example I’ll be jumping straight into the Transform Streamstream.Transform. This is a duplex stream, where the input would usually be related to the output in some way.

Transforming Input from stdin

The basic use of a Transform stream in Node.js (to process input from stdin) looks like this:

const {Transform} = require('stream')
const TransformStream = new Transform;
TransformStream._transform = (chunk, encoding, callback) => {
    // do something with the chunk
    console.log(chunk.toString().toUpperCase());
    callback();
}

process.stdin.pipe(TransformStream);

Toy jq Utility With Transform Streams

I created a ‘toy’ version of jq using a Node.js Transform stream. It’s a very quickly hacked together example, so don’t expect it to do everything that jq can do. I’m also fully aware that the real jq utility is a very lightweight tool and that doing this in the Node.js runtime adds a lot of unecessary bloat!

This is purely for demonstration purposes.

Packaging up the Node.js app with pkg, we get a platform specific binary called toyjq.

Examples

Using node.js streams - toyjs usage examples

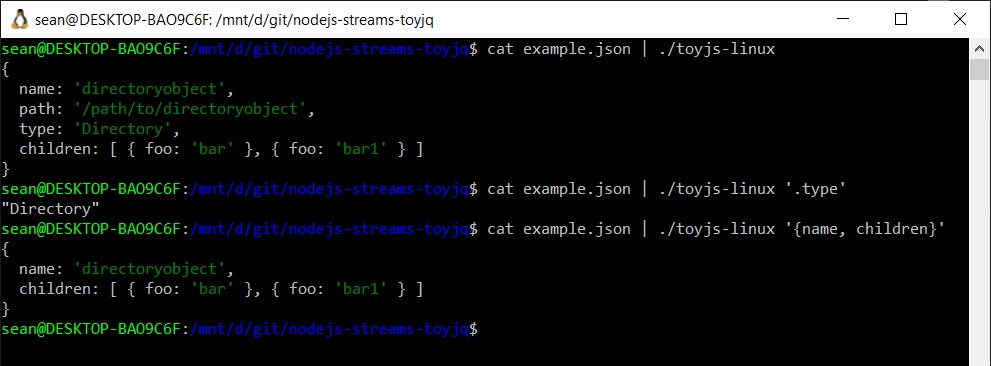
Pretty print input JSON

cat ./example.json | toyjq-linux

{
  name: 'directoryobject',
  path: '/path/to/directoryobject',
  type: 'Directory',
  children: [ { foo: 'bar' }, { foo: 'bar1' } ]
}

Output the `type` field only from input JSON:

cat ./example.json | toyjq-linux

cat ./example.json | toyjq-linux '.type'

"Directory"

Output just the `name` and `children` fields in the input JSON:

cat ./example.json | toyjq-linux '{name, children}'

{
  name: 'directoryobject',
  children: [ { foo: 'bar' }, { foo: 'bar1' } ]
}

Assuming now the Windows platform version of toyjq, and using a PowerShell cmdlet for this example…

Select the children array, convert it to an object in PowerShell and then select the last item in that object array:

(cat .\example.json | .\toyjq-win.exe '.children' | ConvertFrom-Json).foo | Select -Last 1

bar1

The above examples show how you can easily process data from one input pipeline (stdin in this case) and send it along through the pipeline using Node.js streams.

You can find the example toyjq app on my GitHub repository.

Using Sinon stub to Replace External Service Calls in Tests

When writing tests for a service you’ll often find that there are other dependent services that may need to be called in some way or another. You won’t want to actually invoke the real service during test, but rather ‘stub’ out the dependent service call function. Sinon stub provides an easy and customisable way to replace these external service calls for your tests.

Practical Example: AWS SQS sendMessage Sinon Stub

Let’s say you have an AWS Lambda function that drops a message onto an SQS queue. To test this function handler, your test should invoke the handler and verify that the message was sent.

This simple case already involves an external service call – the SQS sendMessage action that will drop the message onto the queue.

Here is a simple NodeJS module that wraps the SQS sendMessage call.

// sqs.ts

import AWS = require("aws-sdk");
import { AWSError } from "aws-sdk";
import { SendMessageRequest, SendMessageResult } from "aws-sdk/clients/sqs";
import { PromiseResult } from "aws-sdk/lib/request";

const sqs = new AWS.SQS({apiVersion: '2012-11-05'});

export function sendMessage(messageBody: string, queueUrl: string) : Promise<PromiseResult<SendMessageResult, AWSError>> {

  var params = {
    QueueUrl: queueUrl,
    MessageBody: messageBody,
  } as SendMessageRequest;

  return sqs
    .sendMessage(params)
    .promise()
    .then(res => res)
    .catch((err) => { throw err; });
}

The actual Lambda Handler code that uses the sqs.ts module above looks like this:

// index.ts

import { sendMessage } from './sqs';
import { Context } from 'aws-lambda';

export const handler = async (event: any, context?: Context) => {

    try {
        const queueUrl = process.env.SQS_QUEUE_URL || "https://sqs.eu-west-2.amazonaws.com/0123456789012/test-stub-example";
        const sendMessageResult = await sendMessage(JSON.stringify({foo: "bar"}), queueUrl);
        return `Sent message with ID: ${sendMessageResult.MessageId}`;
    } catch (err) {
        console.log("Error", err);
        throw err;
    }
}

Next you’ll create a Sinon stub to ‘stub out’ the sendMessage function of this module (the actual code that the real AWS Lambda function would call).

Setup an empty test case that calls the Lambda handler function to test the result.

// handler.spec.ts

import * as chai from 'chai';
import * as sinon from "sinon";
import { assert } from "sinon";

import * as sqs from '../src/sqs';
import { handler } from '../src/index';
import sinonChai from "sinon-chai";
import { PromiseResult } from 'aws-sdk/lib/request';
import { SendMessageResult } from 'aws-sdk/clients/SQS';
import { Response } from 'aws-sdk';
import { AWSError } from 'aws-sdk';

const expect = chai.expect;
chai.use(sinonChai);

const event = {
  test: "test"
};

describe("lambda-example-sqs-handler", () => {
  describe("handler", () => {

    it("should send an sqs message and return the message ID", async () => {

      // WHEN

      process.env.SQS_QUEUE_URL = "https://sqs.eu-west-1.amazonaws.com/123456789012/test-queue";
      const result = await handler(event);
      
      // THEN

      expect(result).to.exist;
      expect(result).to.eql(`Sent message with ID: 123`);
    });
  });
});

Right now running this test will fail due to the test code trying to call the sqs.ts module’s code that in turn calls the real SQS service’s sendMessage.

Here is where Sinon stub will come in handy. You can replace this specific call that sqs.ts makes with a test stub.

In the describe handler section, add the following just before the ‘it‘ section.

const sendMessageStub = sinon.stub(sqs, "sendMessage");

let stubResponse : PromiseResult<SendMessageResult, AWSError> = {
  $response: new Response<SendMessageResult, AWSError>(),
  MD5OfMessageBody: '828bcef8763c1bc616e25a06be4b90ff',
  MessageId: '123',
};

sendMessageStub.resolves(stubResponse);

The code above calls sinon.stub() and passes in the sqs module object, as well as a string (“sendMessage” in this case) identifying the specific method in the module that should be stubbed.

An optional promise result can be passed in to resolves() to get the stub to return data for the test. In this case, we’re having it return an object that matches the real SQS sendMessage return result. Among other things, this contains a message ID which the Lambda function includes in it’s response.

Add a test to verify that the stub method call.

assert.calledOnce(sendMessageStub);

If you run the test again it should now pass. The stub replaces the real service call. Nice!

sinon stub test result

Conclusion

Replacing dependent service function calls with stubs can be helpful in many ways. For example:

  • Preventing wasteful, real service calls, which could result in unwanted test data, logs, costs, etc…
  • Faster test runs that don’t rely on network calls.
  • Exercising only the relevant code you’re interested in testing.

Sinon provides a testing framework agnostic set of tools such as test spies, stubs and mocks for JavaScript. In this case, you’ve seen how it can be leveraged to make testing interconnected AWS services a breeze with a Lambda function that calls SQS sendMessage to drop a message onto a queue.

Feel free to Download the source code for this post’s example.

Quick and Easy Local NPM Registry With Verdaccio and Docker

container storage

Sometimes it can be useful to be able to npm publish libraries or projects you’re working on to a local npm registry for use in other development projects.

This post is a quick how-to showing how you can get up and running with a private, local npm registry using Verdaccio and docker compose.

Verdaccio claims it is a zero config required NPM registry, and that is pretty much correct. You can have it up and running in under 5 minutes. Here’s how:

Local NPM Registry Quick Start

Clone verdaccio docker-examples and then change directory into the docker-examples/docker-local-storage-volume directory.

git clone https://github.com/verdaccio/docker-examples.git
cd docker-examples/docker-local-storage-volume

This particular sample docker-compose configuration gives you a locally run verdaccio instance along with persistence via local volume mount.

From here you can be up and running by simply issuing the following docker-compose command:

docker-compose up -d

However if you do want to make a few tweaks to the configuration, simply load up the conf/config.yaml file in your editor.

I wanted to change the max_body_size to a higher value to allow for larger npm packages to be published locally, so I added:

max_body_size: 500mb

If you haven’t yet started the local docker container, start it up with docker-compose up.

Usage

Now all you need to do is configure your local npm settings to use verdaccio on http://localhost:4873. This is default host and port that verdaccio is configured to listen on when running in docker locally).

Then add an npm user for local development:

npm adduser --registry http://localhost:4873

To use your new registry at a project level, you can create a .npmrc file in your local projects with the following content:

@shogan:registry=http://localhost:4873

Of course replace the scope of @shogan with the package scope of your choosing.

To publish a module / package locally:

npm publish --registry http://localhost:4873

Other Examples

There are lots more verdaccio samples and configurations that you can use in the docker-examples repository. Take a look to find these, including Kubernetes resources to deploy if you prefer running there for a local development setup.

Also refer to the verdaccio configuration page for more examples and documentation on the possible config options.

Scaling Web API 2 and back-end SQL databases in Azure

I recently created a small Web API 2 project running with a back-end SQL database (Entity Framework code first), and had it deployed to an Azure web app, along with Azure SQL.

Naturally, I started it off using the free web app and one of the cheapest possible Azure SQL tiers (S0 – 10 DTUs).

After I finished working on the API, I wanted to see what sort of performance I could get out of it, by using Azure’s various scaling options.

To test I used Loader.io. This is a really nice and easy to use load testing service by SendGrid Labs. The free edition allows me to setup various API endpoint tests and run many concurrent connections for up to 1 minute at a time.

All my tests below were done using the same GET request test. The request always returned a collection of 5 x objects from the /Animals endpoint to keep things consistent.

My initial test was against the F1 free app tier for the Web app, with the SQL database running on S0 (10 DTUs). Here are the results of sending 500 requests per second for 1 minute.

S0-10DTU-result

The API struggled to complete the full 60k requests over 1 minute, and only completed about 8k requests, with an average response time of 4638ms. Terrible, but then again we are running on very low performance, cheap tiers. I had a look at the database performance stats and noticed that the DTUs were capped out at 100% during the 1 minute load test. At this point it definitely seems to be the database performance holding things back.

Scaling the database up to the S1 tier (20 DTUs) gives a definite improvement in response times and number of requests able to be sent within one minute. If we look at the database performance stats in the portal, we can now see that the DTUs are still maxing out at 100% though.

S1-20DTU-result

20-DTUs-maxed out

At this point I decided I would increase database performance again, but throw more requests per second at the API (from 500/second up to 1000/second).

Scaling the database up to S2 (50 DTUs) and throwing more requests a second at the API, and the number of requests completed in total higher now – up by about an extra 5k. Taking a look at the DTU performance status, we can see they now maxed out at around 60%. At this point it is pretty clear that the database is no longer the bottleneck.

50-DTUs-maxed out at 60% - even with doubling the requests per second from 500 to 1000

50-DTUs-maxed out at 60%

Now I scaled the web app tier up from free, to the B1 (Basic) tier, which gives you 1 Core, 1.75GB RAM, and up to 3 x instances scaled manually. I started with just the default 1 instance and ran the 1000 req/second for 1 minute test again.

boo-test-failed-error-rate-higher-than-50% due to timeouts

The results were pretty dismal compared to the free tier now. In fact the test failed due to an error rate of greater than 50% (all caused by timeouts). It is important to remember that we have not yet scaled out from the default 1 instance though.

Scaling up to 2 x instances on the B1 tier, helped quite a bit. The test now completes, and has a much smaller timeout error rate. Many more responses were served, but the response rate was quite slow. Taking a look at the distribution of CPU time over the two instances, we can also see that the traffic is indeed being split between the two instances we’ve scaled out with.

scale-B1-basic-from-1-to-2-instances

yay-test-finished-with much smaller error rate

processor time spread over two instances during load test

Taking this one step further to 3 x instances, and re-running the test nets us the best result so far. No timeout errors, and a response time averaging around 3000ms. Much better, but still quite a high response time, and not all 60k requests are being served.

I scaled up to the B2 tier for the following run. Each instance has 2 x cores and 3.5GB RAM this time. Starting at 1 x instance and running the test on these higher specification web instances seems to now handle things a lot better.

Little to no timeout errors, with about 5000ms avg response time, but using only 1 x instance this time!

Pushing things right up to 3 x instances (2 cores and 3.5GB RAM each) nets us the best result yet. The average response time is down to 1700ms and there are no timeout errors at all. The API was able to handle 49000 requests in the 1 minute test, which is the highest number of requests it has been able to handle so far.

B2-basic-test-with-3x-instances-good-result

I scaled up to the B3 tier from here, and tried another few runs using 3 x instances (at 4 x cores and 7GB RAM each). This didn’t help things much, netting around 200ms better response time, for a much pricier tier. It therefore looks like the sweet spot for this kind of work is to scale out with medium sized instances (2 x cores each), rather than scaling up too much.

I changed the tier to S2 (2 x cores 3.5GB RAM each, but allowing up to 10 x instances scaled out) and this time, running the test gave very similar results to 3 x instances. Clearly, the instances were now no longer the bottleneck. Looking back at the database performance, I saw that the DTUs were maxing out at around 90%. It was clear that there must have been some throttling happening there now.

I changed the database DTUs to 100 using the S3 tier, and re-ran the test once more.

bingo-60k-requests

Bingo! We’re now managing to serve the test’s 1000 requests a second, and over the 1 minute test, we get all 60k requests served successfully, and have a reasonable average response time of roughly 300-400ms.

I made a quick change to the GET method in the API for this endpoint to gather items from the database asynchronously, and running the same test again, now gets us all the way down to an average response time of just 100ms over the 60k requests in one minute. Excellent!

100ms-test-result

As you can see, by running load tests like this, and trying out different scaling options for the front end and back end, logically scaling each whenever you see bottlenecks in test results or performance metrics, you can after some time determine the best specification for your database and web apps.


Working with the vCenter Server Simulator 5.5 – configuring custom ESXi hosts

Working with VCSIM (vCenter Server Simulator)


William Lam has done some excellent blog posts on using the simulator included with the VCSA (vCenter Server Appliance), to setup a simulated vSphere environment. Just the other day at VMworld Europe, he presented a session for vBrownBag entitled “NotSupported Tips/Tricks for vSphere 5.5“. In this session he introduced the new simulator, he dubs “VCSIM 2.0”, which is the latest iteration included with the VCSA 5.5 appliance.

I had previously had a brief look at the VCSIM included with 5.1, but after seeing its limited functionality, did not pursue its use for development testing. However, after learning about the features introduced in VCSIM “2.0”, I just had to take a further look…

To see how to setup and start VCSIM, have a read of Will’s blog post here. However, at a high level, this is what you need to do to start the simulator with defaults:

  • Deploy and fully configure the VCSA 5.5 appliance. Make sure DNS (forward and reverse) is working and the embedded database is properly configured, otherwise the vpxa service will have trouble intialising
  • Ensure you have no issues with the embedded DB being reset (i.e. don’t do this on a production VCSA!)
  • SSH in to the appliance
  • issue command: vmware-vcsim-start default


Customising the default VCSIM ESXi host model


Today, I needed to replicate a certain condition in our lab environment. Specifically, I needed the ESXi hosts to have 32 CPU cores. By default the ESXi hosts that are simulated have 8 cores. I did a bit of digging around in the /etc/vmware-vpx/vcsim/model folder and figured out which files were referenced when launching the simulator with the default option. By default, the host model in the ESX50 folder is used, so naturally, in order to configure custom ESXi hosts, we need to edit the files within this folder.

Initially, I found one file, “HostHardwareInfo.xml” and changed the CPU core count value to 32. This appeared to work – starting up the sim, and looking at the Web Client, I saw that the simulated hosts were now showing 32 CPU cores. I also changed the RAM up to 32GB (from the default of 16) just to test another option, and this was also showing up. However, upon loading up the MOB (Managed Object Browser), and navigating to the these hosts, I saw that the properties under the host summary->config->hardware were telling another story – they were still set to 8 cores and 16GB RAM. A little more digging revealed that another file, “HostListSummary.xml” also needed to be updated.

So in order to setup your custom ESXi host models for the default VCSIM profile, make sure you update both of these files.

The files to update your default ESXi model


Here is the small change I made to increase the Host core count to 32 cores.

<cpuInfo>
    <numCpuPackages>2</numCpuPackages>
    <numCpuCores>32</numCpuCores>
    <numCpuThreads>4</numCpuThreads>
    <hz>2999654793</hz>
 </cpuInfo>

And the data reflected in the MOB:

ESXi Host Hardware Summary


Changes as seen in the vSphere Web Client:

vSphere Web Client Host Hardware Summary

Make sure you backup these files before changing them, so that you can roll back if you need to. There are other ways of creating your own profiles for the simulator, but I could not find any documentation on how to create custom hosts. The only bits I could find were relating to creating your own datastores. You can also use the default profile template to create your own profile in it’s entirety, and this is a better long term solution, however to get things up and running quickly with the default profile, the above works nicely.

Note that all properties and methods pertaining to each managed object found in the API appear to be set up and created when using the VCSIM, so this makes a great development/testing/lab tool. Kudos to VMware for releasing this with the VCSA, and thanks to William Lam for pointing it out and blogging about it!