Securing your Microsoft Exchange 2010 Server / services with an SSL Certificate

Exchange 2010 has definitely simplified the process of applying SSL certificates to your mail services such as Outlook Web Access/App and Exchange ActiveSync. No more muddling about with IIS is required and you can do everything via the Exchange Management Console (GUI) too. I’ll also list a cmdlet at the end for generating a CSR if you wish to go the Exchange Management Shell way.

Exchange Management Console steps:


  • Open the Management Console and from the summary / home tab click on “Manage databases”. Now on the list in the left of the Management Console, select “Server Configuration”, then in the list of Actions on the right look for “New Exchange Certificate” and select this.


  • A wizard will popup and you can begin setting up your new Certificate Signing Request (CSR). Fill in a Common / Friendly name for the certificate. I used the same name as would be used for the actual certificate itself so that I can easily identify it.


  • Continue the wizard. I won’t be using a wildcard certificate so I will leave the “Enable Wildcard Certificate” selection unchecked.


  • The next section allows you to select the services you want to use with your SSL / describe the Exchange configuration for the CSR that we are going to generate. Expand out the sections and you’ll see that some are pre-populated for you. Check over this information and tick any services that you want to use. I want this SSL certificate for Outlook Web App and Exchange ActiveSync for mobile devices, so I checked the options for “Outlook Web App is on the Internet” and “Exchange Active Sync is enabled”. In each of those cases, I entered the A name record for the services (The external name used to connect to the services) – i.e. mail.shogan.co.uk – this is important and it is what your SSL certificate will be securing, so double check that it is correct.


  • Continue by entering some administrative / contact details for your company, choosing a location to the save the CSR request file, then finishing the wizard off. Now, go to your SSL provider’s site and purchase a new SSL certificate. I am using a basic SSL123 certificate in this case from Thawte.


  • Go through the steps of purchasing the certificate, and you’ll get to a point where they ask you for the CSR – paste the exact text of your CSR generated in Exchange’s Management Console into the CSR text box on the website and get your certificate ordered. When it is approved and emailed back to you, save the .cer certificate file on your Exchange server.


  • Go back to the management console, select “Server Configuration”, select the certificate under the “Exchange Certificates” tab and in the Actions view on the side, select “Complete Pending Request”. Browse for the completed SSL certificate your certificate issuer sent you and finish by completing this wizard.


  • You now just need to highlight the certificate under “Exchange Certificates” once again, and under the “Actions” panel, click “Assign Services to Certificate”. In this wizard, select your relevant Exchange server name, then click next. On the next screen, select “Internet Information Services”, then “Next”. Check the summary page looks correct then finish the wizard.


Your SSL certificate should now be configured and ready for use. Browse to the URL of your Outlook Web App service via https. You should find that you don’t get a certificate warning, and clicking the security icon in your web browser to view the site certificate should show that it is valid and providing encryption.


Generate a CSR using the Exchange Management Shell.


You can also generate a CSR using the cmdlet below. Just substitute the relevant values with your own. Be sure you aren’t putting any incorrect values in when using this though as you don’t have a nice GUI to explain things to you as you do with the Exchange Management Shell.


Set-Content -path “C:\mail_shogan_co_uk” -Value (New-ExchangeCertificate -GenerateRequest -KeySize 2048 -SubjectName “c=gb, s=London, l=London, o=Shogan.tech, ou=IT, cn=mail.shogan.co.uk”  -PrivateKeyExportable $True)


The above cmdlet will save the CSR file to C:\mail_shogan_co_uk. You would then copy and paste the text of that file into your SSL certificate provider’s site as part of your SSL purchase process. The cmdlet uses some values that will need to be unique to your organisation – here are the value explanations of parts of the above cmdlet:


c = country code
s = city
l = province/state
o = organisation name
ou = organisational unit
cn = common name the SSL certificate is to be provided for

The cmdlet won’t give you any output if it works correctly, but you’ll be able to see the CSR in the Exchange Management Console if you refresh it at this stage.

That is basically it – the steps above should help you secure some Exchange services such as OWA or ActiveSync with an SSL certificate from a trusted authority.


SQL Server 2008 – Change Tracking

I have recently started studying for some Microsoft SQL Server exams (in particular 70-432). In order to reinforce some of the information, I thought it would be a good idea to blog about some of the features of SQL Server 2008 I learn about. This post will be on the built in mechanism for Change Tracking.

Change tracking is a relatively lightweight functionality that associates a version with each row in a table which has had CHANGE_TRACKING enabled on it.

By using this mechanism, it should be easy to read the version number when data is read from the database, and when it comes to writing data back, this version number can be checked to see if it has changed or not, allowing your application to determine whether it is safe to write data back or not, depending on how you handle the situation.

Once the CHANGE_TRACKING option has been enabled for a database, you can choose which tables in the database change tracking information is kept for.

Two other options can also be used. Namely CHANGE_RETENTION, which allows you to specify how long change tracking information should be captured for, and AUTO_CLEANUP, which allows change tracking information to automatically be cleaned up.

If anyone has any extra information or can clarify any of the above points, then please feel free to add a comment 🙂

Allow ICMP / ping response on a Windows Server 2008 or 2008 R2 machine

A very quick blog post today, seeing as though I have run this command on about 4 or 5 new servers I have deployed today. To allow a server to respond to incoming ICMP traffic (ping) you can issue the following command in the command prompt. Do this as an administrator of course!
netsh firewall set icmpsetting 8

Your machine should now respond to pings. You can also do this via the Windows firewall GUI but I find the command to be the quickest and easiest way of achieving this.

How to pin an application on a network / mapped drive to your Windows 7 or 2008 R2 taskbar

So here is something that has been annoying me lately. On my work machine I use a couple of applications that are stored on mapped network drives. When you try and right-click the .exe to select “Pin to taskbar” there is no option to do this. Here is a work around that will allow you to get these network stored applications / exe files pinned to your taskbar in Windows 7 or Server 2008 R2.

1. Copy the .exe file of your application on the network drive to a temporary location on your local machine or server’s drive.

2. Make a shortcut to this .exe on your desktop.

3. Right-click on this shortcut and then select the “Pin to taskbar” option which will now be available.

4. Right-click the pinned icon on the taskbar and then right-click the shortcut in the list of options that appears – select Properties.

5. Edit the “Start in” and “Target” fields to point to the actual location of the original application on the network location.

6. You can now remove the temporary shortcut and .exe that you copied as these are not needed anymore.

You’ll now have your network location application pinned to your Windows 7 or 2008 R2 taskbar.

How to officially deactivate a Windows 2008 R2 RDS licensing server and remove RDS CALs

This post will explain how to remove Remote Desktop Services Client Access Licenses.

I just got off the phone with Microsoft after wanting to remove some RDS CALs (Formerly known as TS CALs) from a Windows 2008 R2 Terminal Server (Now called Remote Desktop Server). After initially  looking this up, a Technet article mentioned needing to use the Remote Desktop Services Windows Management Instrumentation (WMI) provider. However clicking the link popped up a page stating that the document they refer you to was not available yet. (Not very helpful Technet). The other option in the Technet article mentioned deactivating the licensing server as another option. However when I tried this, followed by a reactivation of the licensing server, the old RDS CALs were still there.

So to get this done here is the process we followed:

1. Open the RD Licensing Manager.

2. Select the Server name, right-click it and then choose Properties. Switch connection method to Telephone and choose your Country. Note – if you want you could also use Internet as connection manager. I did Telephone as I had a guy from the Clearing House / Licensing department on the line already. Click OK to confirm.

3a. Right-click the server name again, go to Advanced, then choose “Deactivate Server”. Run through the wizard. With telephone selected I had to read out a deactivation number. The consultant then read out a confirming code that I entered into the wizard. After this I finished the Wizard which deactivated the Licensing.

b. Next, re-activate the License server – right-click the server name, select Activate, read out the codes in the wizard and enter the key they give back to you. (Or just use the Internet activate method). I needed to close the RD Licensing console at this stage.

4. So next up I launched the Services console (Start -> Run, type services.msc and click OK). Go down to Remote Desktop Licensing, right-click it and choose “Stop” to stop the service.

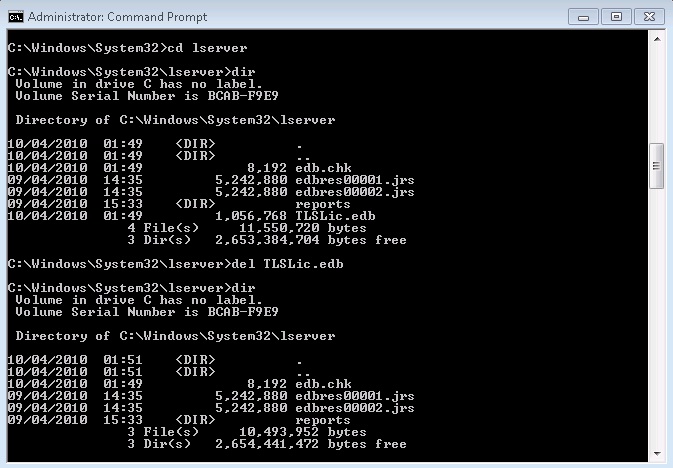
5. Navigate to C:\Windows\System32\lserver and look for the “TLSLic.edb” file. Delete this file. (I would make a backup just in case you wanted it back for some reason).

6. Start the Remote Desktop Licensing service again. (Right-click service and choose “Start”).

7. The Service should start correctly.

8. Launch the RD Licensing console again (you should have closed it at the end of step 3). Your previous licenses should be gone now.

9. Right-click the server and choose “Install Licenses”. Go through the wizard to get the correct RDS CALs installed. You won’t be violating any Microsoft licensing agreements because you deleted your previous RDS CALs. Once everything is working again, delete your backup of your old RDS CALs (the .EDB file that you backed up).

That is it. You should now have removed your old RDS CALs and installed new RDS CALs. Note that no users will be able to login to this RDSH server whilst there are no CALs in place, so do this as planned down time.