Install and configure Nextcloud plugin on FreeNAS with SSL

Install and configure Nextcloud plugin on FreeNAS with SSL

The FreeNAS Nextcloud plugin installation works great with automatic configuration thanks to a recent pull request. But, you don’t get SSL enabled by default. This is critical, especially for a system exposed to the internet.

In this post you’ll see how to:

  • Install the Nextcloud plugin in a FreeNAS BSD jail
  • Add an extra NAT port for SSL to the jail
  • Configure NGINX inside the jail by adding a customised configuration with SSL enabled
  • Apply a free SSL certificate using Lets Encrypt and DNS-01 challenge validation
  • Look at some options for setting up home networking for public access

Start off by Installing the Nextcloud Plugin in a jail. Choose NAT for networking mode. It defaults to port 8282:80 (http).

the Nextcloud jail in the FreeNAS UI

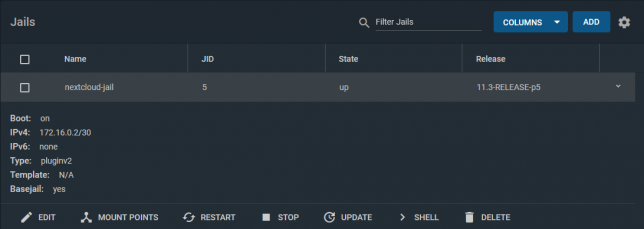
Stop the jail once it’s running and edit it. Add another NAT rule to point 8443 to 443 for SSL.

the extra port 8443 - 443 NAT rule to add

The reason for selecting port 8443 for Nextcloud is because the FreeNAS web UI listens on port 443 for SSL too.

An alternative could be to use DHCP instead of NAT for the jail. I chose NAT for my setup as I prefer using one internal IP address for everything I run on the FreeNAS server.

Shell into the Nextcloud jail, and rename the default nginx configuration.

mv /usr/local/etc/nginx/conf.d/nextcloud.conf /usr/local/etc/nginx/conf.d/nextcloud.conf.old

NGINX will load all .conf files in this directory. Hence the reason you’ll create a new configuration for your SSL setup here.

ee /usr/local/etc/nginx/conf.d/nextcloud-ssl.conf

Populate it with the contents of the gist below, but replace server_name, ssl_certificate, and ssl_certificate_key with your own hostname.

Generate a free SSL certificate with Lets Encrypt

To configure the Nextcloud plugin on FreeNAS with SSL you don’t need to break the bank on SSL certificate costs from traditional CAs. Lets Encrypt it free, but you’ll need to renew your certificate every three months.

DNS-01 challenge certificate generation for Lets Encrypt is a great way to get SSL certificates without a public web server.

It entails creating a TXT/SPF record on the domain you own, with a value set to a code that certbot gives you during the certbot request process.

Install certbot if you don’t already have it installed. On a debian based system:

sudo apt-get install certbot

Request a certificate for your desired hostname using certbot with dns as the preferred challenge.

sudo certbot -d yournextcloud.example.net --manual --preferred-challenges dns certonly

Follow the prompts until you receive a code to setup your own TXT record with. Go to your DNS provider control panel and create it with the code you’re given as the value.

After creating the record, finish the certificate request. Lets Encrypt will confirm the DNS TXT record and issue you a certificate. You’ll get a chain file called fullchain.pem, along with a private key file called privkey.pem.

Upload the SSL certificate files to Nextcloud

Upload both to your Nextcloud Jail. Use SCP to copy them up, renaming them as follows:

  • /etc/ssl/nginx/yournextcloud.example.net.crt (certificate chain file)
  • /etc/ssl/nginx/yournextcloud.example.net.key (private key file)

Rename them as per your chosen hostname to keep things organised, and so that they match your nextcloud-ssl.conf file entries.

Port forwarding / NAT setup

This is the part that comes down to your own network setup. I use a double NAT setup, so I NAT traffic from my external router interface, through to another internal router.

From my internal router, I port forward / NAT from the internal router interface through to my FreeNAS box on port 8443.

From there, the Nextcloud jail does NAT to take the TCP traffic from 8443 to 443 inside the jail (where NGINX is listening on 443).

This is how my NAT and port forwarding chain looks:

Public_IP:29123 (WAN interface) -> Internal_IP:29123 (Internal router LAN interface) -> Internal_IP:8443 (FreeNAS LAN interface) -> Internal_IP:443 (Nextcloud Jail)

If you’re lucky enough to have a static IP address then you can point your DNS host record to your static IP. Otherwise you’ll neee to use some form of dynamic DNS service.

At this point you should have everything in place.

Final steps

Using a shell in the Nextcloud jail, restart nginx with service nginx restart. If all goes well you’ll see nginx started in the output of that command.

If not, you’re likely to have an NGINX configuration syntax error.

The logs are usually good about pinpointing these, so read them to see where you might have missed something obvious in the nextcloud-ssl.conf file. Adjust any errors and restart again.

The default credentials that for Nextcloud are in the home directory of the jail (/root). To retrieve them:

cat /root/ncuser
cat /root/ncpassword

Test logging in, and get started with personalising your Nextcloud system and adding some users.

Now you can enjoy the Nextcloud plugin on FreeNAS with SSL enabled.

Securing your Microsoft Exchange 2010 Server / services with an SSL Certificate

Exchange 2010 has definitely simplified the process of applying SSL certificates to your mail services such as Outlook Web Access/App and Exchange ActiveSync. No more muddling about with IIS is required and you can do everything via the Exchange Management Console (GUI) too. I’ll also list a cmdlet at the end for generating a CSR if you wish to go the Exchange Management Shell way.

Exchange Management Console steps:


  • Open the Management Console and from the summary / home tab click on “Manage databases”. Now on the list in the left of the Management Console, select “Server Configuration”, then in the list of Actions on the right look for “New Exchange Certificate” and select this.


  • A wizard will popup and you can begin setting up your new Certificate Signing Request (CSR). Fill in a Common / Friendly name for the certificate. I used the same name as would be used for the actual certificate itself so that I can easily identify it.


  • Continue the wizard. I won’t be using a wildcard certificate so I will leave the “Enable Wildcard Certificate” selection unchecked.


  • The next section allows you to select the services you want to use with your SSL / describe the Exchange configuration for the CSR that we are going to generate. Expand out the sections and you’ll see that some are pre-populated for you. Check over this information and tick any services that you want to use. I want this SSL certificate for Outlook Web App and Exchange ActiveSync for mobile devices, so I checked the options for “Outlook Web App is on the Internet” and “Exchange Active Sync is enabled”. In each of those cases, I entered the A name record for the services (The external name used to connect to the services) – i.e. mail.shogan.co.uk – this is important and it is what your SSL certificate will be securing, so double check that it is correct.


  • Continue by entering some administrative / contact details for your company, choosing a location to the save the CSR request file, then finishing the wizard off. Now, go to your SSL provider’s site and purchase a new SSL certificate. I am using a basic SSL123 certificate in this case from Thawte.


  • Go through the steps of purchasing the certificate, and you’ll get to a point where they ask you for the CSR – paste the exact text of your CSR generated in Exchange’s Management Console into the CSR text box on the website and get your certificate ordered. When it is approved and emailed back to you, save the .cer certificate file on your Exchange server.


  • Go back to the management console, select “Server Configuration”, select the certificate under the “Exchange Certificates” tab and in the Actions view on the side, select “Complete Pending Request”. Browse for the completed SSL certificate your certificate issuer sent you and finish by completing this wizard.


  • You now just need to highlight the certificate under “Exchange Certificates” once again, and under the “Actions” panel, click “Assign Services to Certificate”. In this wizard, select your relevant Exchange server name, then click next. On the next screen, select “Internet Information Services”, then “Next”. Check the summary page looks correct then finish the wizard.


Your SSL certificate should now be configured and ready for use. Browse to the URL of your Outlook Web App service via https. You should find that you don’t get a certificate warning, and clicking the security icon in your web browser to view the site certificate should show that it is valid and providing encryption.


Generate a CSR using the Exchange Management Shell.


You can also generate a CSR using the cmdlet below. Just substitute the relevant values with your own. Be sure you aren’t putting any incorrect values in when using this though as you don’t have a nice GUI to explain things to you as you do with the Exchange Management Shell.


Set-Content -path “C:\mail_shogan_co_uk” -Value (New-ExchangeCertificate -GenerateRequest -KeySize 2048 -SubjectName “c=gb, s=London, l=London, o=Shogan.tech, ou=IT, cn=mail.shogan.co.uk”  -PrivateKeyExportable $True)


The above cmdlet will save the CSR file to C:\mail_shogan_co_uk. You would then copy and paste the text of that file into your SSL certificate provider’s site as part of your SSL purchase process. The cmdlet uses some values that will need to be unique to your organisation – here are the value explanations of parts of the above cmdlet:


c = country code
s = city
l = province/state
o = organisation name
ou = organisational unit
cn = common name the SSL certificate is to be provided for

The cmdlet won’t give you any output if it works correctly, but you’ll be able to see the CSR in the Exchange Management Console if you refresh it at this stage.

That is basically it – the steps above should help you secure some Exchange services such as OWA or ActiveSync with an SSL certificate from a trusted authority.