SQL Server 2008 – Change Tracking

I have recently started studying for some Microsoft SQL Server exams (in particular 70-432). In order to reinforce some of the information, I thought it would be a good idea to blog about some of the features of SQL Server 2008 I learn about. This post will be on the built in mechanism for Change Tracking.

Change tracking is a relatively lightweight functionality that associates a version with each row in a table which has had CHANGE_TRACKING enabled on it.

By using this mechanism, it should be easy to read the version number when data is read from the database, and when it comes to writing data back, this version number can be checked to see if it has changed or not, allowing your application to determine whether it is safe to write data back or not, depending on how you handle the situation.

Once the CHANGE_TRACKING option has been enabled for a database, you can choose which tables in the database change tracking information is kept for.

Two other options can also be used. Namely CHANGE_RETENTION, which allows you to specify how long change tracking information should be captured for, and AUTO_CLEANUP, which allows change tracking information to automatically be cleaned up.

If anyone has any extra information or can clarify any of the above points, then please feel free to add a comment 🙂

Allow ICMP / ping response on a Windows Server 2008 or 2008 R2 machine

A very quick blog post today, seeing as though I have run this command on about 4 or 5 new servers I have deployed today. To allow a server to respond to incoming ICMP traffic (ping) you can issue the following command in the command prompt. Do this as an administrator of course!
netsh firewall set icmpsetting 8

Your machine should now respond to pings. You can also do this via the Windows firewall GUI but I find the command to be the quickest and easiest way of achieving this.

How to officially deactivate a Windows 2008 R2 RDS licensing server and remove RDS CALs

This post will explain how to remove Remote Desktop Services Client Access Licenses.

I just got off the phone with Microsoft after wanting to remove some RDS CALs (Formerly known as TS CALs) from a Windows 2008 R2 Terminal Server (Now called Remote Desktop Server). After initially  looking this up, a Technet article mentioned needing to use the Remote Desktop Services Windows Management Instrumentation (WMI) provider. However clicking the link popped up a page stating that the document they refer you to was not available yet. (Not very helpful Technet). The other option in the Technet article mentioned deactivating the licensing server as another option. However when I tried this, followed by a reactivation of the licensing server, the old RDS CALs were still there.

So to get this done here is the process we followed:

1. Open the RD Licensing Manager.

2. Select the Server name, right-click it and then choose Properties. Switch connection method to Telephone and choose your Country. Note – if you want you could also use Internet as connection manager. I did Telephone as I had a guy from the Clearing House / Licensing department on the line already. Click OK to confirm.

3a. Right-click the server name again, go to Advanced, then choose “Deactivate Server”. Run through the wizard. With telephone selected I had to read out a deactivation number. The consultant then read out a confirming code that I entered into the wizard. After this I finished the Wizard which deactivated the Licensing.

b. Next, re-activate the License server – right-click the server name, select Activate, read out the codes in the wizard and enter the key they give back to you. (Or just use the Internet activate method). I needed to close the RD Licensing console at this stage.

4. So next up I launched the Services console (Start -> Run, type services.msc and click OK). Go down to Remote Desktop Licensing, right-click it and choose “Stop” to stop the service.

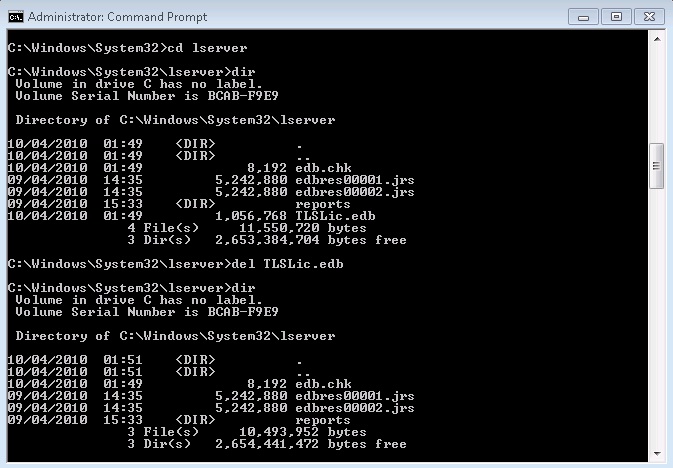
5. Navigate to C:\Windows\System32\lserver and look for the “TLSLic.edb” file. Delete this file. (I would make a backup just in case you wanted it back for some reason).

6. Start the Remote Desktop Licensing service again. (Right-click service and choose “Start”).

7. The Service should start correctly.

8. Launch the RD Licensing console again (you should have closed it at the end of step 3). Your previous licenses should be gone now.

9. Right-click the server and choose “Install Licenses”. Go through the wizard to get the correct RDS CALs installed. You won’t be violating any Microsoft licensing agreements because you deleted your previous RDS CALs. Once everything is working again, delete your backup of your old RDS CALs (the .EDB file that you backed up).

That is it. You should now have removed your old RDS CALs and installed new RDS CALs. Note that no users will be able to login to this RDSH server whilst there are no CALs in place, so do this as planned down time.

DNS for tld’s not working on SBS 2008 when using root hints

After one day, you may find your Windows 2008 DNS Server is unable to resolve names in some top level domains (TLD’s) like .co.uk, .cn, and .br when it is configured to use root hints. This may also be seen with other top level domains too. According to Microsoft, a network monitor trace should show that the DNS Server does not send any DNS traffic out to the internet. The Windows 2008 DNS server returns SERVFAIL to the client or when using nslookup. I have not used Network Monitor to verify this myself, but I am sure if you loaded it up and used this MS KB to set up a trace that you would be able to verify this symptom.
Workarounds include restarting the DNS server, clearing the DNS cache, setting maxcachettl to 2 days or greater, and using DNS Forwarders instead of root hints.


This currently occurs with default SBS 2008 installs that have been configured to use root hints for DNS lookup. I have recently noticed this behaviour myself with two different SBS 2008 installs.


If you want to use root hints, you can set the maxcachettl registry value on the Windows 2008 DNS Server as follows:
1. Start Registry Editor (Regedit.exe).
2. Locate the following registry key:
HKEY_LOCAL_MACHINE\SYSTEM\CurrentControlSet\Services\DNS\Parameters
3. On the Edit menu, click New, click DWORD (32-bit) Value and then add the following value:
Value: MaxCacheTtl
Data Type: DWORD
Data value: 0x2A300 (172800 in decimal = 2 days)
4. Click OK.
5. Quit Registry Editor.
6. Restart the DNS server.


Another way to get around this issue is to use the following method (I personally prefer this way):

1. Open up DNS under Administrative tools from the SBS server’s start menu.
2. Right click on the server name and select Properties.


dns-console1


3. Go to the Forwarders tab and click on the “edit” button.
4. Enter the primary DNS address of your ISP (In this case mine was BT so I used 194.72.0.98) and click Ok.
5. The forwarders section will now attempt to automatically resolve the FQDN for that IP. (Note you can also probably enter your router’s IP address in the forwarders section which should then get your SBS to look to the router for DNS information).


dns-console-properties


6. Click Ok to close the properties window and then close your DNS console.


DNS lookups for the TLDs should now be working again. If not, stop and restart DNS or give the server a reboot.

How to add a user as a local administrator using Windows Server 2008

The computer management console for Server 2008 has changed slightly between now and Windows Server 2003. I was trying to ensure a particular user was setup as a local administrator on a Windows 2008 Small Business Server today, and couldn’t find the option to do this via the GUI. Anyway, for those wondering how this is done using the command prompt, here is the solution.

First you need to run command prompt as an Administrator. Open Computer, go to your C: drive, and navigate to your Windows\System32 directory. Find “cmd.exe” right click on it, and select the run as Administrator option. Once at the command prompt, type the following :

net localgroup Administrators /add (domain)\(username)

(Obviously replace (domain)\(username) with your domainname\username that you want to be the local admin) – That is without the brackets.

You should get a message saying the command completed successfully. If you get an access denied error, you more than likely have not run cmd.exe as an administrator.

Be sure to run cmd.exe as administrator.