Setting up Helm for Kubernetes (with RBAC) and Deploying Your First Chart

I was pointed to Helm the other day and decided to have a quick look at it. I tasked myself with setting it up in a sandbox environment and deploying a pre-packaged application (a.k.a chart, or helm package) into my Kubernetes sandbox environment.

Helm 101

The best way to think about Helm is as a ‘package manager for Kubernetes’. You install Helm as a cli tool (It’s written in Golang) and all the operations it provides to you, you’ll find are very similar to those of common package managers like npm etc…

Helm has a few main concepts.

  • As mentioned above, a ‘Chart’ is a package for Helm. It contains the resource definitions required to run an app/tool/service on a Kubernetes cluster.
  • A ‘Repository’ is where charts are stored and shared from
  • A ‘Release’ is an instance of a chart running in your Kubernetes cluster. You can create multiple releases for multiple instances of your app/tool/service.

More info about Helm and it’s concepts can be found on the Helm Quickstart guide. If however, you wish to get stuck right in, read on…

This is a quick run-down of the tasks involved in setting it up and deploying a chart (I tried out kube-slack to provide slack notifications for failed kubernetes operations in my sandbox environment to my slack channel).

Setting up Helm

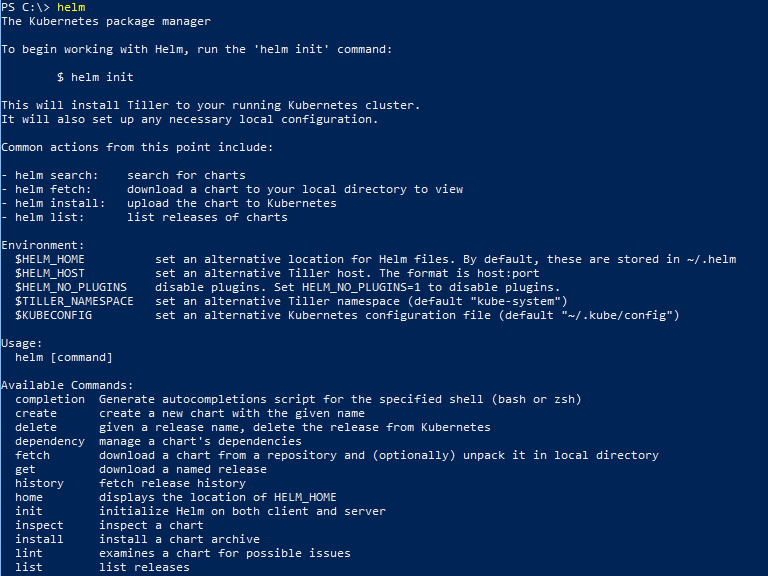
Download and unzip the latest Helm binary for your OS. I’m using Windows so I grabbed that binary, unblocked it, and put in a folder found in my path. Running a PowerShell session I can simply type:

helm

Helm executes and provides a list of possible options.
Before you continue with initialising Helm, you should create a service account in your cluster that Helm will use to manage releases across namespaces (or in a particular namespace you wish it to operate in). For testing its easiest to set up the service account to use the default built-in “cluster-admin” role. (To be more secure you should set up Tiller to have restricted permissions and even restrict it based on namespace too).

To setup the basic SA with the cluster-admin role, you’ll need a ClusterRoleBinding to go with the SA. Here is the config you need to set both up.

apiVersion: v1
kind: ServiceAccount
metadata:
  name: tillersa
  namespace: kube-system
---
apiVersion: rbac.authorization.k8s.io/v1beta1
kind: ClusterRoleBinding
metadata:
  name: tillersa-clusterrolebinding
roleRef:
  apiGroup: rbac.authorization.k8s.io
  kind: ClusterRole
  name: cluster-admin
subjects:
  - kind: ServiceAccount
    name: tillersa
    namespace: kube-system

Run kubectl create and point to this config to set up the SA and ClusterRoleBinding:

kubectl create -f .\tillersa-and-cluster-rolebinding.yaml

Now you can do a helm initialisation.

helm init --service-account tillersa --tiller-namespace kube-system

If all went well, you’ll get a message stating it was initialised and setup in your cluster.

Run:

kubectl get pods -n=kube-system

and you should see your new tiller-deploy pod running.

Deploying Charts with Helm

Run helm list to see that you currently have no chart releases deployed.

helm list

You can search the public Helm repository for charts (applications/tools/etc) that you can now easily deploy into your cluster.

helm search

Search for ‘grafana’ with helm. We’ll deploy that to the cluster in this example.

helm search grafana

Next up you might want to inspect and discover more about the chart you’re going to install. This is useful to see what sort of configuration parameters you can pass to it to customise it to your requirements.

helm inspect grafana
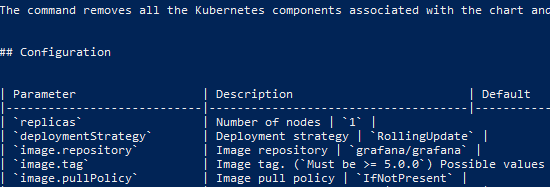
Choose a namespace in your cluster to deploy to and a service type for Grafana (to customise it slightly to your liking) and then run the following, replacing the service.type and service.port values for your own. For example you could use a ClusterIP service instead of LoadBalancer like I did:

helm install --name sean-grafana-release stable/grafana --set service.type=LoadBalancer --set service.port=8088 --namespace sean-dev

Helm will report back on the deployment it started for your release.

The command is not synchronous so you can run helm status to report on the status of a release.

helm status sean-grafana-release

Check on deployments in your namespace with kubectl or the Kubernetes dashboard and you should find Grafana running happily along.
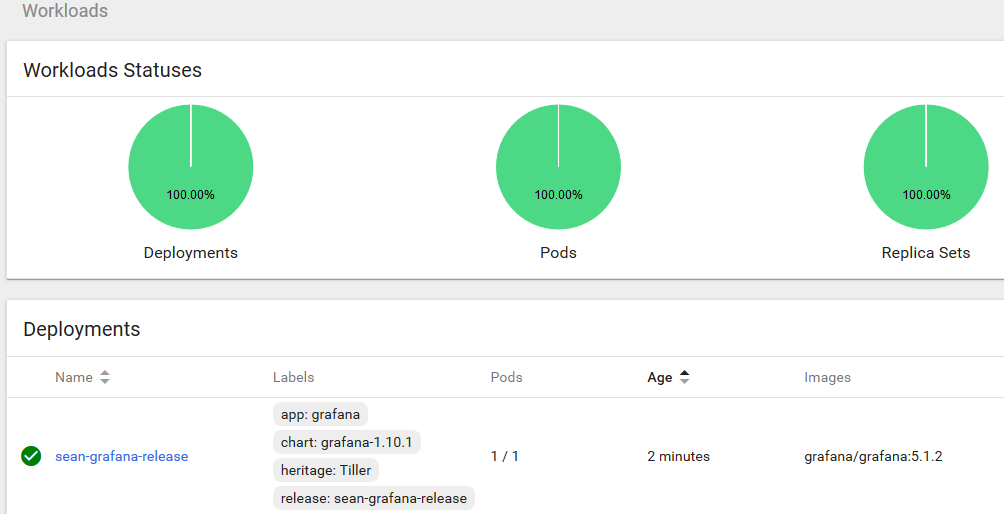
In my case I used a LoadBalancer service, so my cluster being AWS based spun up an ELB to front Grafana. Checking the ELB endpoint on port 8088 as I specified in my Helm install command sure enough shows my new Grafana app’s login page.

The chart ensures all the necessary components are setup and created in your cluster to run Grafana. Things like the deployment, the service, service account, secrets, etc..

In this case the chart outputs instructions on how to retrieve your Grafana admin password for login. You can see how to get that in the output of your release.

Tidy Up

To clean up and delete your release simply do:

helm delete sean-grafana-release

Concluding

Done!

There is plenty more to explore with helm. If you wish to change your helm configuration with helm init, look into using the –upgrade parameter. helm reset can be used to remove Helm from your cluster and there are many many more options and scenarios that could be covered.

Explore further with the helm command to see available commands and do some digging.

Next up for me I’ll be looking at converting one of my personal applications into a chart that I can deploy into Kubernetes.

Deploying a simple linked container web app with Docker

This is a simple guide on how to deploy a multi-container ‘linked’ web app using Docker.

If you have not yet installed or set up a Docker host to run the containers on, here is my guide on setting up a basic uBuntu 16.04 Docker host VM.

The ‘web app’ we’ll be looking at how to deploy will consist of two basic components – a MySQL database for the back-end, and a simple PHP script for the ‘web front-end’ which simply connects to the MySQL container and displays some info from a database table.

simple-web-app-linked-diagram

For the MySQL container we’ll be using the official Docker repo ‘mysql-server’ image, and for our web front-end, we’ll be creating our own Docker image using a custom Dockerfile we’ll craft ourselves, based on an uBuntu 15.04 image.

This means we’ll be covering the following Docker basics:

  • Running docker containers
  • Linking docker containers (more secure than exposing ports directly)
  • Creating custom docker images using a Dockerfile
  • Building a custom image

Start off by creating a new directory in your home directory called ‘web01’ to create and store the Dockerfile we’ll using to build our custom web front-end image. Then create an emtpy file called ‘Dockerfile’ in this directory and edit it using your favourite text editor. I’m using nano for this.


This is what your new Dockerfile should look like:


The commands do the following:

  • FROM – tells docker build to base this image build on the ubuntu:15.04 image
  • RUN – strings a few apt-get commands together to install apache, php5, and a few other tools like curl. This is important, as every RUN command in a Dockerfile creates a new image layer, and we don’t want our image to contain too many layers.
  • The last RUN command grabs the content from a gist I created which is a basic PHP script, and places it in the /var/www/html directory in the container, then deletes the default index.html file that apache places there. This is the script that will connect to our MySQL container and display some basic info (our basic ‘web app’).
  • EXPOSE – exposes port 80 so we can map this to our Docker host and access the website outside of the container.
  • CMD – runs the apache2 service with PID 1 when the container starts.

Now you can build the Dockerfile and create your own custom image, which is what will be used to start the web container later.

Use the following build command to build the new image from your custom Dockerfile

docker build -t=”web01image” ~/web01/Dockerfile

Run ‘docker images’ after the build completes and you should see the new image listed:

docker-images

Next, you’ll run a new container using the official mysql-server image from the Docker repository. You won’t yet have this image locally, but the command will automatically download the image for you.

docker run –name db01 -e MYSQL_ROOT_PASSWORD=MyRootPassword -d mysql/mysql-server:latest

Note that I’ve called my container ‘db01’ and given it a root password of ‘MyRootPassword’. The -e parameter specifies that an environment variable called MYSQL_ROOT_PASSWORD inside the container should be given the value of ‘MyRootPassword’. The MySQL container then uses this environment variable to setup the root user for MySQL when the container starts.

Now that the database container is up and running (verify by running ‘docker ps’ to check its running), you can deploy the custom web container using your image you created above. In this docker run command, you’ll also link  the web container to the db01 container you previously started up using the –link parameter. This is important to link the two containers.

The web container will be given environment variables with information telling it about the networking config of the DB container. These environment variables will then be access by the simple web PHP script to tell it where to find the database server, and what credentials to use to connect.

docker run –name=web01 –link=db01:mysql -d -p=80:80 web01image

Important: notice that in the –link parameter, the name of the database/MySQL container is specified. Make sure you use the exact name you gave your MySQL database container here – this ensures that the linking of the two containers is correct. The last ‘web01image’ bit specifies to base the container you are running off of the newly built ‘web01image’.

The -p parameter maps the exposed port 80 in the container to port 80 on the docker host, so you’ll be able to access the website by using http://dockerhost:80

Check that the new web container and previously created MySQL container are running by using the ‘docker ps’ command.

docker-ps-output

Out of interest, this is what the PHP script looks like (this is what is downloaded and placed on the web container as a RUN build step in the Dockerfile you created above):

You can see the environment variables that the PHP script grabs (top of the script) to establish the database connection from the docker container. These environment variables are what are created and populated by linking the web container to the db container using the –link parameter.

Lastly, you may want to create a sample database, table and some data for the simple ‘web app’ to display after it connects to the database container. Issue the following ‘docker exec’ command, which will add the sample database, create a sample table, and add some sample data.

Make sure you change the ‘MyRootPassword’ bit to whatever root MySQL password you chose when you ran the MySQL container above, and ensure you run exec against the name of the MySQL container you chose (I used db01). Keep the database name and the rest of the command intact, as the PHP script relies on these staying the same.

docker exec db01 mysql -u root -pMyRootPassword -e “create database testdb1; use testdb1; CREATE TABLE events (id INT NOT NULL PRIMARY KEY AUTO_INCREMENT, name VARCHAR(20), signup_date DATE); INSERT INTO events (id,name,signup_date) VALUES (NULL, ‘MySpecialEvent’, ‘2016-06-11’);”

Finally, browse to http://dockerhostnameorip and you should see the simple PHP script display some basic info, stating it was able to connect to the MySQL server and display the sample data in the database.

simple-php-web-app-display

PowerCLI – script to deploy multiple random VMs

There are probably tons of scripts out there to deploy VMs in a vSphere environment, but I was in the mood for scripting this evening and decided to create my own PowerCLI script to automatically deploy multiple random VMs to my home lab. The point was to create random “content” for something exciting I have been working on 🙂


[download id=”19″]


$i = 1
[int]$NumberToDeploy = 10 # Number of VMs to deploy
[string]$NamingConvention = "homelab-VM-" # Prefix for VM names
[string]$folderLoc = "Discovered virtual machine" # Name of VM folder to deploy into

while ($i -le $NumberToDeploy) {
	$NumCPUs = (Get-Random -Minimum 1 -Maximum 3) #NUM CPU of either 1 or 2.
	$MemoryMB = ("16","32","64") | Get-Random # Get a random VM Memory size from this list (MB)
	$DiskSize = ("256","512","768" ) | Get-Random # Get a random disk size from this list (MB)
	$targetDatastore = Get-Datastore | Where {($_.ExtensionData.Summary.MultipleHostAccess -eq "True") -and ($_.FreeSpaceMB -gt "10240")} | Get-Random
	$targetVMhost = Get-VMHost | Where { $_.ConnectionState -eq "Connected" } | Get-Random # Selects a random host which is in "connected State"
	$targetNetwork = ("VM Network","VM Distributed Portgroup") | Get-Random
	$GuestType = (	"darwinGuest","dosGuest","freebsd64Guest","freebsdGuest","mandrake64Guest",
					"mandrakeGuest","other24xLinux64Guest","other24xLinuxGuest","other26xLinux64Guest",
					"other26xLinuxGuest","otherGuest","otherGuest64","otherLinux64Guest","otherLinuxGuest",
					"rhel5Guest","suse64Guest","suseGuest","ubuntu64Guest","ubuntuGuest",
					"win2000AdvServGuest","win2000ProGuest","win2000ServGuest","win31Guest","win95Guest",
					"win98Guest","winLonghorn64Guest","winLonghornGuest","winNetBusinessGuest",
					"winNetDatacenter64Guest","winNetDatacenterGuest","winNetEnterprise64Guest",
					"winNetEnterpriseGuest","winNetStandard64Guest","winNetStandardGuest","winNetWebGuest",
					"winNTGuest","winVista64Guest","winVistaGuest","winXPPro64Guest",
					"winXPProGuest") | Get-Random
	$VMName = $NamingConvention + $i

	if ((Get-VM $VMName -ErrorAction SilentlyContinue).Name -eq $VMName) {
		Write-Host "$VMName already exists, skipping creation of this VM!" -ForegroundColor Yellow
		}
	else {	
		Write-Host "Deploying $VMName to $folderLoc ..." -ForegroundColor Green
		#Create our VM
		New-VM -Name $VMName -ResourcePool $targetVMhost -Datastore $targetDatastore -NumCPU $NumCPUs -MemoryMB $MemoryMB -DiskMB $DiskSize `
		-NetworkName $targetNetwork -Floppy -CD -DiskStorageFormat Thin -GuestID $GuestType -Location $folderLoc | Out-Null
		}
	$i++
}


This script will automatically deploy a variable number of Virtual Machines, based on a certain naming convention you specify. It’ll also randomly choose VM settings. Here is what it does:


  • Deploy any number of VMs by changing the total number of VMs to deploy (specify in script as $NumberToDeploy)
  • Deploys each VM to a random ESXi host which is in a connected state
  • Deploys each VM to a random shared datastore (i.e. a datastore with multiple hosts connected)
  • Sets a random vCPU count to each VM (specify options in the script as $NumCPUs)
  • Sets a random Memory size for each VM (specify options in the script as $MemoryMB)
  • Create a virtual disk as thin provisioned on each VM with a random disk size (specify disk size options in the script as $DiskSize)
  • Adds each VM to a random VM network (specify VM network options in the script as $targetNetwork)
  • Specifies a random GuestOS type for each VM deployed
  • Creates each VM in a specified VM & Templates folder (specify in script as $folderLoc)


All options are already set to defaults in the script as is stands, but don’t forget to change important options unique to your environment like the $folderLoc (folder to deploy VMs into), and the list of VM networks ($targetNetwork). Other items are automatically determined (datastore and host to deploy to for example).

Also note that some of the built-in guestOS types might not be supported on some ESXi hosts. In these cases, the script just skips creating that VM and moves onto the next. You may see a red error message for the failed VM in these cases. For a full list of GuestID types, check out this page.