ZFS includes some great features that help deliver lightning fast read speeds for storage. Two such features are Adapative Replacement Cache (ARC), and a second possible cache tier, L2ARC. Together these features can dramatically decrease the number of reads required from magnetic storage.
Usually ZFS will assign all but 1GB of system memory to ARC. When files are retrieved they are cached in system RAM dedicated to ARC. This allows them to be retrieved very quickly the next time they are read.
A second tier of cache named L2ARC is also possible. This is where you can dedicate solid state disks to act as another tier of cache. L2ARC only really makes sense when you are fronting slower magnetic spinning disks with cache, and you won’t have enough RAM to support a large enough ARC either. L2ARC doesn’t make a lot of sense if you are already running storage pools across solid state drives.
Another point to consider is that if your requirements mandate a large ARC size, system memory will start to get very expensive. If you are using magnetic storage tiers, then using SSD for L2ARC becomes a much cheaper option than simply dumping piles of money into more memory.
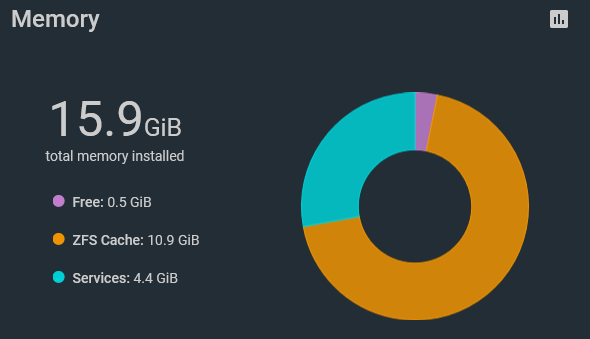
My personal FreeNAS server has 16GB of RAM, with much of that dedicated to ARC.
Analyzing ZFS ARC hit rates for Web Traffic to this Blog
I’ve been running this blog on my personal Kubernetes Raspberry Pi Cluster, which has its storage provisioned via NFS from my FreeNAS storage server.
The storage and cache breakdown is:
4 x 3TB SATA spinning disks, RAIDZ1
2 x 250GB SSD SATA disks, ZFS Mirror
16GB RAM, around 4GB used for jails and VMs, the remaining for ARC
No L2ARC. NFS storage is provided from the SSD based storage pool
This blog has a bunch of static files along with it’s WordPress installation, plus a MySQL database. Both of these sets of files are provisioned from NFS on the ZFS mirror storage pool, utilizing Kubernetes PVs.
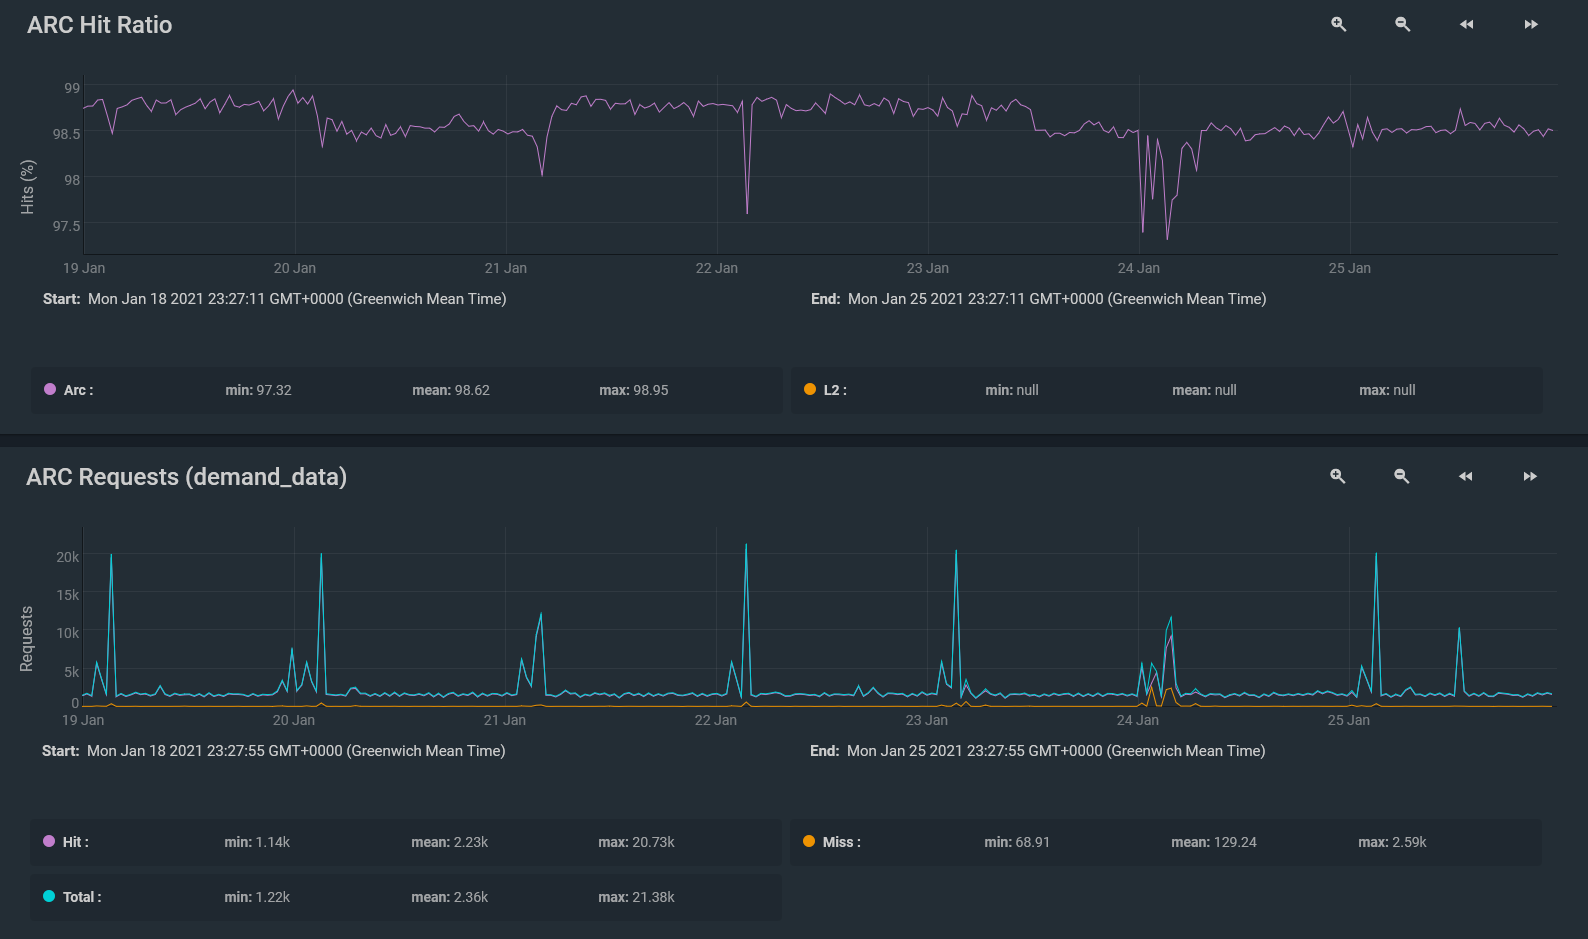
The SSD storage is already quite fast, but the cache features of ZFS really help here when serving frequent random IO generated from web traffic. Just take a look at these two charts:
ARC Hit Ratio and ARC Requests. Notice the really high (almost 100%) ARC hit ratio.
Instead of constantly reading from SSDs and causing unecessary wear, web traffic file requests are mostly served from ARC.
From these two graphs, I can tell that right now 16GB of system memory is perfectly fine for my home storage and web traffic serving needs. ARC is handling these workloads perfectly, with a very high cache hit ratio too.
Secondly, I certainly don’t need L2ARC. Web content is already sitting on SSD storage. Additionally, even if files were on magnetic storage, the main ARC would still be able to serve almost all web traffic.
Conclusion
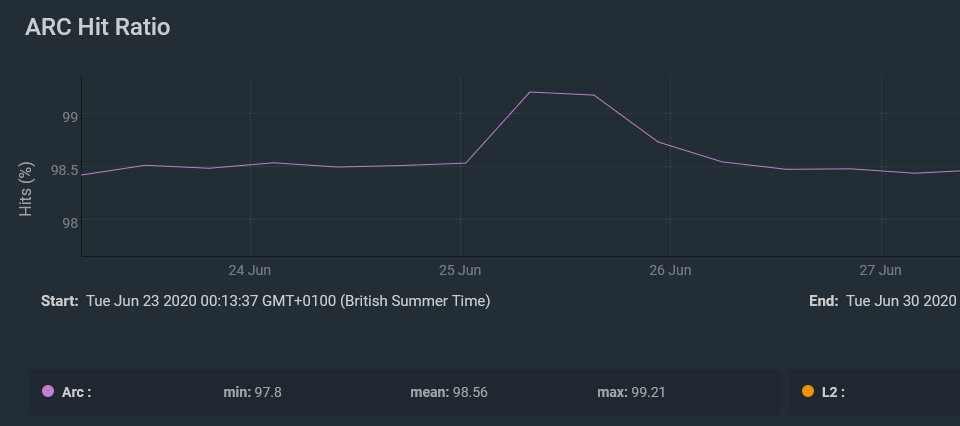
ZFS ARC impresses all around. On it’s busiest day of web traffic last year, this blog saw 12000 sessions, and around 13500 page views in just a few hours. ZFS ARC happily served the site’s storage needs from system memory.
In fact, the ARC hit ratio actually increased to just over 99% at this point in time!
There is something magical about building your own infrastructure from scratch. And when I say scratch, I mean using bare metal. This is a run through of my multipurpose FreeNAS server build process.
After scratching the itch recently with my Raspberry Pi Kubernetes Cluster, I got a hankering to do it again, and this build was soon in the works.
Part of my motivation came from my desire to reduce our reliance on cloud technology at home. Don’t get me wrong, I am an advocate for using the cloud where it makes sense. My day job revolves around designing and managing various clients’ cloud infrastructure.
At home, this was more about taking control of our own data.
I’ll skip to the juicy specifications part if you would like to know what hardware I used right away.
Note: I got this Gigabyte B450 motherboard, but soon found out it did not support ECC.
Final specifications:
These are the final specifications I decided on. Scroll down to see the details about each area.
It should be able to run Plex for home and remote media streaming.
It must be able to run Nextcloud for home and remote mobile file storage.
Run services in Virtual Machines, Jails, or Docker containers. For example, I like to run Pi-hole as a DNS server for all my home equipment and devices.
The Decision Process
I started out my search looking at two products. Unraid and FreeNAS.
I have had experience running FreeNAS in the past for home lab setups. I never really used it seriously with the goal of making it reliable though.
This time around, all my files would be at stake, so I did a fair bit of research into the features and offerings of both products.
Unraid performed quite well for me. But, what pushed me away from it was the fact that it is a paid for, closed source, commercial product.
Unraid does make it super easy to bundle storage together and expand that storage in future if need be. However FreeNAS’ use of ZFS and it’s various other features were what won me over.
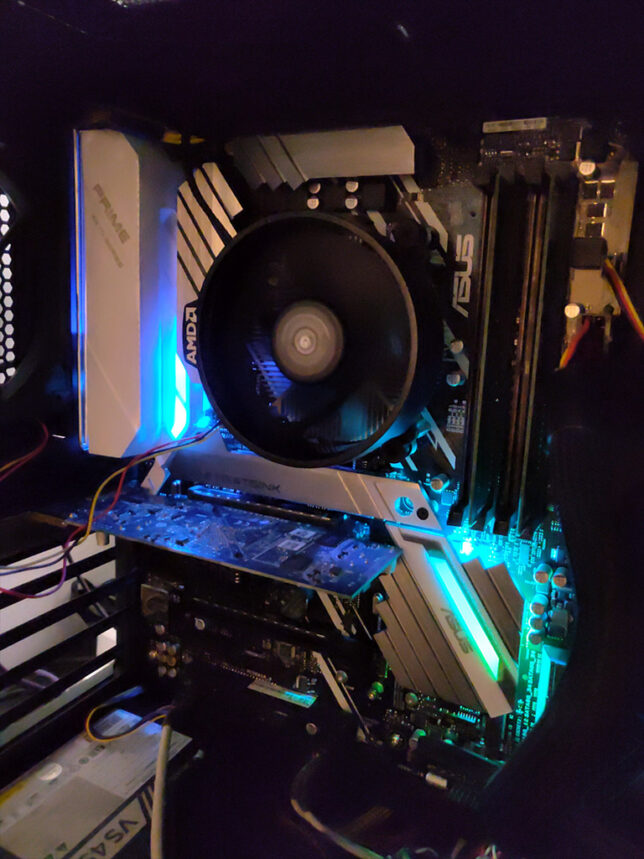
The Build Details
Having settled on FreeNAS, I went about researching which hardware I would need. My goal here was to not spend too much money, but at the same time not cheap out and compromise on reliability.
CPU, Motherboard, RAM
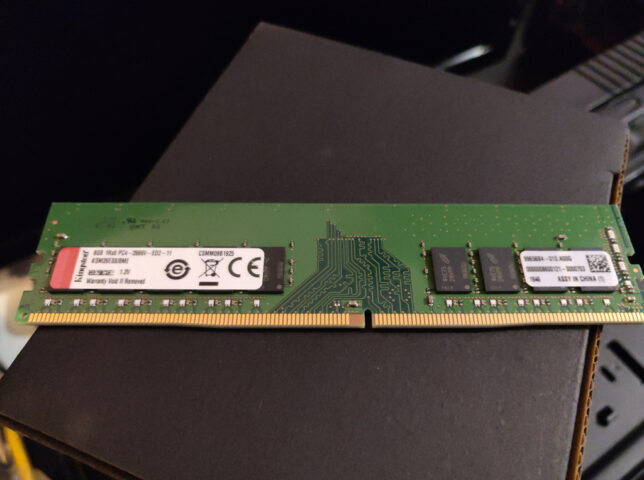
ECC (Error Checking and Correction) RAM is very important for ZFS, so this is basically what my build hinged on.
I found that AMD Ryzen CPUs support ECC, and so do most Ryzen compatible motherboards.
Importantly, in my research I found that Ryzen APU CPUs do not support ECC. Make sure you do not get an APU if ECC is important to you.
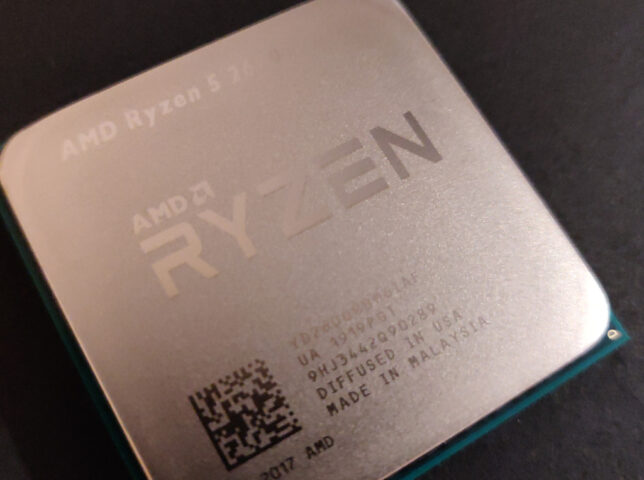
Additionally, many others report much better stability running FreeNAS on AMD Ryzen Generation 2 chips and above. With this in mind, I decided I would use at least an AMD Ryzen 2xxx CPU.
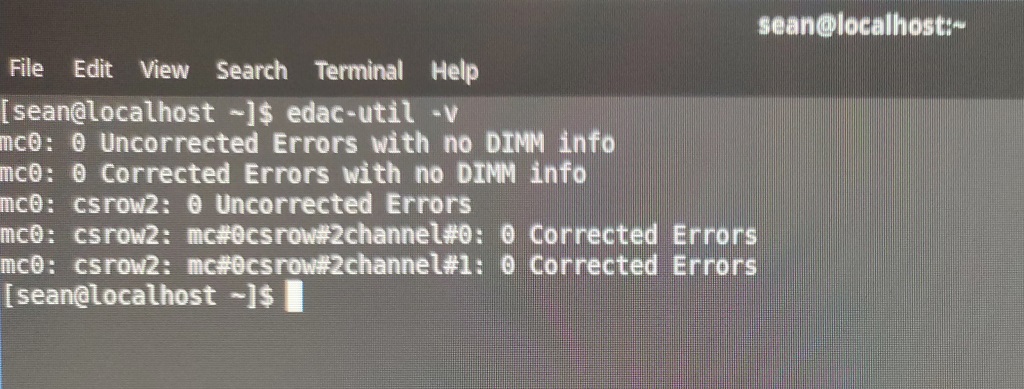
I also made an initial mistake here in my build buying a Gigabyte B450M DS3H motherboard. The product specs seem to indicate that it supports ECC, and so did a review I found on Anandtech. In reality the Gigabyte board does not support the ECC feature. Rather it ‘supports’ ECC memory by allowing the system to boot with ECC RAM installed, but you don’t get the actual error checking and correction!
I figured this out after booting it up with Fedora Rawhide as well as a couple of uBuntu Server distributions and running the edac-utils package. In all cases edac-utils failed to find ECC support / or any memory controller.
Checking ECC support with edac-utils
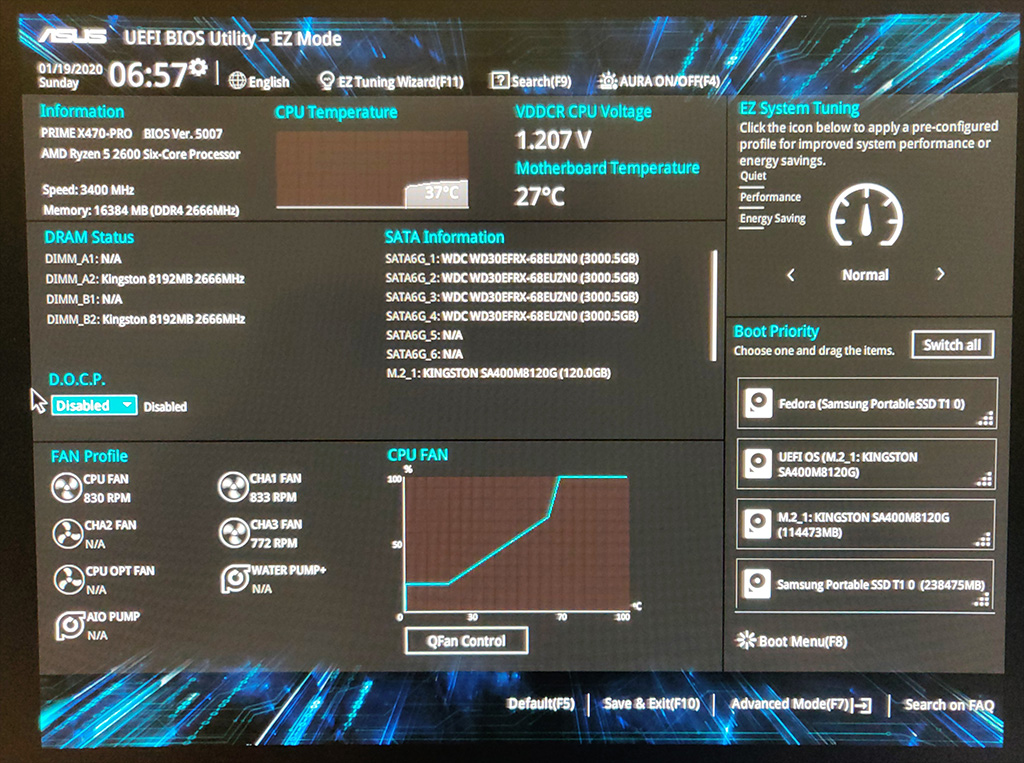
The Asus board I settled on supports ECC and edac-utils confirmed this.
The motherboard also has an excellent EFI BIOS. I found it easy to get to the ECC and Virtualization settings.
Storage
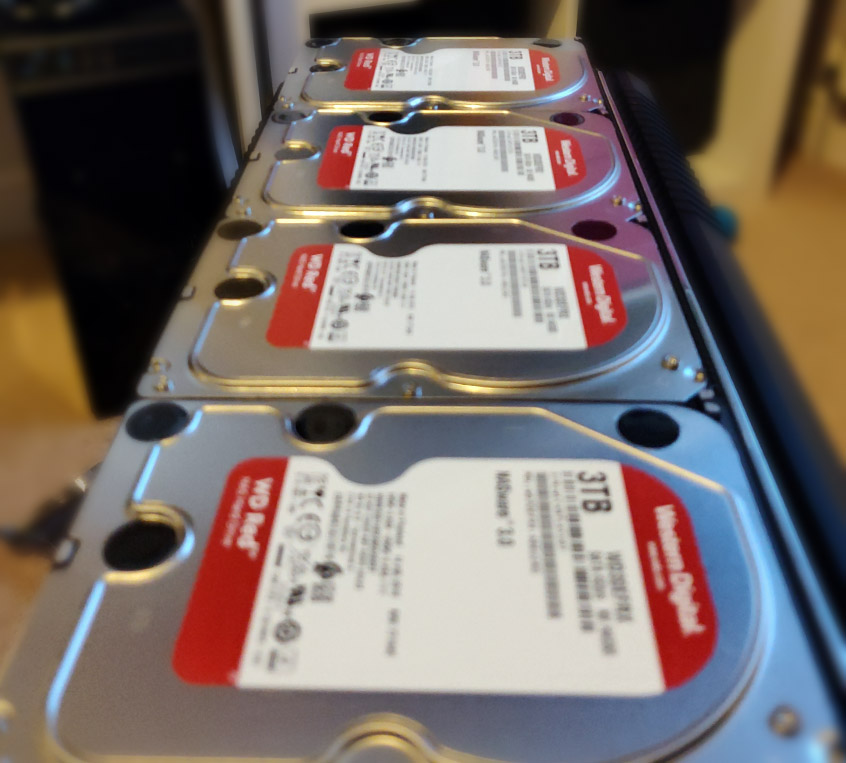
I used 4 x Western Digital 3TB Red hard drives for the RAIDZ1 main storage pool.
The SSD storage pool consists of 2 x Crucial MX500 250GB SSD SATA drives in a mirror configuration. This configuration is for running Virtual Machines and the NFS storage for my Kubernetes cluster.
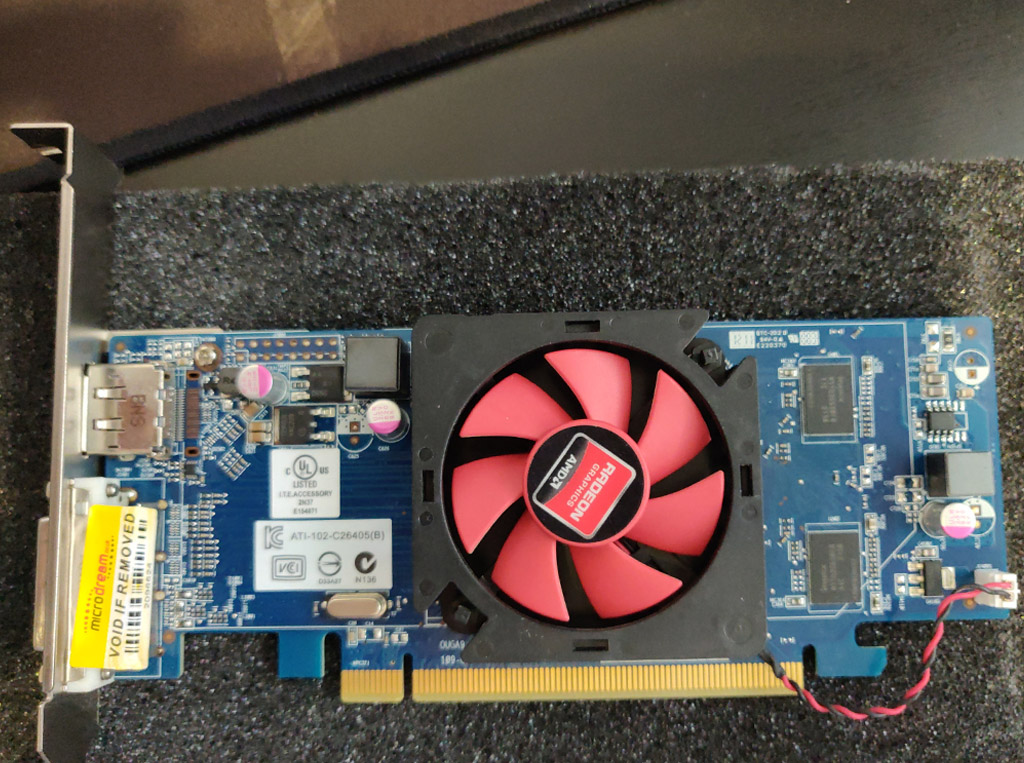
Graphics Card
The crossing out of APUs also meant I would need a discrete graphic card for console / direct access, and to install the OS initially. I settled on a cheap PCI Express Graphics card off Ebay for this.
Having chosen a beefy six core Ryzen 2600 CPU, I decided I didn’t need to get a fancy graphics card for live media encoding. (Plex does much better with this). If media encoding speed and efficiency is important to you, then consider something like an nVIDIA or AMD card.
For me, the six core CPU does a fine job at encoding media for home and remote streaming over Plex.
Network
I wanted to use this system to server file storage for my home PCs and equipment. Besides this, I also wanted to export and share storage to my Raspberry Pi Kubernetes cluster, which runs on it’s own, dedicated network.
The simple solution for me here was multihoming the server onto the two networks. So I would need two network interface cards, with at least 1Gbit/s capability.
The motherboard already has an Intel NIC onboard, so I added two more ports with an Intel Pro Dual Port Gigabit PCI Express x4 card.
Configuration Highlights
I’ll detail the highlights of my configuration for each service the multipurpose FreeNAS Server build hosts.
Main System Setup
The boot device is the 120GB M.2 nVME SSD. I installed FreeNAS 11.3 using a bootable USB drive.
FreeNAS Configuration
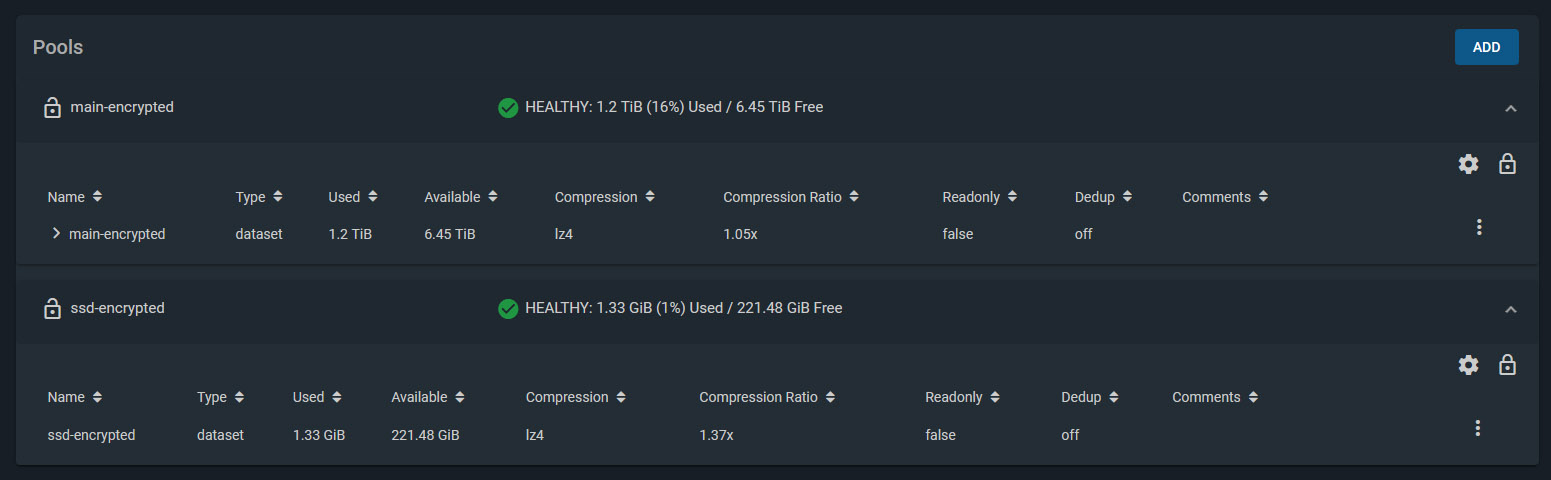
I created two Storage Pools. Both are encrypted. Besides the obvious protection encryption provides, this also makes it easier to recycle drives later on if I need to.
Storage Pool 1
4 x Western Digital Red 3TB drives, configured with RAIDZ1. (1 disk’s worth of storage is effectively lost for parity, giving roughly 8-9 TB of usable space).
Deduplication turned off
Compression enabled
Storage Pool 2
2 x Crucial MX500 250GB SSD drives, configured in a Mirror (1 disk mirrors the other, providing a backup if one fails).
Deduplication turned off
Compression enabled
The network is set to use the onboard NIC to connect to my main home LAN. One of the ports on the Intel dual port NIC connects to my Raspberry Pi Kubernetes Cluster network and assigned a static IP address on that network.
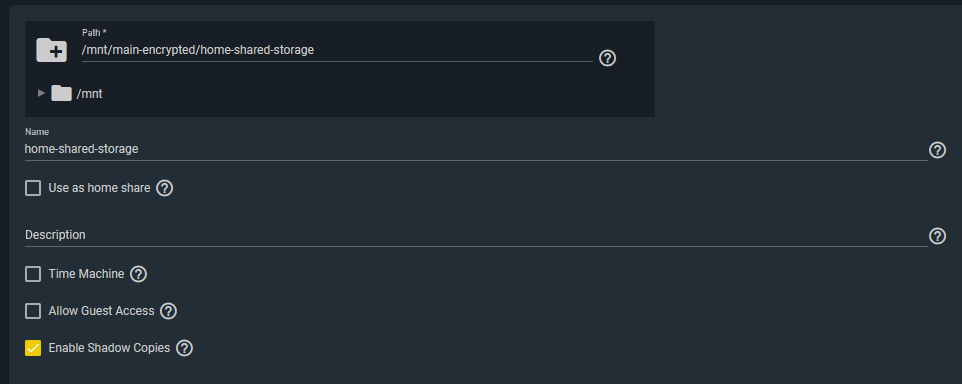
Windows Shares
My home network’s storage shares are simple Windows SMB Shares.
I created a dedicated user in FreeNAS which I configured in the SMB share configuration ACLs to give access.
Windows machines then simply mount the network location / path as mapped drives.
I also enabled Shadow Copies. FreeNAS supports this to enable Windows to use Shadow Copies.
Pi-hole Configuration
I setup a dedicated uBuntu Server 18.04 LTS Virtual Machine using FreeNAS’ built-in VM support (bhyve). Before doing this, I enabled virtualization support in the motherboard BIOS settings. (SVM Mode = Enabled).
I used the standard installation method for Pi-Hole. I made sure the VM was using a static IP address and was bridged to my home network. Then I reconfigured my home DHCP server to dish out the Pi-hole’s IP address as the primary DNS server to all clients.
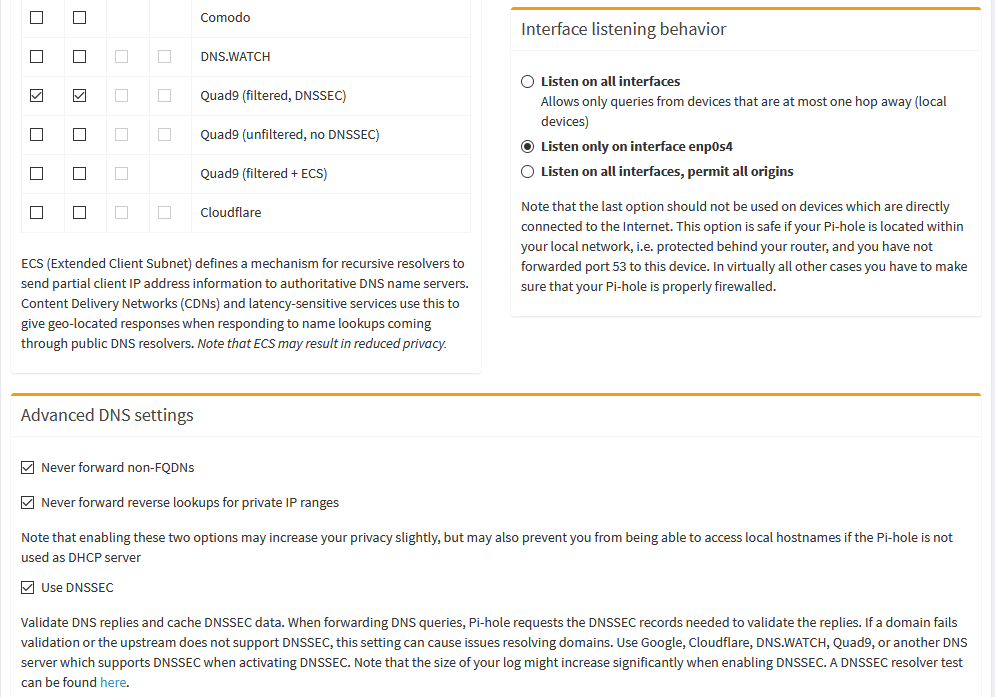
For the DNS upstream servers that Pi-hole uses, I chose to use the Quad9 (filtered, DNSSEC) ones, and enabled DNSSEC.
NextCloud
NextCloud has a readily available plugin for FreeNAS. However, out of the box you get no SSL. You’ll need to setup your networking at home to allow remote access. Additionally, you’ll need to get an SSL certificate. I used Let’s Encrypt.
Plex was a simple setup. Simply install the Plex FreeNAS plugin from the main Plugins page and follow the wizard. It will install and configure a jail to run Plex.
To mount your media, you need to stop the Plex jail and edit it to add your media location on your storage. Here is an example of my mount point. It basically mounts the media directory I use to keep all my media into the Plex Jail’s filesystem.
NFS Storage for Kubernetes
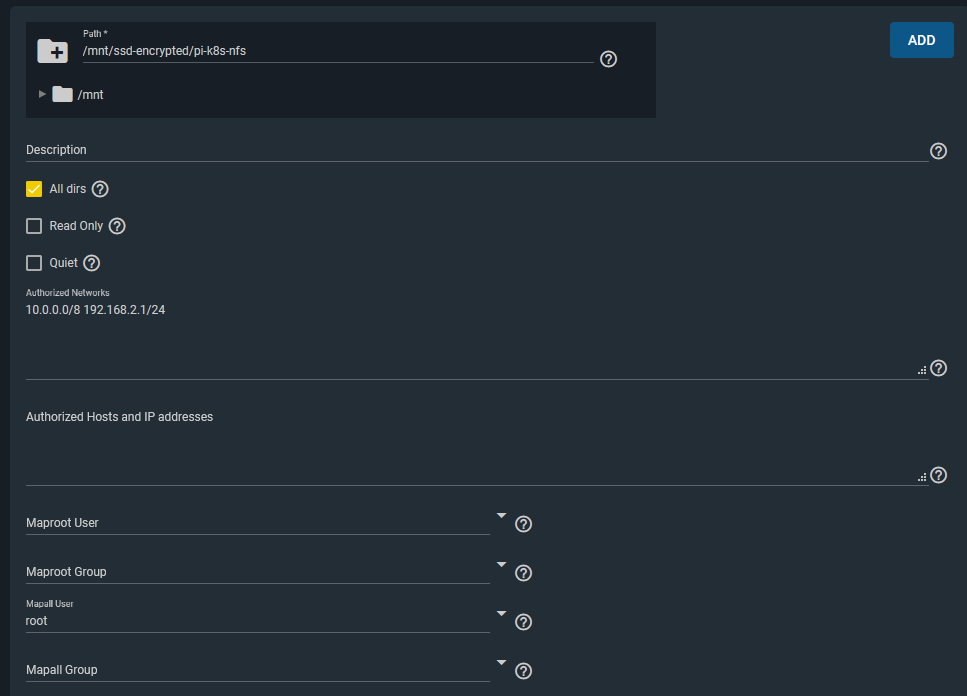
Lastly, I setup an NFS share / export for my Raspberry Pi Kubernetes Cluster to use for Persistent Volumes to attach to pods.
The key points here were that I allowed the two network ranges I wanted to have access to this storage from. (10.0.0.0/8 is my Kubernetes cluster network). I also configured a Mapall user of ‘root’, which allows the storage to be writeable when mounted by pods/containers in Kubernetes. (Or any other clients that mount this storage).
I was happy with this level of access for this particular NFS storage share from these two networks.
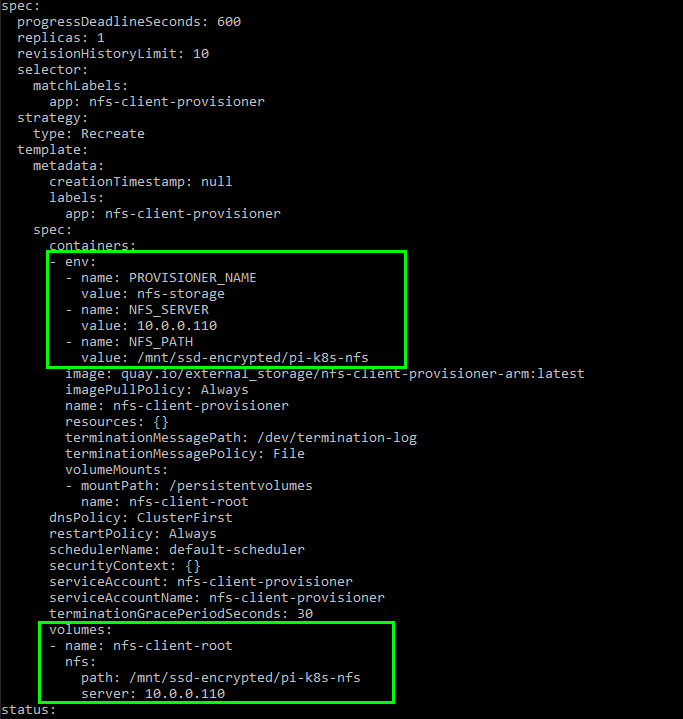
I modified the deployment manifest to point it to my FreeNAS machine’s IP address and NFS share path.
With that done, pods can now request persistent storage with a Persistent Volume Claim (PVC). The NFS client provisioner will create a directory for the pod (named after the pod itself) on the NFS mount and mount that to your pod.
Final Thoughts
So far the multipurpose FreeNAS server build has been very stable. It has been happily serving our home media streaming, storage, and shared storage needs.
It’s also providing persistent storage for my Kubernetes lab environment which is great, as I prefer not to use the not-so-durable microSD cards on the Raspberry Pi’s themselves for storage.
The disk configuration size seems fine for our needs. At the moment we’re only using ~20% of the total storage, so there is plenty of room to grow.
I’m also happy with the ability to run custom VMs or Jails for additional services, though I might need to add another 16GB of ECC RAM in the future to support more as ZFS does well with plenty of memory.