Editing a webapp or site’s HTTP headers with Lambda@Edge and CloudFront

dark clouds in the sky

Putting CloudFront in front of a static website that is hosted in an S3 bucket is an excellent way of serving up your content and ensuring it is geographically performant no matter where your users are by leveraging caching and CloudFront’s geographically placed edge locations. You can go one step further and customise your HTTP headers with Lambda@Edge and CloudFront.

The basic Cloudfront and S3 origin setup goes a little something like this:

  • Place your static site files in an S3 bucket that is set up for static web hosting
  • Create a CloudFront distribution that uses the S3 bucket content as the origin
  • Add a cache behaviour to the distribution

This is an excellent way of hosting a website or webapp that can be delivered anywhere in the world with ultra low latency, and you don’t even have to worry about running your own webserver to host the content. Your content simply sits in an S3 bucket and is delivered by CloudFront (and can be cached too).

Modifying HTTP headers with Lambda@Edge and CloudFront

But what happens if you want to get a little more technical and serve up custom responses for any HTTP requests for your website content? Traditionally you’d need a custom webserver that you could use to modify the HTTP request/response lifecycle (such as Varnish / Nginx).

That was the case until Lambda@Edge was announced.

I was inspired to play around with Lambda@Edge after reading Julia Evan’s blog post about Cloudflare Workers, where she set up something similar to add a missing Content-Type header to responses from her blog’s underlying web host. I wanted to see how easy it was to handle in an AWS setup with S3 hosted content and CloudFront.

So here is a quick guide on how to modify your site / webapp’s HTTP responses when you have CloudFront sitting in front of it.

Note: you can run Lambda@Edge functions on all these CloudFront events (not just the one mentioned above):

  • After CloudFront receives a request from a viewer (viewer request)
  • Before CloudFront forwards the request to the origin (origin request)
  • After CloudFront receives the response from the origin (origin response)
  • Before CloudFront forwards the response to the viewer (viewer response)
  • You can return a custom response from Lambda@Edge without even sending a request to the CloudFront origin at all.

Of course the only ones that are guaranteed to always run are the Viewer type events. This is because origin request and origin response events only happen when the requested object is not already cached in an edge location. In this case CloudFront forwards a request to the origin and will receive a response back from the origin (hopefully!), and these events you can indeed act upon.

How to edit HTTP responses with Lambda@Edge

Create a new Lambda function and make sure it is placed in the us-east-1 region. (There is a requirement here by AWS that the function must be created in the US East / N. Virginia Region). When you create the function, it is deployed to all regions across the world with their own replication version of the Lambda@Edge function.

Fun fact: your CloudWatch logs for Lambda@Edge will appear in the relevant region where your content is requested from – i.e. based on the region the edge location exists in that ends up serving up your content.

You’ll need to create a new IAM Role for the function to leverage, so use the Lambda@Edge role template.

Select Node 6.10 runtime for the function. In the code editor, setup the following Node.js handler function which will do the actual header manipulation work:

exports.handler = (event, context, callback) => {
    const response = event.Records[0].cf.response;
    const headers = response.headers;
    
    headers['x-sean-example'] = [{key: 'X-Sean-Example', value: 'Lambda @ Edge was here!'}];
    
    callback(null, response);
};
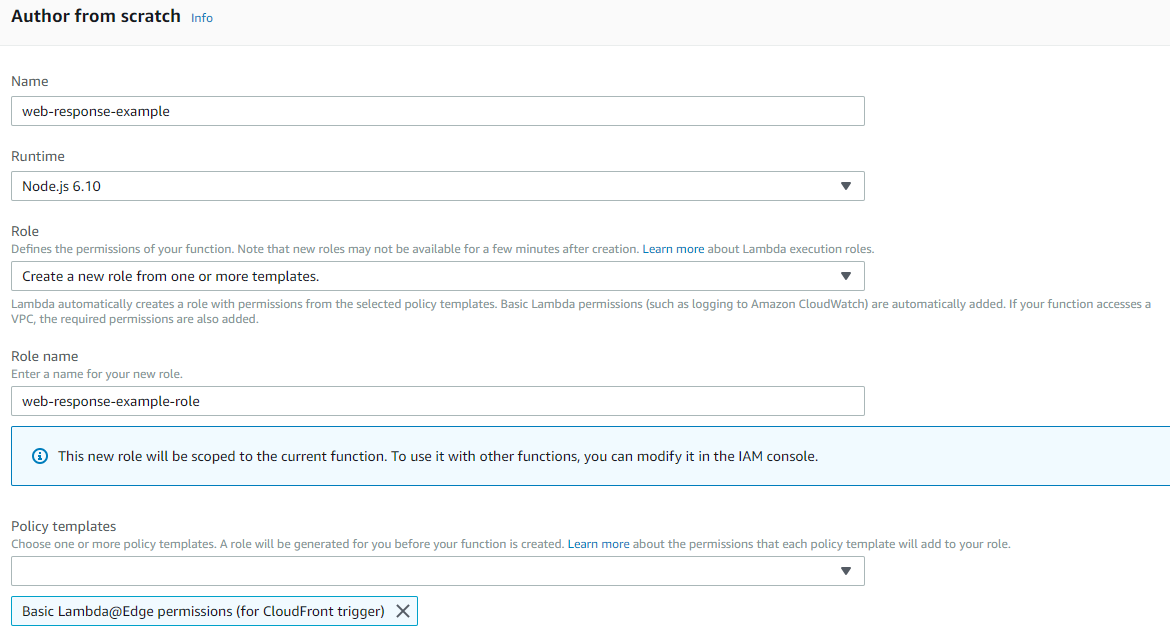
basic lambda function configuration

The function will receive an event for every request passing through. In that event you simply retrieve the CloudFront response event.Records[0].cf.response and set your required header(s) by referencing the key by header name and setting the value.

Make sure you publish a version of the Lambda function, as you’ll need to attach it to your CloudFront behavior by ARN that includes the version number. (You can’t use $LATEST, so make sure you use a numerical version number that you have published).

Now if you make a new request to your content, you should see the new header being added by Lambda@Edge!
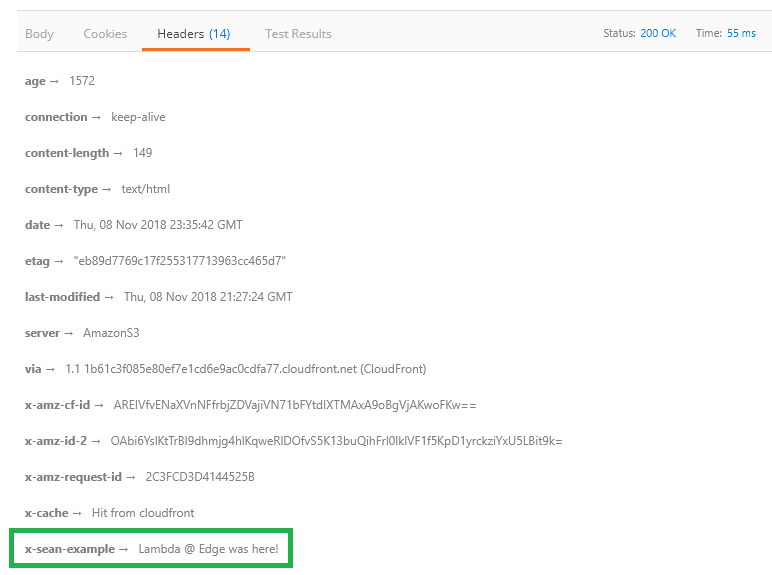
HTTP header view showing modified header and value.

Lambda@Edge is a great way to easily modify CloudFront Distribution related events in the HTTP lifecycle. You can keep response times super low as the Lambda functions are executed at the edge location closest to your users. It also helps you to keep your infrastructure as simple as possible by avoiding the use of complicated / custom web servers that would otherwise just add unecessary operational overhead.

Running an S3 API compatible object storage server (Minio) on the Raspberry Pi

I’ve recently become interested in hosting my own local S3 API compatible object storage server at home.

So tonight I set about setting up Minio.

Image result for minio

Minio is an object storage server that is S3 API compatible. This means I’ll be able to use my working knowledge of the Amazon S3 API and tools, but to interact with my own, locally hosted storage service running on a Raspberry Pi.

I had heard about Zenko before (an S3 API compatible object storage server) but was searching around for something really lightweight that I could easily run on ARM architecture – i.e. my Raspberry Pi model 3 I have sitting on my desk right now. In doing so, Minio was the first that I found that could easily be compiled to run on the Raspberry Pi.

The goal right now is to have a local object storage service that is compatible with S3 APIs that I can use for home use. This has a bunch of cool use cases, and the ones I am specifically interested in right now are:

  • Being able to write scripts that interact with S3, but test them locally with Minio before even having to think about deploying them to the cloud. A local object storage API is going to be free and fast. Plus it’s great knowing that you’re fully in control of your own data.
  • Setting up a publically exposable object storage service that I can target with serverless functions that I plan to be running on demand in the cloud to do processing and then output artifacts to my home object storage service.

The second use case above is what I intend on doing to send ffmpeg processed video to. Basically I want to be able to process video from online services using something like AWS Lambda (probably using ffmpeg bundled in with the function) and output the resulting files to my home storage system.

The object storage service will receive these output files from Lambda and I’ll have a cronjob or rsync setup to then sync the objects placed into my storage bucket(s) to my home Plex media share.

This means I’ll be able to remotely queue up stuff to watch via a simple interface I’ll expose (or a message queue of some sort) to be processed by Lambda, and by the time I’m home everything will be ready to watch in Plex.

Normally I would be more interesting in running the Docker image for Minio, but at home I want something that is really cheap to run, and so compiling Minio for Raspberry Pi makes total sense to me here, as this device is super cheap to level powered on 24/7 as opposed to running something beefier that would instead run as a Docker host or lightweight Kubernetes home cluster.

Here’s the quick start up guide to get it running on Raspberry Pi

You’ll basically download Go, extract it, set it up on your path, then use it to compile Minio’s source code into an ARM compatible binary that you can run on your pi.

wget https://dl.google.com/go/go1.10.3.linux-armv6l.tar.gz
sudo tar -C /usr/local -xzf go1.10.3.linux-armv6l.tar.gz
export PATH=$PATH:/usr/local/go/bin # put into ~/.profile
source .profile
go get -u github.com/minio/minio
mkdir ~/minio-data
cd go/bin
./minio server ~/minio-data/

And you’re up and running! It’s that simple to get going quickly.

Running interactively you’ll get a default access and secret key in the terminal, so head on over to the Web UI / interface to check things out: http://your-raspberry-pi-ip-or-hostname:9000/minio/

Enter your credentials to login.

Of course at this stage you can also start using your S3 API compatible command line tools to start working with your new object storage server too.

Nice!

Provision your own Kubernetes cluster with private network topology on AWS using kops and Terraform – Part 2

Getting Started

If you managed to follow and complete the previous blog post, then you managed to get a Kubernetes cluster up and running in your own private AWS VPC using kops and Terraform to assist you.

In this blog post, you’ll cover following items:

  • Setup upstream DNS for your cluster
  • Get a Kubernetes Dashboard service and deployment running
  • Deploy a basic metrics dashboard for Kubernetes using heapster, InfluxDB and Grafana

Upstream DNS

In order for services running in your Kubernetes cluster to be able to resolve services outside of your cluster, you’ll now configure upstream DNS.

Containers that are started in the cluster will have their local resolv.conf files automatically setup with what you define in your upstream DNS config map.

Create a ConfigMap with details about your own DNS server to use as upstream. You can also set some external ones like Google DNS for example (see example below):

apiVersion: v1
kind: ConfigMap
metadata:
  name: kube-dns
  namespace: kube-system
data:
  stubDomains: |
    {"yourinternaldomain.local": ["10.254.1.1"]}
  upstreamNameservers: |
    ["10.254.1.1", "8.8.8.8", "8.8.4.4"]

Save your ConfigMap as kube-dns.yaml and apply it to enable it.

kubectl apply -f kube-dns.yaml

You should now see it listed in Config Maps under the kube-system namespace.

Kubernetes Dashboard

Deploying the Kubernetes dashboard is as simple as running one kubectl command.

kubectl apply -f https://raw.githubusercontent.com/kubernetes/dashboard/master/src/deploy/recommended/kubernetes-dashboard.yaml

You can then start a dashboard proxy using kubectl to access it right away:

kubectl proxy

Head on over to the following URL to access the dashboard via the proxy you ran:

http://localhost:8001/api/v1/namespaces/kube-system/services/https:kubernetes-dashboard:/proxy/

You can also access the Dashboard via the API server internal elastic load balancer that was set up in part 1 of this blog post series. E.g.

https://your-internal-elb-hostname/api/v1/namespaces/kube-system/services/https:kubernetes-dashboard:/proxy/#!/overview?namespace=default

Heapster, InfluxDB and Grafana (now deprecated)

Note: Heapster is now deprecated and there are alternative options you could instead look at, such as what the official Kubernetes git repo refers you to (metrics-server). Nevertheless, here are the instructions you can follow should you wish to enable Heapster and get a nice Grafana dashboard that showcases your cluster, nodes and pods metrics…

Clone the official Heapster git repo down to your local machine:

git clone https://github.com/kubernetes/heapster.git

Change directory to the heapster directory and run:

kubectl create -f deploy/kube-config/influxdb/
kubectl create -f deploy/kube-config/rbac/heapster-rbac.yaml

These commands will essentially launch deployments and services for grafana, heapster, and influxdb.

The Grafana service should attempt to get a LoadBalancer from AWS via your Kubernetes cluster, but if this doesn’t happen, edit the monitoring-grafana service YAML configuration and change the type to LoadBalancer. E.g.

"type": "LoadBalancer",

Save the monitoring-grafana service definition and your cluster should automatically provision a public facing ELB and set it up to point to the Grafana pod.

Note: if you want it available on an internal load balancer instead, you’ll need to create your grafana service using the aws-load-balancer-internal annotation instead.

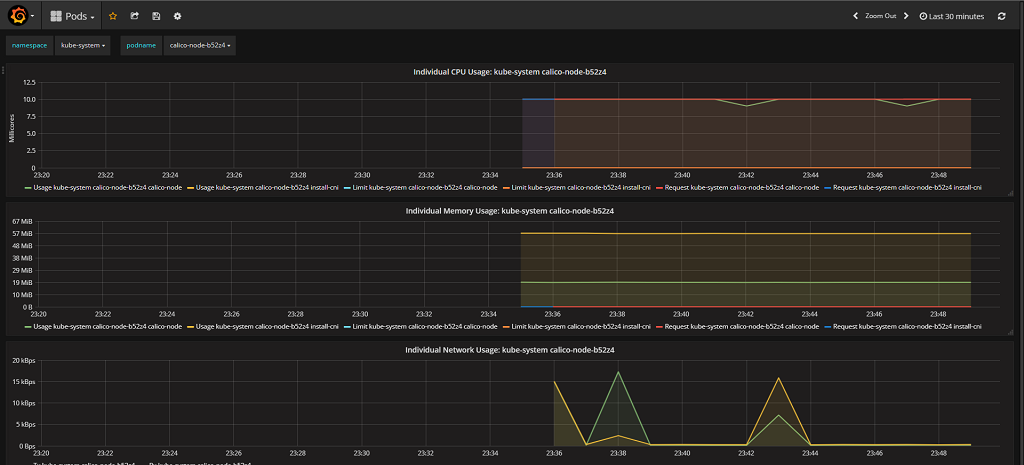
Grafana dashboard for Kubernetes with Heapster

Now that you have Heapster running, you can also get some metrics displayed directly in your Kubernetes dashboard too.

You may need to restart the dashboard pods to access the new performance stats in the dashboard though. If this doesn’t work, delete the dashboard deployment, service, pods, role, and then re-deploy the dashboard using the same process you followed earlier.

Once its up and running, use the DNS for the new ELB to access grafana’s dashboard, login with admin/admin and change the default admin password to something secure and save. You can now access cluster stats/performance stats in kubernetes, as well as in Grafana.

Closing off

This concludes part two of this series. To sum up, you managed to configure upstream DNS, deploy the Kubernetes dashboard and set up Heapster to allow you to see metrics in the dashboard, as well as deploying InfluxDB for storing the metric data with Grafana as a front end service for viewing dashboards.

Provision your own Kubernetes cluster with private network topology on AWS using kops and Terraform – Part 1

Goals

In this post series I’ll be covering how to provision a brand new self-hosted Kubernetes environment provisioned into AWS (on top of EC2 instances) with a specific private networking topology as follows:

  • Deploy into an existing VPC
  • Use existing VPC Subnets
  • Use private networking topology (Calico), with a private/internal ELB to access the API servers/cluster
  • Don’t use Route 53 AWS DNS services or external DNS, instead use Kubernetes gossip DNS service for internal cluster name resolution, and allow for upstream DNS to be set up to your own private DNS servers for outside-of-cluster DNS lookups

This is a more secure set up than a more traditional / standard kops provisioned Kubernetes cluster,  placing API servers on a private subnet, yet still allows you the flexibility of using Load Balanced services in your cluster to expose web services or APIs for example to the public internet if you wish.

Set up your workstation with the right tools

You need a Linux or MacOS based machine to work from (management station/machine). This is because kops only runs on these platforms right now.

sudo apt install python-pip
  • Use pip to install the awscli
pip install awscli --upgrade --user
  • Create yourself an AWS credentials file (~/.aws/credentials) and set it up to use an access and secret key for your kops IAM user you created earlier.
  • Setup the following env variables to reference from, but make sure you fill in the values you require for this new cluster. So change the VPC ID, S3 state store bucket name, and cluster NAME.
export ZONES=us-east-1b,us-east-1c,us-east-1d
export KOPS_STATE_STORE=s3://your-k8s-state-store-bucket
export NAME=yourclustername.k8s.local
export VPC_ID=vpc-yourvpcidgoeshere
  • Note for the above exports above, ZONES is used to specify where the master nodes in the k8s cluster will be placed (Availability Zones). You’ll definitely want these spread out for maximum availability

Set up your S3 state store bucket for the cluster

You can either create this manually, or create it with Terraform. Here is a simple Terraform script that you can throw into your working directory to create it. Just change the name of the bucket to your desired S3 bucket name for this cluster’s state storage.

Remember to use the name for this bucket that you specified in your KOPS_STATE_STORE export variable.

resource "aws_s3_bucket" "state_store" {
  bucket        = "${var.name}-${var.env}-state-store"
  acl           = "private"
  force_destroy = true

  versioning {
    enabled = true
  }

  tags {
    Name        = "${var.name}-${var.env}-state-store"
    Infra       = "${var.name}"
    Environment = "${var.env}"
    Terraformed = "true"
  }
}

Terraform plan and apply your S3 bucket if you’re using Terraform, passing in variables for name/env to name it appropriately…

terraform plan
terraform apply

Generate a new SSH private key for the cluster

  • Generate a new SSH key. By default it will be created in ~/.ssh/id_rsa
ssh-keygen -t rsa

Generate the initial Kubernetes cluster configuration and output it to Terraform script

Use the kops tool to create a cluster configuration, but instead of provisioning it directly, you’ll output it to terraform script. This is important, as you’ll be wanting to change values in this output file to provision the cluster into existing VPC and subnets. You also want to change the ELB from a public facing ELB to internal only.

kops create cluster --master-zones=$ZONES --zones=$ZONES --topology=private --networking=calico --vpc=$VPC_ID --target=terraform --out=. ${NAME}

Above you ran the kops create cluster command and specified to use a private topology with calico networking. You also designated an existing VPC Id, and told the tool to create terraform script as the output in the current directory instead of actually running the create cluster command against AWS right now.

Change your default editor for kops if you require a different one to vim. E.g for nano:

set EDITOR=nano

Edit the cluster configuration:

kops edit cluster ${NAME}

Change the yaml that references the loadBalancer value as type Public to be Internal.

While you are still in the editor for the cluster config, you need to also change the entire subnets section to reference your existing VPC subnets, and egress pointing to your NAT instances. Remove the current subnets section, and add the following template, (updating it to reference your own private subnet IDs for each region availability zone, and the correct NAT instances for each too. (You might possibly use one NAT instance for all subnets or you may have multiple). The Utility subnets should be your public subnets, and the Private subnets your private ones of course. Make sure that you reference subnets for the correct VPC you are deploying into.

subnets:
- egress: nat-2xcdc5421df76341
  id: subnet-b32d8afg
  name: us-east-1b
  type: Private
  zone: us-east-1b
- egress: nat-04g7fe3gc03db1chf
  id: subnet-da32gge3
  name: us-east-1c
  type: Private
  zone: us-east-1c
- egress: nat-0cd542gtf7832873c
  id: subnet-6dfb132g
  name: us-east-1d
  type: Private
  zone: us-east-1d
- id: subnet-234053gs
  name: utility-us-east-1b
  type: Utility
  zone: us-east-1b
- id: subnet-2h3gd457
  name: utility-us-east-1c
  type: Utility
  zone: us-east-1c
- id: subnet-1gvb234c
  name: utility-us-east-1d
  type: Utility
  zone: us-east-1d
  • Save and exit the file from your editor.
  • Output a new terraform config over the existing one to update the script based on the newly changed ELB type and subnets section.
kops update cluster --out=. --target=terraform ${NAME}
  • The updated file is now output to kubernetes.tf in your working directory
  • Run a terraform plan from your terminal, and make sure that the changes will not affect any existing infrastructure, and will not create or change any subnets or VPC related infrastructure in your existing VPC. It should only list out a number of new infrastructure items it is going to create.
  • Once happy, run terraform apply from your terminal
  • Once terraform has run with the new kubernetes.tf file, the certificate will only allow the standard named cluster endpoint connection (cert only valid for api.internal.clustername.k8s.local for example). You now need to re-run kops update and output to terraform again.
kops update cluster $NAME --target=terraform --out=.
  • This will update the cluster state in your S3 bucket with new certificate details, but not actually change anything in the local kubernetes.tf file (you shouldn’t see any changes here). However you can now run a rolling update rolling update with the cloudonly and force –yes options:
kops rolling-update cluster $NAME --cloudonly --force --yes

This will roll all the masters and nodes in the cluster (the created autoscaling groups will initialise new nodes from the launch configurations) and when the ASGs initiate new instances, they’ll get the new certs applied from the S3 state storage bucket. You can then access the ELB endpoint on HTTPS, and you should get an auth prompt popup.

Find the endpoint on the internal ELB that was created. The rolling update may take around 10 minutes to complete, and as mentioned before, will terminate old instances in the Autoscaling group and bring new instances up with the new certificate configuration.

Tag your public subnets to allow auto provisioning of ELBs for Load Balanced Services

In order to allow Kubernetes to automatically create load balancers (ELBs) in AWS for services that use the LoadBalancer configuration, you need to tag your utility subnets with a special tag to allow the cluster to find these subnets automatically and provision ELBs for any services you create on-the-fly.

Tag the subnets that you are using as utility subnets (public) with the following tag:

Key: kubernetes.io/role/elb Value: (Don’t add a value, leave it blank)

Tag your private subnets for internal-only ELB provisioning for Load Balanced Services

In order to allow Kubernetes to automatically create load balancers (ELBs) in AWS for services that use the LoadBalancer configuratio and a private facing configuration, you need to tag the private subnets that the cluster operates in with a special tag to allow k8s to find these subnets automatically.

Tag the subnets that you are using as private (where your nodes and master nodes should be running now) with the following two tags:

Key: kubernetes.io/cluster/{yourclusternamehere.k8s.local} Value: shared
Key: kubernetes.io/role/internal-elb Value: 1

As an example for the above, the key might end up with a value of “kubernetes.io/cluster/yourclusternamehere.k8s.local” if your cluster is named “yourclusternamehere.k8s.local” (remember you named your cluster when you created your local workstation EXPORT value for {NAME}.

Closing off

This concludes part one of this series for now.

As a summary, you should now have a kubernetes cluster up and running in your private subnets, spread across availability zones, and you’ve done it all using kops and Terraform.

Straighten things out by creating a git repository, and commiting your terraform artifacts for the cluster and storing them in version control. Watch out for the artifacts that kops output along with the Terraform script like the private certificate files – these should be kept safe.

Part two should be coming soon, where we’ll run through some more tasks to continue setting the cluster up like setting upstream DNS, provisioning the Kubernetes Dashboard service/pod and more…

Streamlining AWS AMI image creation and management with Packer

If you want to set up quick and efficient provisioning and automation pipelines and you rely on machine images as a part of this framework, you’ll definitely want to prepare and maintain preconfigured images.

With AWS you can of course leverage Amazon’s AMIs for EC2 machine images. If you’re configuring autoscaling for an application, you definitely don’t want to be setting up your launch configurations to launch new EC2 instances using base Amazon AMI images and then installing any prerequesites your application may need at runtime. This will be slow and tedious and will lead to sluggish and unresponsive auto scaling.

Packer comes in at this point as a great tool to script, automate and pre-bake custom AMI images. (Packer is a tool by Hashicorp, of Terraform fame). Packer also enables us to store our image configuration in source control and set up pipelines to test our images at creation time, so that when it comes time to launching them, we can be confident they’ll work.

Packer doesn’t only work with Amazon AMIs. It supports tons of other image formats via different Builders, so if you’re on Azure or some other cloud or even on-premise platform you can also use it there.

Below I’ll be listing out the high level steps to create your own custom AMI using Packer. It’ll be Windows Server 2016 based, enable WinRM connections at build time (to allow Packer to remote in and run various setup scripts), handle sysprep, EC2 configuration like setting up the administrator password, EC2 computer name, etc, and will even run some provioning tests with Pester

You can grab the files / policies required to set this up on your own from my GitHub repo here.

Setting up credentials to run Packer and an IAM role for your Packer build machine to assume

First things first, you need to be able to run Packer with the minimum set of permissions it needs. You can run packer on an EC2 instance that has an EC2 role attached that provides it the right permissions, or if you’re running from a workstation, you’ll probably want to use an IAM user access/secret key.

Here is an IAM policy that you can use for either of these. Note it also includes an iam:PassRole statement that references an AWS account number and specific role. You’ll need to update the account number to your own, and create the Role called Packer-S3-Access in your own account.

IAM Policy for user or instance running Packer:

{
    "Version": "2012-10-17",
    "Statement": [
        {
            "Effect": "Allow",
            "Action": [
                "ec2:AttachVolume",
                "ec2:AuthorizeSecurityGroupIngress",
                "ec2:CopyImage",
                "ec2:CreateImage",
                "ec2:CreateKeypair",
                "ec2:CreateSecurityGroup",
                "ec2:CreateSnapshot",
                "ec2:CreateTags",
                "ec2:CreateVolume",
                "ec2:DeleteKeypair",
                "ec2:DeleteSecurityGroup",
                "ec2:DeleteSnapshot",
                "ec2:DeleteVolume",
                "ec2:DeregisterImage",
                "ec2:DescribeImageAttribute",
                "ec2:DescribeImages",
                "ec2:DescribeInstances",
                "ec2:DescribeRegions",
                "ec2:DescribeSecurityGroups",
                "ec2:DescribeSnapshots",
                "ec2:DescribeSubnets",
                "ec2:DescribeTags",
                "ec2:DescribeVolumes",
                "ec2:DetachVolume",
                "ec2:GetPasswordData",
                "ec2:ModifyImageAttribute",
                "ec2:ModifyInstanceAttribute",
                "ec2:ModifySnapshotAttribute",
                "ec2:RegisterImage",
                "ec2:RunInstances",
                "ec2:StopInstances",
                "ec2:TerminateInstances",
                "ec2:RequestSpotInstances",
                "ec2:CancelSpotInstanceRequests"
            ],
            "Resource": "*"
        },
        {
            "Effect":"Allow",
            "Action":"iam:PassRole",
            "Resource":"arn:aws:iam::YOUR_AWS_ACCOUNT_NUMBER_HERE:role/Packer-S3-Access"
        }
    ]
}

IAM Policy to attach to new Role called Packer-S3-Access (Note, replace the S3 bucket name that is referenced with a bucket name of your own that will be used to provision into your AMI images with). See a little further down for details on the bucket.

{
    "Version": "2012-10-17",
    "Statement": [
        {
            "Sid": "AllowS3BucketListing",
            "Action": [
                "s3:ListBucket"
            ],
            "Effect": "Allow",
            "Resource": [
                "arn:aws:s3:::YOUR-OWN-PROVISIONING-S3-BUCKET-HERE"
            ],
            "Condition": {
                "StringEquals": {
                    "s3:prefix": [
                        "",
                        "Packer/"
                    ],
                    "s3:delimiter": [
                        "/"
                    ]
                }
            }
        },
        {
            "Sid": "AllowListingOfdesiredFolder",
            "Action": [
                "s3:ListBucket"
            ],
            "Effect": "Allow",
            "Resource": [
                "arn:aws:s3:::YOUR-OWN-PROVISIONING-S3-BUCKET-HERE"
            ],
            "Condition": {
                "StringLike": {
                    "s3:prefix": [
                        "Packer/*"
                    ]
                }
            }
        },
        {
            "Sid": "AllowAllS3ActionsInFolder",
            "Effect": "Allow",
            "Action": [
                "s3:GetObject"
            ],
            "Resource": [
                "arn:aws:s3:::YOUR-OWN-PROVISIONING-S3-BUCKET-HERE/Packer/*"
            ]
        }
    ]
}

This will allow Packer to use the iam_instance_profile configuration value to specify the Packer-S3-Access EC2 role in your image definition file. Essentially, this allows your temporary Packer EC2 instance to assume the Packer-S3-Access role which will grant the temporary instance enough privileges to download some bootstrapping files / artifacts you may wish to bake into your custom AMI. All quite securely too, as the policy will only allow the Packer instance to assume this role in addition to the Packer instance being temporary too.

Setting up your Packer image definition

Once the above policies and roles are in place, you can set up your main packer image definition file. This is a JSON file that will describe your image definition as well as the scripts and items to provision inside it.

Look at standardBaseImage.json in the GitHub repository to see how this is defined.

standardBaseImage.json

{
  "builders": [{
    "type": "amazon-ebs",
    "region": "us-east-1",
    "instance_type": "t2.small",
    "ami_name": "Shogan-Server-2012-Build-{{isotime \"2006-01-02\"}}-{{uuid}}",
    "iam_instance_profile": "Packer-S3-Access",
    "user_data_file": "./ProvisionScripts/ConfigureWinRM.ps1",
    "communicator": "winrm",
    "winrm_username": "Administrator",
    "winrm_use_ssl": true,
    "winrm_insecure": true,
    "source_ami_filter": {
      "filters": {
        "name": "Windows_Server-2012-R2_RTM-English-64Bit-Base-*"
      },
      "most_recent": true
    }
  }],
  "provisioners": [
    {
        "type": "powershell",
        "scripts": [
            "./ProvisionScripts/EC2Config.ps1",
            "./ProvisionScripts/BundleConfig.ps1",
            "./ProvisionScripts/SetupBaseRequirementsAndTools.ps1",
            "./ProvisionScripts/DownloadAndInstallS3Artifacts.ps1"
        ]
    },
    {
        "type": "file",
        "source": "./Tests",
        "destination": "C:/Windows/Temp"
    },
    {
        "type": "powershell",
        "script": "./ProvisionScripts/RunPesterTests.ps1"
    },
    {
        "type": "file",
        "source": "PesterTestResults.xml",
        "destination": "PesterTestResults.xml",
        "direction": "download"
    }
  ],
  "post-processors": [
    {
        "type": "manifest"
    }
  ]
}

When Packer runs it will build out an EC2 machine as per the definition file, copy any contents specified to copy, and provision and execute any scripts defined in this file.

The packer image definition in the repository I’ve linked above will:

  • Create a Server 2012 R2 base instance.
  • Enable WinRM for Packer to be able to connect to the temporary instance.
  • Run sysprep to generalize it.
  • Set up EC2 configuration.
  • Download a bunch of tools (including Pester for running test once the image build is done).
  • Download any S3 artifacts you’ve placed in a specific bucket in your account and store them on the image.

S3 Downloads into your AMI during build

Create a new S3 bucket and give it a unique name of your choice. Set it to private, and create a new virtual folder inside the bucket called Packer. This bucket should have the same name you specified in the Packer-S3-Access role policy in the few policy definition sections.

Place any software installers or artifacts you would like to be baked into your image in the /Packer virtual folder.

Update the DownloadAndInstallS3Artifacts.ps1 script to reference any software installers and execute the installers. (See the commented out section for an example). This PowerShell script will download anything under the /Packer virtual folder and store it in your image under C:\temp\S3Downloads.

Testing

Finally, you can add your own Pester tests to validate tasks carried out during the Packer image creation.

Define any custom tests under the /Tests folder.

Here is simple test that checks that the S3 download for items from /Packer was successful (The Read-S3Object cmdlet will create the folder and download items into it from your bucket):

Describe  'S3 Artifacts Downloads' {
    It 'downloads artifacts from S3' {
        "C:\temp\S3Downloads" | Should -Exist
    }
}

The main image definition file ensures that these are all copied into the image at build time (to the temp directory) and from there Pester executes them.

Hook up your image build process to a build system like TeamCity and you can get it to output the results of the tests from PesterTestResults.xml.

Have fun automating and streamlining your image builds with Pester!