Looking to install the Weave Net CNI on AWS EKS / Kubernetes and remove the AWS CNI? Look no further. This guide will detail and demonstrate the process.
What this guide will cover
- Removing AWS CNI plugin
- Installing the Weave Net CNI on AWS EKS
- Making sure your EC2 instances will work with Weave
- Customising Weave Net CNI including custom pod overlay network ranges
- Removing max-pods limit on your EKS worker nodes
- Reconfiguring pods that don’t work after switching to Weave. (E.g. those that need to talk back to the EKS master nodes that do not get the Weave overlay network)
Want the Terraform source and test scripts to jump right in?
GitHub Terraform and test environment source
Otherwise, read on for step-by-step and more information…
There are a few guides floating around that detail how to install the Weave Net CNI plugin for Amazon Kubernetes clusters (EKS), however I’ve not seen them go into much detail.
Most tend to skip over some important steps and details when it comes to configuring weave and getting the pod networking functioning correctly.
There are also some important caveats that you should be aware of when replacing the AWS CNI Plugin with a different CNI, whether it be Weave, Calico, or any other.
Replacing CNI functionality
You should be 100% happy with what you’ll lose if completely replace the AWS CNI with another CNI. The AWS CNI has some very useful functionality such as:
- Assigning IP addresses (via ENIs) to place pods directly into your VPC network
- VPC flow logs that make sense
However, depending on your architecture and design decisions, as well as potential VPC network limitations, you may wish to opt out of the CNI that Amazon provides and instead use a different CNI that provides an overlay network with other functionality.
AWS CNI Limitations
One of the problems I have seen in VPCs is limited CIDR ranges, and therefore subnets that are carved up into smaller numbers of IP addresses.
The Amazon AWS CNI plugin is very IP address hungry and attaches multiple Secondary Private IP addresses to EKS worker nodes (EC2 instances) to provide pods in your cluster with directly assigned IPs.
This means that you can easily exhaust subnet IP addresses with just a few EKS worker nodes running.
This limitation also means that those who want high densities of pods running on worker nodes are in for a surprise. The IP address limit becomes an issue for maximum number of pods in these scenarios way before compute capacity becomes a problem.
This page shows the maximum number of ENI’s and Secondary IP addresses that can be used per EC2 instance: https://github.com/awslabs/amazon-eks-ami/blob/master/files/eni-max-pods.txt
Removing the AWS CNI plugin
Note: This process will involve you needing to replace your existing EKS worker nodes (if any) in the cluster after installing the Weave Net CNI.
Assuming you have a connection to your cluster already, the first thing to do is to remove the AWS CNI.
kubectl -n=kube-system delete daemonset aws-node
With that gone, your future EKS workers will no longer assign multiple Secondary IP addresses from your VPC subnets.
Installing CNI Genie
With the AWS CNI plugin removed, your pods won’t be able to get a network connection when starting up from this point onward.
Installing a basic deployment of CNI Genie is a quick way to get automatic CNI selection working for containers that start from this point on.
CNI genie has tons of other great features like allowing you to customise which CNI containers use when starting up and more.
For now, you’re just using it to allow containers to start-up and use the Weave Net overlay network by default.
Install CNI Genie. This manifest works with Kubernetes 1.12, 1.13, and 1.14 on EKS.
kubectl apply -f https://raw.githubusercontent.com/Shogan/terraform-eks-with-weave/master/src/weave/genie-plugin.yaml
Installing Weave
Before continuing, you should ensure your EC2 machines disable source/destination network checking.
Make this change in the userdata script that your instances run when starting from their autoscale groups.
REGION_ID=$(curl -s http://169.254.169.254/latest/meta-data/placement/availability-zone | grep -Po "(us|ca|ap|eu|sa)-(north|south)?(east|west|central)-[0-9]+")
aws ec2 modify-instance-attribute --instance-id $INSTANCE_ID --no-source-dest-check --region $REGION_ID
On to installing Weave Net CNI on AWS EKS…
Next, get a Weave Net CNI yaml manifest file. Decide what overlay network IP Range you are going to be using and fill it in for the env.IPALLOC_RANGE query string parameter value in the code block below before making the curl request.
curl --location -o ./weave-cni.yaml "https://cloud.weave.works/k8s/net?k8s-version=$(kubectl version | base64 | tr -d '\n')&env.IPALLOC_RANGE=192.168.0.0/16"
Note: the env.IPALLOC_RANGE query string param added is to specify you want a config with a custom CIDR range. This should be chosen specifically not to overlap with any network ranges shared with the VPC you’ll be deploying into.
In the example above I had a VPC and VPC peers that shared the CIDR block 10.0.0.0/8). Therefore I chose to use 192.168.0.0/16 for the Weave overlay network.
You should be aware of the network ranges you’re using and plan this out appropriately.
The config you now have as weave-cni.yaml will contain the environment variable IPALLOC_RANGE with the correct value that the weave pods will use to setup networking on the EKS Worker nodes.
Apply the weave Net CNI resources:
Note: This manifest is pre-created to use an overlay network range of 192.168.0.0/16
kubectl apply -f https://raw.githubusercontent.com/Shogan/terraform-eks-with-weave/master/src/weave/weave-cni.yaml
Note: Don’t expect things to change suddenly. The current EKS worker nodes will need to be rotated out (e.g. drain, terminate, wait for new to appear) in order for the IP addresses that the AWS CNI has kept warm/allocated to be released.
If you have any existing EKS workers running, drain them now and terminate/replace them with new workers. This includes the source/destination check change made previously.
kubectl get nodes
kubectl drain nodename --ignore-daemonsets
Remove max pod limits on nodes:
Your worker nodes by default have a limit set on how many pods they can schedule. The EKS AMI sets this based on EC2 type (and the max pods due to the usual ENI limitations / IP address limitations with the AWS CNI).
Check your max pod limits with:
kubectl get nodes -o yaml | grep pods
If you’re using the standard EKS optimized AMI (or a derivative of it) then you can simply pass an option to the bootstrap.sh script located in the image that setup the kubelet and joins the cluster. Set –use-max-pods false as an argument to the script.
For example, your autoscale group launch configuration might get the EC2 worker nodes to join the cluster using the bootstrap.sh script. You can update it like so:
/etc/eks/bootstrap.sh --b64-cluster-ca 'YOUR_BASE64_CLUSTER_CA_DATA_HERE' --apiserver-endpoint 'https://YOUR_EKS_CLUSTER_ENDPOINT_HERE' --use-max-pods false --kubelet-extra-args '' 'YOUR_CLUSTER_NAME_HERE'
If you’re using the EKS Terraform module you can simply pass in bootstrap-extra-args – this will automatically setup your worker node userdata templates with extra bootstrap arguments for the kubelet. See example here
Checking max-pods limit again after applying this change, you should see the previous pod limit (based on prior AWS CNI max pods for your instance type) removed now.

You’re almost running Weave Net CNI on AWS EKS, but first you need to roll out new worker nodes.
With the Weave Net CNI installed, the kubelet service updated and your EC2 source/destination checks disabled, you can rotate out your old EKS worker nodes, replacing them with the new nodes.
kubectl drain node --ignore-daemonsets
Once the new nodes come up and start scheduling pods, if everything went to plan you should see that new pods are using the Weave overlay network. E.g. 192.168.0.0/16.

A quick run-down on weave IP addresses and routes
If you get a shell to a worker node running the weave overlay network and do a listing of routes, you might see something like the following:
# ip route show
default via 10.254.109.129 dev eth0
10.254.109.128/26 dev eth0 proto kernel scope link src 10.254.109.133
169.254.169.254 dev eth0
192.168.0.0/16 dev weave proto kernel scope link src 192.168.192.0
This routing table shows two main interfaces in use. One from the host (EC2) instance network interfaces itself, eth0, and one from weave called weave.
When network packets are destined for the 10.254.109.128/26 address space, then traffic is routed down eth0.
If traffic on the host is destined for any address on 192.168.0.0/16, it will instead route via the weave interface ‘weave’ and the weave system will handle routing that traffic appropriately.
Otherwise if the traffic is destined for some public IP address out on the wider internet, it’ll go down the default route which is down the interface, eth0. This is a default gateway in the VPC subnet in this case – 10.254.109.129.
Finally, metadata URL traffic for 169.254.169.254 goes down the main host eth0 interface of course.
Caveats
For the most part everything should work great. Weave will route traffic between it’s overlay network and your worker node’s host network just fine.
However, some of your custom workloads or kubernetes tools might not like being on the new overlay network. For example they might need to talk to other Kubernetes nodes that do not run weave net.
This is now where the limitation of using a managed Kubernetes offering like EKS becomes a bit of a problem.
You can’t run weave on the Kubernetes master / API servers that are effectively the ‘managed’ control plane that AWS EKS hosts for you.
This means that your weave overlay network does not span the Kubernetes master nodes where the Kubernetes API runs.
If you have an application or container in the weave overlay network and the Kubernetes master node / API needs to talk to it, this won’t work.
One potential solution though is to use hostNetwork: true in your pod specification. However you should of course be aware of how this would affect your application and application security.
In my case, I was running metrics-server and it stopped working after it started using Weave. I found out that the Kubernetes API needs to talk to the metrics-server service and of course this won’t work in the overlay network.
Example EKS with Weave Net CNI cluster
You can use the source code I’ve uploaded here.
There are five simple steps to deploy this example EKS cluster in your own account.
- Modify the example.tfvars file to fit your own parameters.
terraform plan -var-file="example.tfvars" -out="example.tfplan"-
terraform apply "example.tfplan" ./setup-weave.sh./test-weave.sh
Warning: This will create a new VPC, subnets, NAT Gateway instance, Internet Gateway, EKS Cluster, and set of worker node autoscale groups. So be sure Terraform Destroy this if you’re just testing things out.
– Your wallet
After terraform creates all the resources, you can run the two included shell scripts. setup-weave.sh will remove the AWS CNI, install CNI genie, Weave, and deploy two simple example pods and services.
At this point you should terminate your existing worker nodes (that still use the AWS CNI) and wait for your new worker nodes to join the cluster.
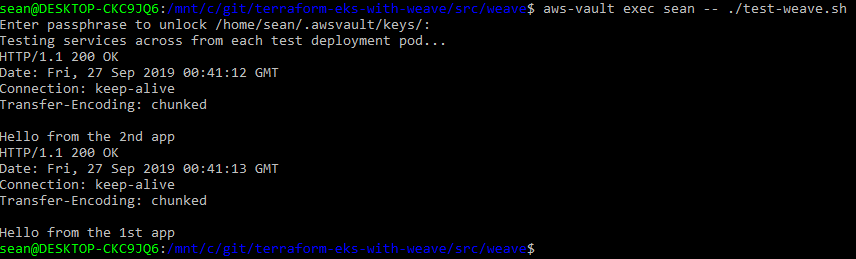
test-weave.sh will wait for the hello-node test pods to become ready, and then execute a curl command inside one, talking to the other via the the service and vice versa. If successful, you’ll see a HTTP 200 OK response from each service.