Kubernetes Ingress Controller with NGINX Reverse Proxy and Wildcard SSL from Let’s Encrypt

This is a pattern I’ve used with success for access to apps running in a number of Kubernetes clusters that were restricted to only having a single kubernetes ingress load balancer.

The Scenario

  • Kubernetes clusters (EKS) are on the internal network only (in this case private subnets in an AWS VPC).
  • IAM permissions are locked down to prevent creation of security groups (we can only use existing, pre-defined security groups) and so the LoadBalancer service type of Kubernetes is off-limits, as the k8s control plane needs to be able to create these automatically with security groups – this operation fails because of the restricted IAM permissions on the cluster. We have one Elastic Load Balancer created with the LoadBalancer service type when the cluster was initial bootstrapped with an nginx ingress controller + service type == LoadBalancer before the permissions were locked down again.
  • The Ingress Controller that is running is backed by an internal facing Elastic Load Balancer (ELB), created initially as described above.
  • Applications run across namespaces in each cluster, and the Ingress Controller must be able to provide dynamic access for users of these internal applications that sit on the network outside the k8s cluster.
  • DNS and ingress must be dynamic enough to allow the same apps to run in different namespaces, use the same URL path, but with differing hostnames. SSL must also be provided for all of these apps using a wildcard SSL certificate. E.g.
    • namespace1.cluster.foo.bar/app1
    • namespace2.cluster.foo.bar/app1
    • namespace3.cluster.foo.bar/app1
    • namespace1.cluster.foo.bar/app2
    • namespace2.cluster.foo.bar/app2
    • namespace3.cluster.foo.bar/app2
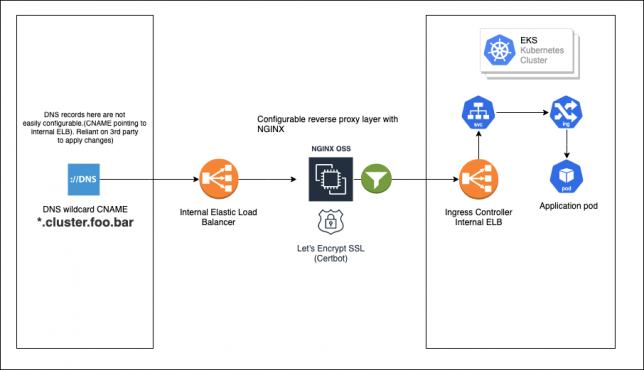
  • Once DNS wildcard CNAME record is created, it is difficult to change to point to a new location if needing changes (reliant on 3rd party to manage DNS).

A Solution with Reverse Proxying

There are of course a number of ways to approach this, like running under cert-manager inside the cluster with the letsencrypt issuer, or if you are running your own PKI with vault, the vault issuer.

cert-manager wouldn’t work well here as services are not publicly accessible for HTTP-01 certificate verification.

It could also be possible to terminate SSL at the ingress controller level in the cluster with the SSL certificate loaded there.

One additional requirement that I didn’t mention above though was that developers who are pushing their apps into the clusters need to be able to ‘dynamically’ configure their own personal ‘dev’ namespaces / ingress rules.

They configure their ingress easily enough with the Kubernetes Ingress resource when they deploy their apps (using Helm), however hostnames are not so easy for them to configure. Route53 is not in use here, and not allowed in this environment, and programmatic access to DNS is not possible.

A reverse proxy with NGINX

This layer exists more or less just to allow easy re-pointing of CNANE wildcard DNS entry to the Kubernetes cluster. As DNS is not easily configured (handled by another team/resource), we can simply leave it pointed to the NGINX elastic load balancer, and then just re-point requests using NGINX configuration if we need to.

It’s worth pointing out that this NGINX layer could be hosted on a multitude of places, including as a containerised solution, or it could even be replaced by a lambda function with API Gateway that could do the reverse proxying instead.

diagram showing flow of traffic from dns all the way through to pod via ingress controller.

Environments are designated by namespaces in each ‘class’ of cluster. For example a non-production EKS cluster will have namespaces for non-production environments.

Hostnames need to be used to help the ingress rules match correctly with designated paths.

I configured an internal load balancer and setup a fleet of NGINX instances behind it.

Here is a quick runbook of how to setup NGINX and certbot on a vanilla Amazon Linux 2 EC2 instance. Use whichever automation you prefer such as baking your own AMI with packer, using Terraform, or ansible, but the runbook of steps to install NGINX and certbot is effectively:

# nginx
sudo amazon-linux-extras install nginx1.12
sudo systemctl enable nginx
sudo systemctl start nginx

# certbot
sudo wget -r --no-parent -A 'epel-release-*.rpm' https://dl.fedoraproject.org/pub/epel/7/x86_64/Packages/e/
sudo rpm -Uvh dl.fedoraproject.org/pub/epel/7/x86_64/Packages/e/epel-release-*.rpm
sudo yum-config-manager --enable epel*
yum repolist all
yum install -y certbot

# request / generate letsencrypt wildcard cert using dns challenge interactively
certbot -d *.your.domain.here --manual --preferred-challenges dns certonly
# Interactive command above, choose to omit this in automation and do manually if you're using DNS-01 like I am here - certbot will give you a dynamically generated TXT record value for DNS-01 that you'll need to create.
systemctl restart nginx

Once NGINX is installed and your certs are generated, you’ll need to configure /etc/nginx/nginx.conf to point to the correct certificate files.
A wildcard CNAME record is created once-off that points anyhost.cluster.foo.bar to the internal ELB hostname for the reverse proxy NGINX instances (these sit outside of the cluster as standard EC2 hosts for now). For example:

[CNAME] *.cluster.foo.bar -> internal-nginx-reverse-proxy-fleet-xxxx-xxxx.us-east-2.elb.amazonaws.com

I used certbot (letsencrypt) to issue a wildcard SSL certificate for the NGINX fleet servers for *.cluster.foo.bar. DNS-01 challenge type was used, as everything here is in a private, internal network, not accessible by letsencrypt services.

A TXT record just needs to be created with your DNS to verify to letsencrypt that you own the domain in question.

In the NGINX configuration, the generated certificate is loaded up for port 443 and the following location rule is setup to proxy_pass the requests sent to the NGINX fleet back to the Kubernetes Ingress Controller ELB.

location / {
  proxy_set_header Host $host;
  proxy_pass http://internal-ingress-controller-xxxxx.us-east-2.elb.amazonaws.com;
}

The proxy_set_header directive is important, as it adds the host header that the NGINX fleet instance receives from the client, and sends it with the proxied request back to the Kubernetes ingress controller. The ingress rules need to match both hostname AND path in the requests to find the correct service inside the cluster/namespace.

SSL is now effectively terminated at the NGINX fleet layer with a wildcard SSL certificate and services inside the cluster don’t need to worry about configuring their own individual SSL certificates.

Ingress Rule Configuration

Now, developers can deploy their apps, and customise their ingress rules to use both hostname and path to setup access for their apps running in the cluster(s).

For example:

apiVersion: extensions/v1beta1
kind: Ingress
metadata:
  annotations:
    kubernetes.io/ingress.class: nginx
  labels:
    app: some-app
  name: some-app
  namespace: namespace1
spec:
  rules:
  - host: namespace1.cluster.foo.bar
    http:
      paths:
      - backend:
          serviceName: app1
          servicePort: 8083
        path: /app1
}

There are definitely other ways of doing this. Cleaner possibly, more automated in some ways, however with the constraints in play here (internal EKS, private only networks, no public internet access into the cluster), I think this is a good solution that makes life fairly pleasant for the developers that need to deploy their apps to these Kubernetes clusters.

My Thoughts On Remote Working, AKA Working From Home

remote working desk setup

I am an advocate for remote working flexibility in companies where it makes sense. I think there are huge benefits for both employers and employees when it comes down to offering this style of working. Here is why I think that this is the case:

Quality of life improvements

Remote workers get more free time in a typical working day where they work from home. No commute to worry about means that they can spend more time with family in the morning before work, or the evening after work.

Alternatively, they get more personal time to do things that they would like to do, but couldn’t really do if they were otherwise commuting.

I personally spend time early in the morning or in the evenings after work sharing it between family time and personal time. For example here are some of the activities I like to use the extra time for:

  • Helping with kids breakfast time
  • School readiness / transport
  • Meditation
  • Spend 30 minutes working on personal projects
  • Go to the gym or go for a quick run

Employers benefit from the positive effects that remote working has on employees

In my experience and opinion, remote workers that don’t have to deal with the monotonous cycle of commuting every day to their jobs tend to approach their work with extra enthusiasm and drive.

Employers benefit from more efficient and energetic employees.

In my case I personally don’t mind throwing in an extra hour or two of work on top of my usual hours when I work remotely. A typical commute for me in and out of work would take around 3 to 4 hours.

If I find myself making good headway on a project and want to continue the momentum I’ve picked up during the day to get good work done, I’ll gladly spend extra time after hours to do so. I count the time spent less commuting as credit toward extra overtime.

Balancing remote work and on-site work

Of course too much one thing can have its drawbacks. My personal preference is a bias of more remote work in a typical work week than on-site work.

I think having 1 or 2 days or work on-site during a work week is plenty to balance things out.

There are definite benefits to seeing colleagues in person and having those face to face conversations. Pairing work is also good to get done in person.

When I’m on-site, I will make extra effort to:

  • Catch up with colleagues in the mornings
  • Grab a coffee or two with colleagues for personal or work related conversations at random break intervals during the day, or between meetings
  • Go out for lunch with team members
  • See if there is work we can pair on – e.g. pair programming or problem solving

In addition to the above, I also try to plan my on-site work days to coincide with days where there are meetings scheduled. For example, sprint planning or retrospective meetings.

Potentially More Desk Space

Working from home can give you a potentially better workspace. As long as you have the room, you can deck your area out to your liking.

Here is a post about my Jarvis Standing Desk and workspace configuration.

In summary

I think there are some clear benefits to working remotely. These mainly come in the form of the positive effects on employee lives being passed on to their work and outlook on their work.

Useful NGINX Ingress Controller Configurations for Kubernetes using Helm

My favourite Ingress Controller for Kubernetes is definitely the official NGINX Ingress Controller. It provides tons of customisation and is under active development with great community support. This post will dive into some of the more useful nginx ingress controller configurations and options available.

If you use the official stable/nginx-ingress chart for Helm, the default values you’ll get with installation are not always the best choices.

This is my collection of useful / common configuration options I tend to change when installing an ingress controller. A few of these options are geared towards AWS deployments, but otherwise the rest of the options are generic enough to apply to any platform you may be running on.

Useful nginx ingress controller options for Kubernetes

AWS only configuration options

  • Use an internal (private) Elastic Load Balancer for Ingress. Annotate with: service.beta.kubernetes.io/aws-load-balancer-internal: 0.0.0.0/0
  • Specify the kind of AWS Load Balancer to use with Ingress Controller. Annotate with: service.beta.kubernetes.io/aws-load-balancer-type: nlb/elb/alb

Common configuration options

  • controller.service.type (default == LoadBalancer) – specifies the type of controller service to create. Useful to open up the Ingress Controller for North/South traffic with differing models of access. E.g. Cluster only with ClusterIP, NodePort for specific host only access, or LoadBalancer to expose with a public or internal facing Load Balancer.
  • controller.scope.enabled (default == disabled / watch all namespaces) – where the controller should look out for ingress rule resources. Useful to limit the namespace(s) that the Ingress Controller works in.
  • controller.scope.namespace – namespace to watch for ingress rules if the controller.scope.enabled option is toggled on.
  • controller.minReadySeconds – how many seconds a pod needs to be ready before killing the next, during update – useful for when updating/upgrading the Ingress Controller deployment.
  • controller.replicaCount (default == 1) – definitely set this higher than 1. You want at least 2 for replicaCount to ensure there is always a controller running when draining nodes or updating your ingress controller.
  • controller.service.loadBalancerSourceRanges (default == []) – Useful to lock your Ingress Controller Load Balancer down. For example, you might not want Ingress open to 0.0.0.0/0 (all internet) and instead assign a value that restricts ingress access to an IP range you own. Using helm, you can specify an array with typical array square brackets e.g. [10.0.0.0/8, 172.0.0.0/8]
  • controller.service.enableHttp (default == true) – Useful to disable insecure HTTP (and leave only HTTPS)
  • controller.stats.enabled (default == false) – Enables controller stats page – Useful for stats and debugging. Not a good idea for production though. The controller stats service can be locked down if required by specific CIDR range.

To deploy the NGINX Ingress Controller helm chart and specify some of the above customisations, you can create a yaml file and populate it with the following example configuration (replace/change as required):

controller:
  replicaCount: 2
  service:
    type: "LoadBalancer"
    loadBalancerSourceRanges: [10.0.0.0/8]
    targetPorts:
      http: http
      https: http
    annotations:
      service.beta.kubernetes.io/aws-load-balancer-internal: 0.0.0.0/0
      service.beta.kubernetes.io/aws-load-balancer-backend-protocol: "http"
      service.beta.kubernetes.io/aws-load-balancer-ssl-ports: "https"
      service.beta.kubernetes.io/aws-load-balancer-connection-idle-timeout: '3600'
  stats:
    enabled: true

Install with helm like so:

helm install -f ingress-custom.yaml stable/nginx-ingress --name nginx-ingress --namespace example

If you’re using an internal elastic load balancer (like the above example yaml configuration), don’t forget to make sure your private subnets are tagged with the following key/value:

key = “kubernetes.io/role/internal-elb”
value = “1”

Enjoy customising your own ingress controller!

Customising your EKS cluster DNS and the CoreDNS vs KubeDNS configuration differences

In the past I’ve used the excellent kops to build out Kubernetes clusters. The standard builds always made use of the kube-dns cluster addon. With EKS and CoreDNS things are a little different.

With kube-dns, I got used to using configMaps to customise DNS upstream servers and stub domains using the standard kube-dns configuration format which looks something like this:

apiVersion: v1
kind: ConfigMap
metadata:
  name: kube-dns
  namespace: kube-system
data:
  stubDomains: |
    {"ec2.internal": ["10.0.0.2"], "shogan.co.uk": ["10.20.0.200"]}
  upstreamNameservers: |
    ["8.8.8.8", "8.8.4.4"]

Amazon EKS and CoreDNS

However recently I’ve started doing a fair bit of Kubernetes cluster setups and configurations using Amazon EKS. I found that EKS and CoreDNS is now the standard and requires a different kind of configuration format which looks something like this:

apiVersion: v1
data:
  Corefile: |
    .:53 {
        errors
        health
        kubernetes cluster.local in-addr.arpa ip6.arpa {
          pods insecure
          upstream
          fallthrough in-addr.arpa ip6.arpa
        }
        prometheus :9153
        proxy . /etc/resolv.conf
        cache 30
        loop
        reload
        loadbalance
    }
    shogan.co.uk:53 {
        errors
        cache 30
        forward . 10.20.0.200
    }
    ec2.internal:53 {
        errors
        cache 30
        forward . 10.0.0.2
    }
kind: ConfigMap
metadata:
  labels:
    eks.amazonaws.com/component: coredns
    k8s-app: kube-dns
  name: coredns
  namespace: kube-system

To add your own custom stub domain nameservers with CoreDNS, the task becomes a case of editing the CoreDNS ConfigMap called coredns in the kube-system namespace.

Add your stub domain configuration blocks after the default .:53 section, with the forward property pointing to your custom DNS nameserver.

Once you’re done adding the new configuration, restart your CoreDNS containers. You can do this gracefully by executing the following in your CoreDNS containers:

kubectl exec -n kube-system coredns-pod-name-x -- kill -SIGUSR1 1

Alternatively, roll your CoreDNS pods one at a time.

Last of all, you’ll want to test the name resolution in a test container using a tool like dig. Your container /etc/resolv.conf files should usually be pointing at the IP address of your CoreDNS Cluster Service. So they’ll talk to the CoreDNS service for their usual look up queries, and CoreDNS should now be able to resolve your custom stub domain records but referring to your custom forwarded nameservers.

Apart from the different configuration format, there seem to be some fairly significant differences between CoreDNS and kube-dns. In my opinion, it would seem that overall CoreDNS is the better, more modern choice. Some of the benefits it enjoys over kube-dns are:

  • CoreDNS has multi-threaded design (leveraging Go)
  • CoreDNS uses negative caching whereas kube-dns does not (this means CoreDNS can cache failed DNS queries as well as successful ones, which overall should equal better speed in name resolution). It also helps with external lookups.
  • CoreDNS has a lower memory requirement, which is great for clusters with smaller worker nodes

Hopefully this helps when it comes to configuring EKS and CoreDNS. For more information, there is a great article that goes into the details of the differences of CoreDNS and kube-dns here.

Troubleshooting Amazon EKS Worker Nodes not joining the cluster

mechanic underneath car fixing things

I’ve recently been doing a fair bit of automation work on bringing up AWS managed Kubernetes clusters using Terraform (with Packer for building out the worker group nodes). Read on for some handy tips on troubleshooting EKS worker nodes.

Some of my colleagues have not worked with EKS (or Kubernetes) much before and so I’ve also been sharing knowledge and helping others get up to speed. A colleague was having trouble with their newly provisioned personal test EKS cluster found that the kube-system / control plane related pods were not starting.  I assisted with the troubleshooting process and found the following…

Upon diving into the logs of the kube-system related pods (dns, aws CNI, etc…) it was obvious that the pods were not being scheduled on the brand new cluster. The next obvious command to run was kubectl get nodes -o wide to take a look at the general state of the worker nodes.

Unsurprisingly there were no nodes in the cluster.

Troubleshooting worker nodes not joining the cluster

The first thing that comes to mind when you have worker nodes that are not joining the cluster on startup is to check the bootstrapping / startup scripts. In EKS’ case (and more specifically EC2) the worker nodes should be joining the cluster by running a couple of commands in the userdata script that the EC2 machines run on launch.

If you’re customising your worker nodes with your own custom AMI(s) then you’ll most likely be handling this userdata script logic yourself, and this is the first place to check.

The easiest way of checking userdata script failures on an EC2 instance is to simply get the cloud-init logs direct from the instance. Locate the EC2 machine in the console (or the instance-id inspect the logs for failures on the section that logs execution of your userdata script.

  • In the EC2 console: Right-click your EC2 instance -> Instance Settings -> Get System Log.
  • On the instance itself:
    • cat /var/log/cloud-init.log | more
    • cat /var/log/cloud-init-output.log | more

Upon finding the error you can then check (using intuition around the specific error message you found):

  • Have any changes been introduced lately that might have caused the breakage?
  • Has the base AMI that you’re building on top of changed?
  • Have any resources that you might be pulling into the base image builds been modified in any way?

These are the questions to ask and investigate first. You should be storing base image build scripts (packer for example) in version control / git, so check the recent git commits and image build logs first.