I picked up a Puck.js a while ago and after trying out a few basic bits of code, sadly let it start to gather dust on my shelf. That changed this weekend as I browsed the sample project listings for something simple to build, picking up the Puck.js Duplo police siren build to try.
It should be a fun toy for my youngest to play with, as he really enjoys Duplo.
What is the Puck.js?
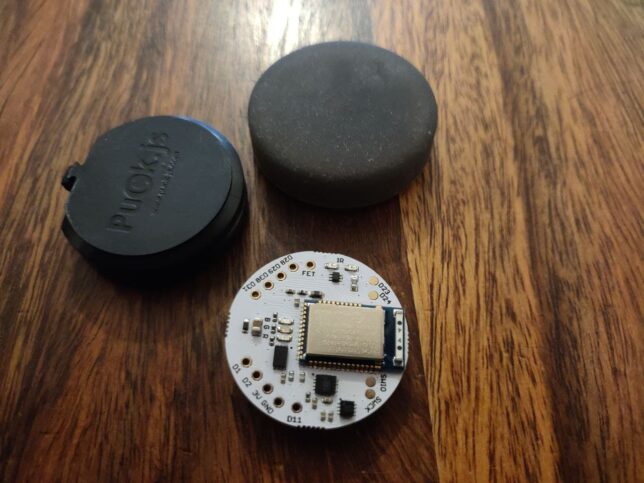
The Puck.js and it’s button case.
The Puck.js is an open source JavaScript microcontroller. It has a variety of features such as:
Button
Magnetometer
Accelerometer
Gyro
IR & RGB LEDs
Temperature and light sensor
FET output
Programmable NFC tag
9 IO pins
The best part about the Puck.js for me is how accessible it is to run and deploy code to. Using Web Bluetooth and it’s included puck.js library, you can write code in a Web IDE, connect over Bluetooth, and have your code running in seconds.
Building the Puck.js Duplo Police Siren Project
If you want to try it out yourself, the actual tutorial page itself is the best resource to begin with. There is a video available there to follow along with.
Here is the Thingiverse page where you can get the model. It currently only lists a scad version of the file, so you’ll need to download OpenSCAD and open it there.
Here is a gist for the file including the cut-out operation that subtracts the innards from the block to make room for the puck.js and piezo to fit into.
I printed the block using my Elegoo Mars resin 3D printer. My first go seems to be slightly loose fitting, so I might shrink the model to 99% size and try again for a second iteration.
I used a new resin that is meant to be easily rinsed/washed after printing with water. The quality on the top of the block doesn’t look as good as usual, so I’m not sure if this resin is to blame for that or not.
Connecting the Components
The LEDs connect to D1/D2 and D30/D31. The piezo goes on D28/D29. I used RGB LEDs, so I snipped the other legs off, leaving just the blue and common cathode terminals to connect up.
After a bit of dodgy soldering, it works!
Installing Everything Into the Block
With a little bit of coercion, the whole lot fits in. I used a bit of hot glue on four edges of the Puck.js to keep it in place, but keep it easy to remove if needed.
After that, I added a layer of scrap paper with the piezo in-between, and glued that in too.
Here is the final result.
The Puck.js may be fairly pricey, but it includes a lot of IO. It’s battery and use of Bluetooth LE make it ideal for projects where battery life is a concern. The battery is super cheap and can last up to around a year if used carefully.
I had fun making this project. It’s a great project to get started with the Puck.js, and hopefully I’ll find some more use cases soon where I can use more of these great little devices.
ffmpeg is a very useful utility to have installed for common audio and video conversion and modification tasks. I find myself using it frequently for both personal and work use.
Got an audio or video file to compress or convert? Or maybe you’re looking to split off a section of a video file. Did you do a screen recording of a meeting session and find you need to share it around, but it’s way too large in filesize?
ffmpeg is the clean and easy command line approach. I’ve put together a ffmpeg cheat sheet below that has some quick and easy usages documented.
Skip ahead to the ffmpeg Cheat Sheet section below if you already have it installed and ready to go.
Installing ffmpeg (macOS / Windows)
On macOS, you’re best off using homebrew. If you don’t have homebrew already, go get that done first. Then:
macOS
brew install ffmpeg
Windows
You can grab a release build in 7-zip archive format from here (recent as of the publish date of this post). Be sure to check the main ffmpeg downloads page for newer builds if you’re reading this page way in the future.
If you don’t have 7-zip, download and install that first to decompress the downloaded ffmpeg release archive.
Now you’ll ideally want to update your user PATH to include the path that you’ve extracted 7-zip to. Make sure you’ve moved it to a convenient location. For example on my Windows machine, I keep ffmpeg in D:\Tools\ffmpeg.
Open PowerShell (Windows key + R), type powershell, hit enter.
To ensure that the path persists whenever you run powershell in the future, in powershell, run:
notepad $profile
This will load a start-up profile for powershell in notepad. If it doesn’t exist yet, it’ll prompt you to create a new file. Choose yes.
In your profile notepad window, enter the following, replacing D:\Tools\ffmpeg with the path you extracted ffmpeg to on your own machine.
Close Notepad and save the changes. Close Powershell, then launch it again. This time if you type ffmpeg in the powershell window you’ll run it, no matter which directory you’re in.
ffmpeg Cheat Sheet
This is a list of my 10 most useful ffmpeg commands for conversion and modification of video and audio files.
Bonus batch scripts for video file re-sizing below. For example, iterate over every .MP4 file in a directory and resize to 1080p, or every file prefixed with DJI_ and resize to 1440p:
for f in *.MP4 ; do ffmpeg -i "$f" -s 1920x1080 -c:a copy "resized-1080p-$f" ; done
for f in DJI_* ; do ffmpeg -i "$f" -s 2560x1440 -c:a copy "resized-1440p-$f" ; done
Yes, that is a banana logo overlayed onto this video using ffmpeg.
This list doesn’t even scratch the surface of the capabilities of ffmpeg. If you dig deeper you’ll find commands and parameters for just every audio and video modification process you need.
Remember, while it’s often easy to find a free conversion tool online, there’ll always be a catch or risk of using these. Whether it’s being subjected to unecessary advertising, catching potential malware, or being tracked with 3rd party cookies, you always take risks using free online tools. I guarantee almost every single free conversion website is using ffmpeg on their backend.
So do yourself a favour and practice and using CLI tools to do things yourself.
The saga pattern is useful when you have transactions that require a bunch of steps to complete successfully, with failure of steps requiring associated rollback processes to run. This post will cover the saga pattern with aws-cdk, leveraging AWS Step Functions and Lambda.
If you need an introduction to the saga pattern in an easy to understand format, I found this GOTO conference session by Caitie McCaffrey very informative.
I’ll be taking things one step further by automating the setup and deployment of a sample app which uses the saga pattern with aws-cdk.
I’ve started using aws-cdk fairly frequently, but realise it has the issue of vendor lock-in. I found it nice to work with in the case of step functions particularly in the way you construct step chains.
Saga Pattern with Step Functions
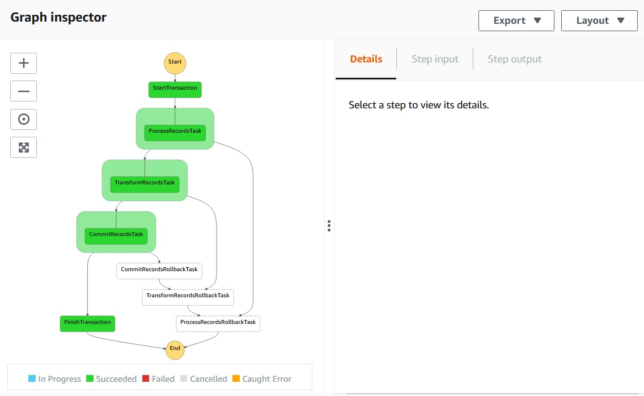
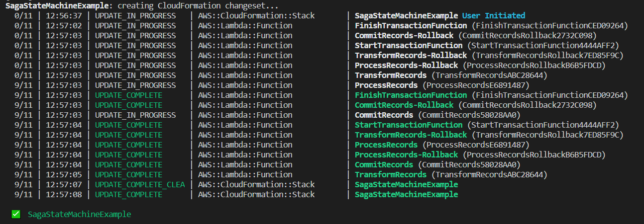
So here is the step function state machine you’ll create using the fairly simple saga pattern aws-cdk app I’ve set up.
A successful transaction run
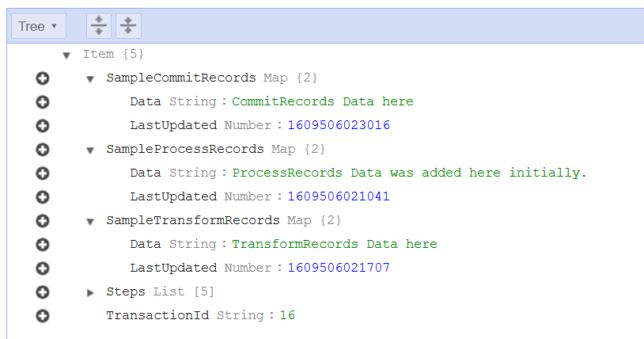
Above you see a successful transaction run, where all records are saved to a DynamoDB table entry.
The sample data written by a succesful transaction run. Each step has a ‘Sample’ map entry with ‘Data’ and a timestamp.
If one of those steps were to fail, you need to manage the rollback process of your transaction from that step backwards.
Illustrating Failure Rollback
As mentioned above, with the saga pattern you’ll want to rollback any steps that have run from the point of failure backward.
The example app has three steps:
Process Records
Transform Records
Commit Records
Each step is a simple lambda function that writes some data to a DynamoDB table with a primary partition key of TransactionId.
In the screenshot below, TransformRecords has a simulated failure, which causes the lambda function to throw an error.
A catch step is linked to each of the process steps to handle rollback for each of them. Above, TransformRecordsRollbackTask is run when TransformRecordsTask fails.
The rollback steps cascade backward to the first ‘business logic’ step ProcessRecordsTask. Any steps that have run up to that point will therefore have their associated rollback tasks run.
Here is what an entry looks like in DynamoDB if it failed:
A failed transaction has no written data, because the data written up to the point of failure was ‘rolled back’.
You’ll notice this one does not have the ‘Sample’ data that you see in the previously shown successful transaction. In reality, for a brief moment it does have that sample data. As each rollback step is run, the associated data for that step is removed from the table entry, resulting in the above entry for TransactionId 18.
Deploying the Sample Saga Pattern App with aws-cdk
The lambda functions check the payload input for the simulateFail flag, and if found will do a Math.random() check to give chance of failure in one of the process steps.
Taking it Further
To take this example further, you’ll want to more carefully manage step outputs using Step Function ResultPath configuration. This will ensure that your steps don’t overwrite data in the state machine and that steps further down the line have access to the data that they need.
You’ll probably also want a step at the end of the line for the case of failure (which runs after all rollback steps have completed). This can handle notifications or other tasks that should run if a transaction fails.
About a year ago I embarked on a quest to “de-google” my life as much as possible. While it hasn’t been a completely successful mission, I feel happier knowing I’m not giving away as much of my data to google as I was before.
It hasn’t been an easy process. It is not yet a complete process either. For example, the analytics on this very site are still run in Google Analytics. I realise the irony in this, but rest assured this is something I plan on changing.
If you’re looking for ways to “de-google” your own life, or are after some quick wins to get started, read on.
Some Quick Wins
I started off by changing the amount of data that Google keeps on my account. For example web browsing, youtube viewing, and location history data are all generally kept forever by default.
If you’re looking for the quickest things you can do to reduce the amount of data that Google holds about you in these areas, try these quick wins for a start:
These can all be controlled from your single Activity Controls Page linked above.
Limiting various Google Product activity tracking and storage
Moving on, here are the main Google Products I used and what I did to migrate away from them, or at least limit my usage of them…
Migrating Away from Gmail
I started with email, as it is one of the biggest and most difficult to move away from in my opinion.
After evaluating options, and even considering self-hosted e-mail, I settled on moving over to Protonmail.
Protonmail has proven to be a good replacement for email and my calendar. For contacts, I now use Nextcloud (see below).
I set up a new Protonmail account and forwarded my gmail inbox over to the new protonmail address.
The next step I took was to start changing all my online account email addresses to the new one. Now, whenever an email arrives in my Protonmail inbox and has been forwarded from gmail, I make an effort to login to that account and change the email.
Eventually I’ll have little to no e-mail coming in via gmail and I’ll be able to shutdown and delete the account entirely.
I used a free Protonmail account for a while, but after a few months decided that I really liked the product and switched to a paid subscription.
Now I’ve configured some of my personal domains in Protonmail and use it for hosted email on those too. I benefit from end-to-end encryption now as well as features like DKIM too.
Dumping Chrome
Next, I stopped using Chrome. I installed Mozilla Firefox and used the import feature to bring in most of my Chrome bookmarks.
The few browser extensions I use are all available as Firefox Add-ons, so I had little to no friction with this move.
I do prefer Chrome’s developer features, but have managed fine so far with Firefox on that front.
Google Drive Replacement
Next up, Google Drive storage. Thankfully, a free Google account doesn’t give you too much storage space for free, so I did not have that many files in Google Drive that needed migrating.
Self-hosting your files keeps you in control of your own data, but can also be a risk. Make sure you have solid backup and off-site storage contingency.
Now I benefit from around 10TB of “cloud” storage, and can rest assured its under my own control.
Using the Nextcloud mobile app, I can also have all of my mobile phone photos and videos synchronised automatically to my Nextcloud instance.
I have the most important folders backed up to multiple locations out of Nextcloud.
YouTube
Here’s the difficult one for me. I consume a fair bit of content on Youtube. This makes it very tricky to completely de-google my life.
I have taken steps to improve how I use YouTube and to limit their ability to track me. It’s not perfect though.
For one, I use Youtube signed-out now. Sure they can still track by things like IP address and fingerprinting, but
I’ve also started using a mobile app (available on F-Droid and direct via their Github page) that has a feature to import all of your Youtube channel subscriptions and set up a video feed using these.
The app does not sign into your Google account at all, and does not try to provide you with any annoying “recommendations” like Youtube does. Even better, you don’t get any ads. Not a single one.
I’ve also started supporting alternative content platforms wherever possible. Of course they don’t match YouTube, but offer a glimmer of hope. For example:
I still maintain my own YouTube channel, and for now I have not done anything about that. To be honest, I’m not entirely sure what my approach here would be if I were to completely delete my Google Account.
The first thing I think I would do is set up a PeerTube instance and host videos there. I would also prefer to consume video content there.
Alternative Analytics
So as noted above, I still rely on Google Analytics. I hope to change that in the near future.
I’ll continue to try to reduce my reliance on Google Products going forward. As I mentioned before, what I have done so far is by no means perfect or complete. It is a constant concerted effort for me.
This post should not just apply to Google either. It shouldn’t just be case of “de-google” and move on. There are many other entities out there providing ‘free’ products that literally turn us into the ‘product’ by harvesting our data for advertising.
One of the the most important questions to always ask yourself when signing up for a ‘free’ new service is: “Why is this free, and what’s in it for them if I sign up?“
I’m constantly searching for minimal cost web hosting solutions. To clarify that statement, I mean ‘dynamic‘ websites, not static. At the moment I am running this blog and a bunch of others on a Raspberry Pi Kubernetes cluster at home. I got to thinking though, what happens if I need to move? I’ll have an inevitable period of downtime. Clearly self-hosting from home has it’s drawbacks.
I’ve run my personal dynamic websites from AWS before (EC2 with a single Docker instance), but used an application load balancer (ALB) to help with routing traffic to different hostnames. The load balancer itself adds a large chunk of cost, and storage was EBS, a little more difficult to manage when automating host provisioning.
A Minimal Cost Web Hosting Infrastructure in AWS
I wanted to find something that minimises costs in AWS. My goal was to go as cheap as possible. I’ve arrived at the following solution, which saves on costs for networking, compute, and storage.
AWS spot EC2 single instance running on AWS Graviton2 (ARM).
EFS storage for persistence (a requirement is that containers have persistence, as I use wordpress and require MySQL etc…)
Elastic IP address
Simple Lambda Function that manages auto-attachment of a static, Elastic IP (EIP) to the single EC2 instance. (In case the spot instance is terminated due to demand/price changes for example).
Traefik v2 for reverse proxying of traffic hitting the single EC2 instance to containers. This allows for multiple websites / hosts on a single machine
It isn’t going to win any high availability awards, but I’m OK with that for my own self-hosted applications and sites.
One important requirement with this solution is the ability to run dynamic sites. I know I could be doing this all a lot easier with S3/CloudFront if I were to only be hosting static sites.
Using this setup also allows me to easily move workloads between my home Kubernetes cluster and the cloud. This is because the docker images and tags I am using are now compatible between ARM (on Raspberry Pi) and ARM on Graviton2 AWS docker instances.
The choices I have gone with allow me to avoid ‘cloud lock in’, as I can easily switch between the two setups if needed.
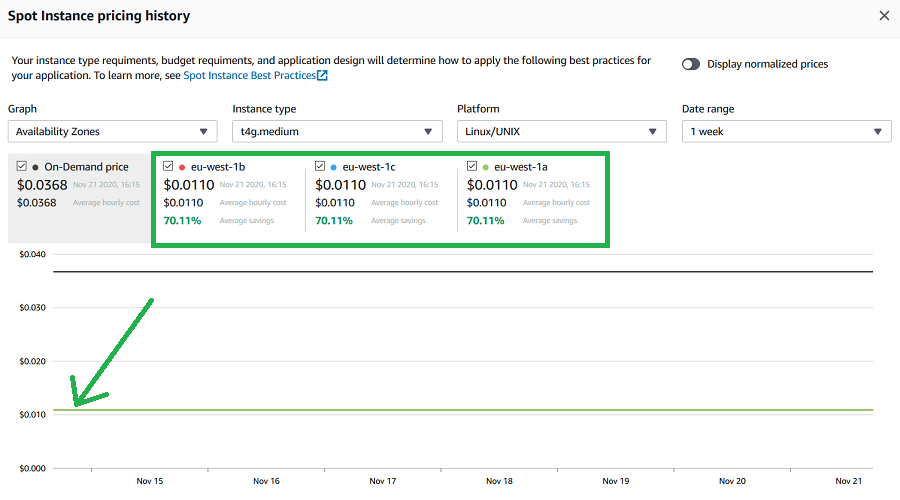
Cost Breakdown
I’ve worked out the monthly costs to be roughly as follows:
EC2 Graviton2 ARM based instance (t4g.medium), $7.92
3GB EFS Standard Storage, $0.99
Lambda – will only invoke when an EC2 instance change occurs, so cost not even worth calculating
EIP – free, as it will remain attached to the EC2 instance at all times
Current Spot Instance pricing for t4g.medium instances
If you don’t need 4GB of RAM, you can drop down to a t4g.small instance type for half the cost.
Total monthly running costs should be around $8.91.
Keep in mind that this solution will provide multiple hostname support (multiple domains/sites hosted on the same system), storage persistence, and a pretty quick and responsive ARM based Graviton2 processor.
You will need to use ARM compatible Docker images, but there are plenty out there for all the standard software like MySQL, WordPress, Adminer, etc…
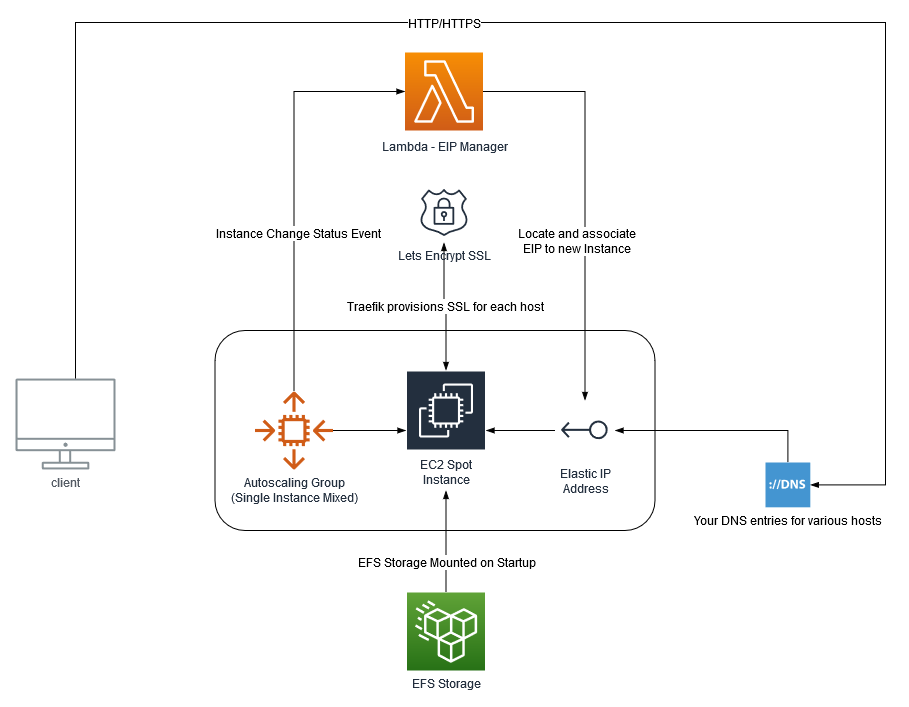
How it Works
The infrastructure diagram above pretty much explains how everything fits together. But at a high level:
An Autoscaling Group is created, in mixed mode, but only allows a single, spot instance. This EC2 instance uses a standard Amazon Linux 2 ARM based AMI (machine image).
When the new instance is created, a Lambda function (subscribed to EC2 lifecycle events) is invoked, locates a designated Elastic IP (EIP), and associates it with the new spot EC2 instance.
The EC2 machine mounts the EFS storage on startup, and bootstraps itself with software requirements, a base Traefik configuration, as well as your custom ‘dynamic’ Traefik configuration that you specify. It then launches the Traefik container.
You point your various A records in DNS to the public IP address of the EIP.
Now it doesn’t matter if your EC2 spot instance is terminated, you’ll always have the same IP address, and the same EFS storage mounted when the new one starts up.
There is the question of ‘what if the spot market goes haywire?’ By default the spot price will be allowed to go all the way up to the on-demand price. This means you could potentially pay more for the EC2 instance, but it is not likely. If it did happen, you could change the instance configuration or choose another instance type.
Deploying the Solution
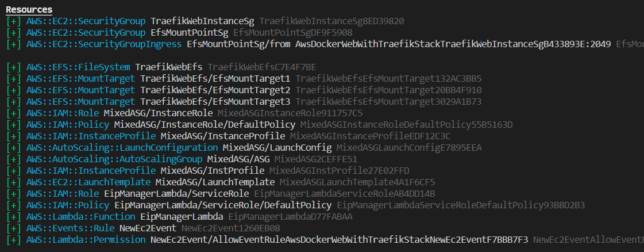
As this is an AWS opinionated infrastructure choice, I’ve packaged everything into an AWS Cloud Development Kit (AWS CDK) app. AWS CDK is an open source software development framework that allows you to do infrastructure-as-code. I’ve used Typescript as my language of choice.
Define your own traefik_dynamic.toml configuration, and host it somewhere where the EC2 instance will be able to grab it with curl. Note, that the Traefik dashboard basic auth password is defined using htpasswd.
An existing VPC in your account to use. The CDK app does not create a VPC (additional cost). You can definitely use your default account VPC that is already available in all accounts though.
An existing AWS Keypair
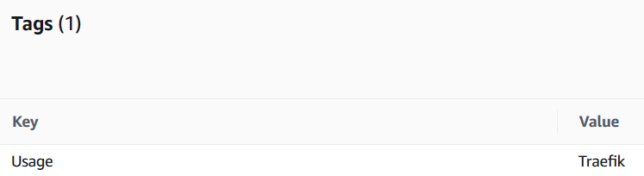
An existing Elastic IP address (EIP) created, and tagged with the key/value of Usage:Traefik (this is for the Lambda function to identify the right EIP to associate to the EC2 instance when it starts)
Tag requirement for the Elastic IP Address
I haven’t set up the CDK app to pass in parameters, so you’ll just need to modify a bunch of variables at the top of aws-docker-web-with-traefik-stack.ts to substitute your specific values for the aforementioned items. For example:
const vpcId = "your-vpc-id";
const instanceType = "t4g.medium"; // t4g.small for even more cost saving
const keypairName = "your-existing-keypair-name";
const managementLocationCidr = "1.1.1.1/32"; // your home / management network address that SSH access will be allowed from. Change this!
const traefikDynContentUrl = "https://gist.githubusercontent.com/Shogan/f96a5a20183e672f9c49f278ea67503b/raw/351c52b7f2bacbf7b8dae65404b61ff4e4313d81/example-traefik-dynamic.toml"; // this should point to your own dynamic traefik config in toml format.
const emailForLetsEncryptAcmeResolver = 'email = "youremail@example.com"'; // update this to your own email address for lets encrypt certs
const efsAutomaticBackups = false; // set to true to enable automatic backups for EFS
Build and Deploy
Build the Typescript project using npm run build. This compiles the CDK and the EIP Manager Lambda function typescript.
At this point you’re ready to deploy with CDK.
If you have not used CDK before, all you really need to know is that it takes the infrastructure described by the code (typescript in this case), and coverts it to CloudFormation language. The cdk deploy command deploys the stack (which is the collection of AWS resources defined in code).
Run:
# Check what changes will be made first
cdk diff

# Deploy
cdk deploy
SSH onto the EC2 instance that is provisioned, and use docker-compose up -d deploy the compose example stack. Just remember to edit and change the template passwords in the two environment variables.
You’ll also need to update the hostnames to your own (from .example.com), and point those A records to your Elastic public IP address.
One more thing, there is a trick to running docker-compose on ARM systems. I personally prefer to grab a docker image that contains a pre-built docker-compose binary, and shell script that ties it together with the docker-compose command. Here are the steps if you need them (run on the EC2 instance that you SSH onto):
For your own peace of mind, make sure you inspect that githubusercontent run.sh script yourself before downloading, as well as the docker image(s) it references and pulls down to run docker-compose.
Tear Down
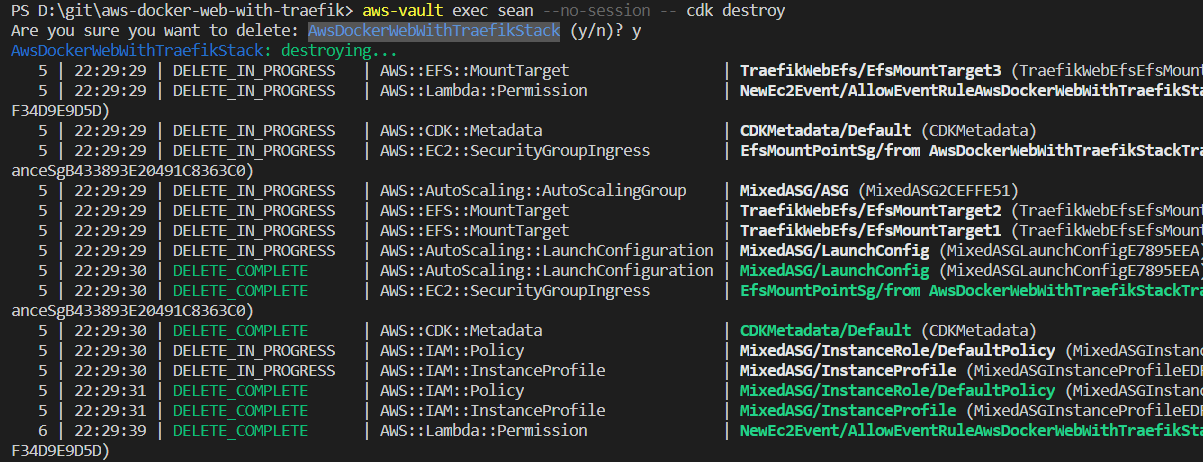
To destroy the stack, simply issue the cdk destroy command. The EFS storage is marked by default with a retain policy, so it will not be deleted automatically.
cdk destroy AwsDockerWebWithTraefikStack
Closing
If you’re on the look out for a minimal cost web hosting solution, then give this a try.
The stack uses the new Graviton2 based t4g instance type (ARM) to help achieve a minimal cost web hosting setup. Remember to find compatible ARM docker images for your applications before you go all in with something like this.
The t4g instance family is also a ‘burstable’ type. This means you’ll get great performance as long as you don’t use up your burst credits. Performance will slow right down if that happens. Keep an eye on your burst credit balance with CloudWatch. For 99% of use cases you’ll likely be just fine though.
Also remember that you don’t need to stick to AWS. You could bolt together services from any other cloud provider to do something similiar, most likely at a similar cost too.