Recently I had to renew expired kubernetes certificates on my home lab cluster after getting locked out from managing it. I wasn’t tracking their age and all of a sudden I found them expired. Kubeadm has a feature to auto-renew certificates during control plane upgrades. Unfortunately I had not done an upgrade on my home cluster in the last year. I realised when issuing a kubectl command to the cluster and receiving an error along the lines of x509: certificate has expired or is not yet valid.
Preparation
To regain access I needed to SSH onto a master node in the cluster and do the following:
Move / backup old certificate and kubeadm config files:
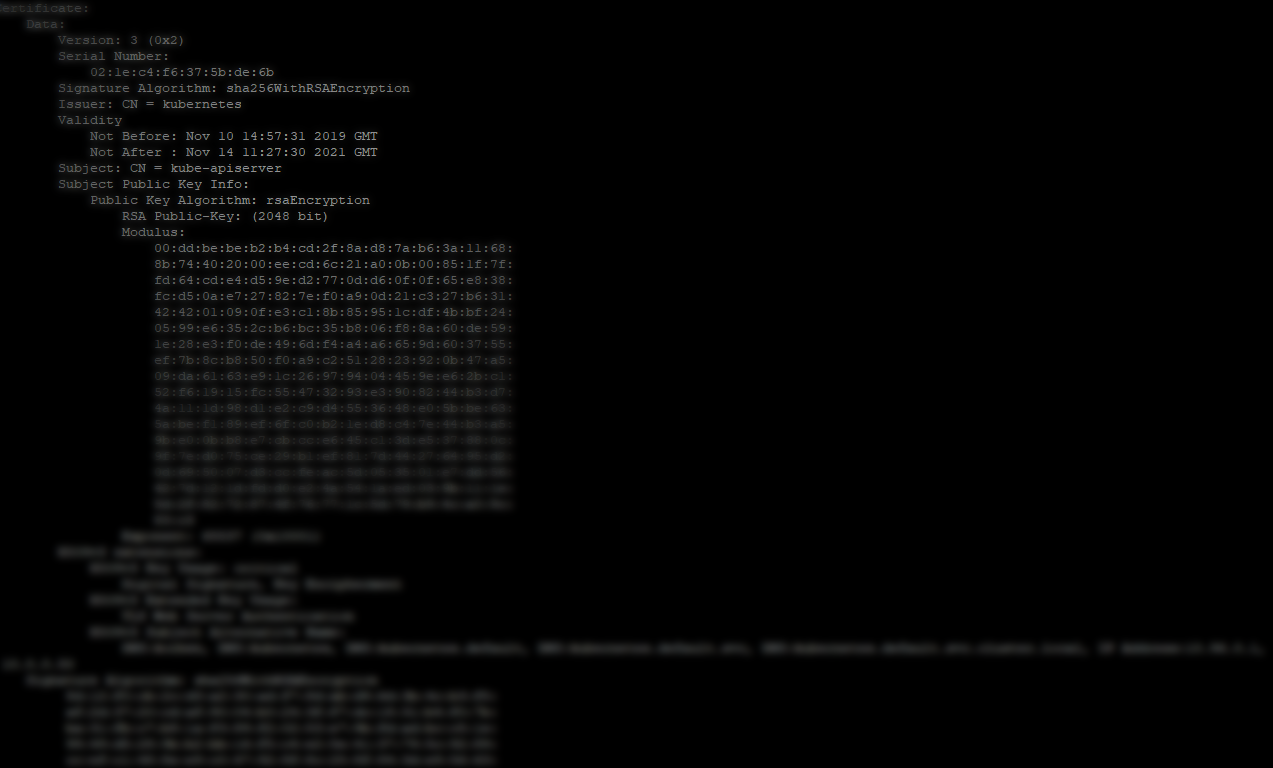
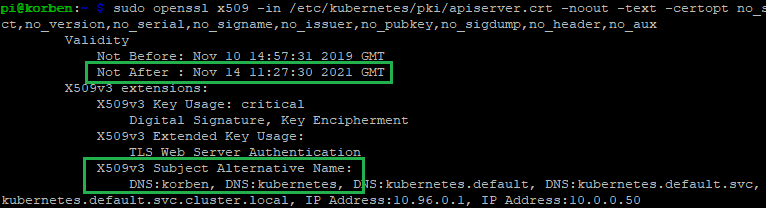
Inspect the generated certificates under /etc/kubernetes/pki to make sure they are generated correctly. E.g. expiry dates a year in the future, etc… For example, checking the new kube api server certificate details:
If your kube services have stopped on the master (kubelet etc) as a result of expired certificates and having tried to restart services recently (as was my case), reboot the master node at this point. All services that were failing to start because of expired certificates should now start correctly.
Reconnect and check everything is working as expected:
When writing tests for a service you’ll often find that there are other dependent services that may need to be called in some way or another. You won’t want to actually invoke the real service during test, but rather ‘stub’ out the dependent service call function. Sinon stub provides an easy and customisable way to replace these external service calls for your tests.
Practical Example: AWS SQS sendMessage Sinon Stub
Let’s say you have an AWS Lambda function that drops a message onto an SQS queue. To test this function handler, your test should invoke the handler and verify that the message was sent.
This simple case already involves an external service call – the SQS sendMessage action that will drop the message onto the queue.
Here is a simple NodeJS module that wraps the SQS sendMessage call.
// sqs.ts

import AWS = require("aws-sdk");
import { AWSError } from "aws-sdk";
import { SendMessageRequest, SendMessageResult } from "aws-sdk/clients/sqs";
import { PromiseResult } from "aws-sdk/lib/request";

const sqs = new AWS.SQS({apiVersion: '2012-11-05'});

export function sendMessage(messageBody: string, queueUrl: string) : Promise<PromiseResult<SendMessageResult, AWSError>> {

  var params = {
    QueueUrl: queueUrl,
    MessageBody: messageBody,
  } as SendMessageRequest;

  return sqs
    .sendMessage(params)
    .promise()
    .then(res => res)
    .catch((err) => { throw err; });
}
The actual Lambda Handler code that uses the sqs.ts module above looks like this:
Next you’ll create a Sinon stub to ‘stub out’ the sendMessage function of this module (the actual code that the real AWS Lambda function would call).
Setup an empty test case that calls the Lambda handler function to test the result.
// handler.spec.ts
import * as chai from 'chai';
import * as sinon from "sinon";
import { assert } from "sinon";
import * as sqs from '../src/sqs';
import { handler } from '../src/index';
import sinonChai from "sinon-chai";
import { PromiseResult } from 'aws-sdk/lib/request';
import { SendMessageResult } from 'aws-sdk/clients/SQS';
import { Response } from 'aws-sdk';
import { AWSError } from 'aws-sdk';
const expect = chai.expect;
chai.use(sinonChai);
const event = {
test: "test"
};
describe("lambda-example-sqs-handler", () => {
describe("handler", () => {
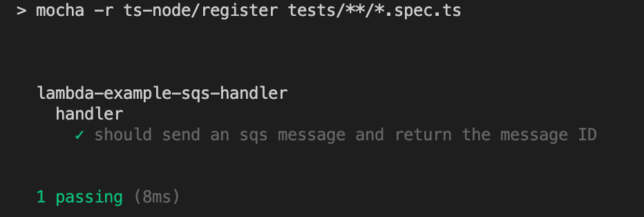
it("should send an sqs message and return the message ID", async () => {
// WHEN
process.env.SQS_QUEUE_URL = "https://sqs.eu-west-1.amazonaws.com/123456789012/test-queue";
const result = await handler(event);
// THEN
expect(result).to.exist;
expect(result).to.eql(`Sent message with ID: 123`);
});
});
});
Right now running this test will fail due to the test code trying to call the sqs.ts module’s code that in turn calls the real SQS service’s sendMessage.
Here is where Sinon stub will come in handy. You can replace this specific call that sqs.ts makes with a test stub.
In the describe handler section, add the following just before the ‘it‘ section.
The code above calls sinon.stub() and passes in the sqs module object, as well as a string (“sendMessage” in this case) identifying the specific method in the module that should be stubbed.
An optional promise result can be passed in to resolves() to get the stub to return data for the test. In this case, we’re having it return an object that matches the real SQS sendMessage return result. Among other things, this contains a message ID which the Lambda function includes in it’s response.
Add a test to verify that the stub method call.
assert.calledOnce(sendMessageStub);
If you run the test again it should now pass. The stub replaces the real service call. Nice!
Conclusion
Replacing dependent service function calls with stubs can be helpful in many ways. For example:
Preventing wasteful, real service calls, which could result in unwanted test data, logs, costs, etc…
Faster test runs that don’t rely on network calls.
Exercising only the relevant code you’re interested in testing.
Sinon provides a testing framework agnostic set of tools such as test spies, stubs and mocks for JavaScript. In this case, you’ve seen how it can be leveraged to make testing interconnected AWS services a breeze with a Lambda function that calls SQS sendMessage to drop a message onto a queue.
This evening I finally got a little time to play around with Waypoint. This wasn’t a straightforward install of Waypoint on my desktop though. I wanted to run and test HashiCorp Waypoint Server on Raspberry Pi. Specifically on my Pi Kubernetes cluster.
Out of the box Waypoint is simple to setup locally, whether you’re on Windows, Linux, or Mac. The binary is written in the Go programming language, which is common across HashiCorp software.
There is even an ARM binary available which lets you run the CLI on Raspberry Pi straight out of the box.
Installing Hashicorp Waypoint Server on Raspberry Pi hosted Kubernetes
I ran into some issues initially when assuming that waypoint install --platform=kubernetes -accept-tos would ensure an ARM docker image was pulled down for my Pi based Kubernetes hosts though.
My Kubernetes cluster also has the nfs-client-provisioner setup, which fulfills PersistentVolumeClaim resources with storage from my home FreeNAS Server Build. I noticed that PVCs were not being honored because they did not have the specific storage-class of nfs-storage that my nfs-client-provisioner required.
Fixing the PVC Issue
Looking at the waypoint CLI command, it’s possible to generate the YAML for the Kubernetes resources it would deploy with a --platform=kubernetes flag. So I fetched a base YAML resource definition:
That sorted out the pending PVC issue in my cluster.
Fixing the ARM Docker Issue
Looking at the Docker image that the waypoint install command for Kubernetes gave me, I could see right away that it was not right for ARM architecture.
To get a basic Waypoint server deployment for development and testing purposes on my Raspberry Pi Kubernetes Cluster, I created a simple Dockerfile for armhf builds.
Basing it on the hypriot/rpi-alpine image, to get things moving quickly I did the following in my Dockerfile.
Added few tools, such as cURL.
Added a RUN command to download the waypoint ARM binary (currently 0.1.3) from Hashicorp releases and place in /usr/bin/waypoint.
Now it is just a simple case of updating the image in the generated YAML StatefulSet to use the ARM image with the ARM waypoint binary embedded.
containers:
- name: server
  image: shoganator/waypoint:0.1.3.20201026-armhf
  imagePullPolicy: Always
With the YAML updated, I simply ran kubectl apply to deploy it to my Kubernetes Cluster. i.e.
kubectl apply -f ./waypoint-armhf.yaml
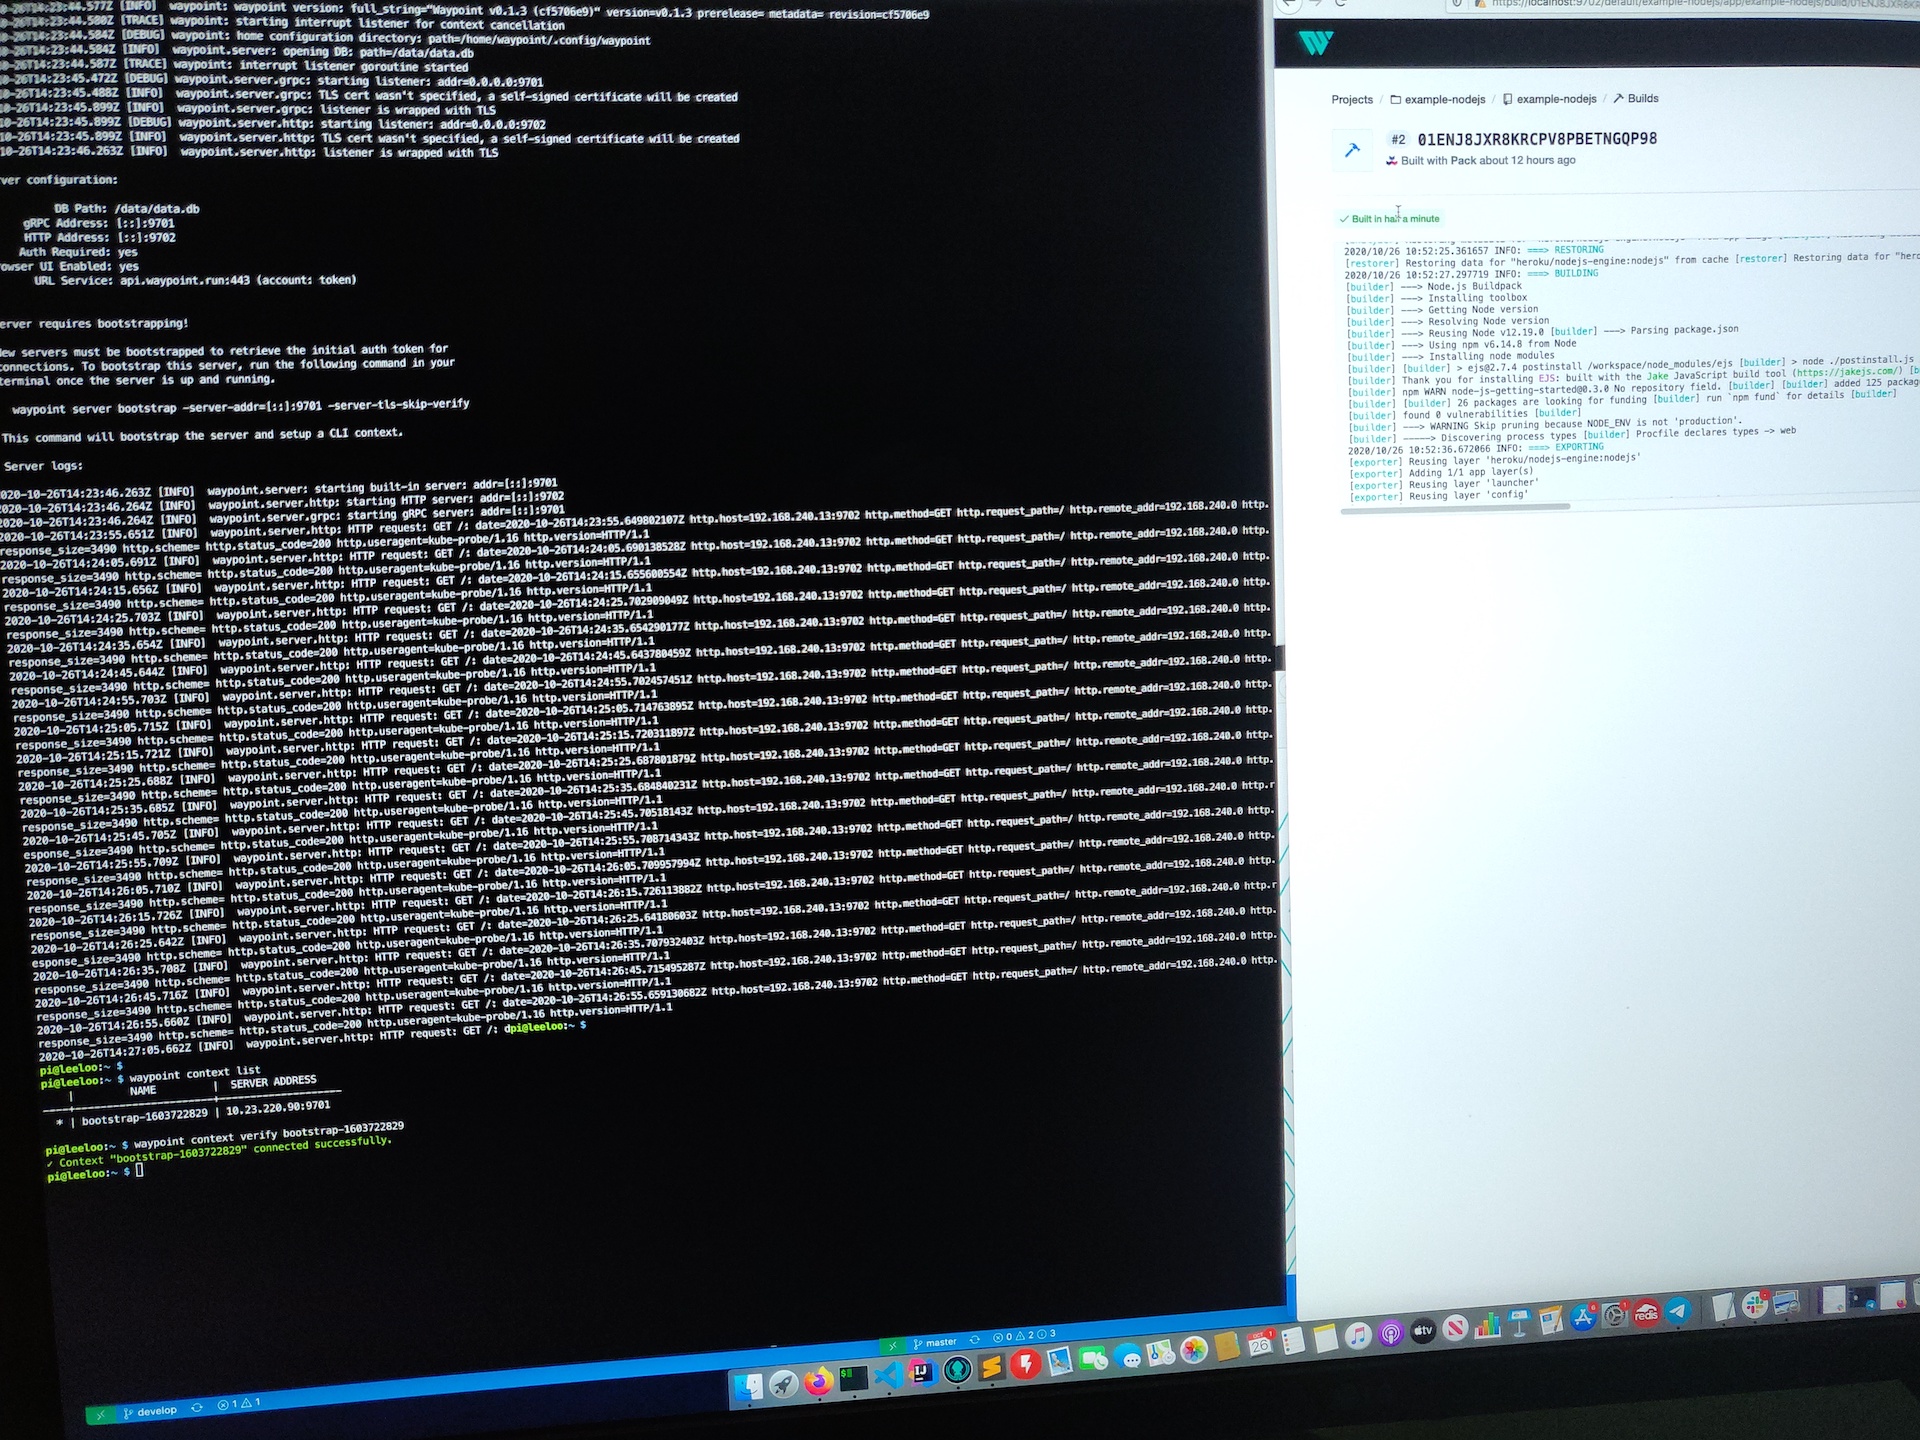
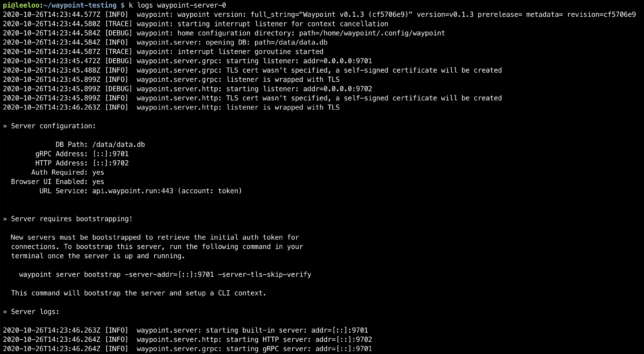
Now Waypoint Server was up and running on my Raspberry Pi cluster. It just needed bootstrapping, which is expected for a new installation.
Configuring Waypoint CLI to Connect to the Server
Next I needed to configure my internal jumpbox to connect to Waypoint Server to verify everything worked.
Things may differ for you here slightly, depending on how your cluster is setup.
Waypoint on Kubernetes creates a LoadBalancer resource. I’m using MetalLB in my cluster, so I get a virtual LoadBalancer, and the EXTERNAL-IP MetalLB assigned to the waypoint service for me was 10.23.220.90.
My cluster is running on it’s own dedicated network in my house. I use another Pi as a router / jumpbox. It has two network interfaces, and the internal interface is on the Kubernetes network.
By getting an SSH session to this Pi, I could verify the Waypoint Server connectivity via it’s LoadBalancer resource.
curl -i --insecure https://10.23.220.90:9702

HTTP/1.1 200 OK
Accept-Ranges: bytes
Content-Length: 3490
Content-Type: text/html; charset=utf-8
Last-Modified: Mon, 19 Oct 2020 21:11:45 GMT
Date: Mon, 26 Oct 2020 14:27:33 GMT
Bootstrapping Waypoint Server
On a first time run, you need to bootstrap Waypoint. This also sets up a new context for you on the machine you run the command from.
The Waypoint LoadBalancer has two ports exposed. 9702 for HTTPS, and 9701 for the Waypoint CLI to communicate with using TCP.
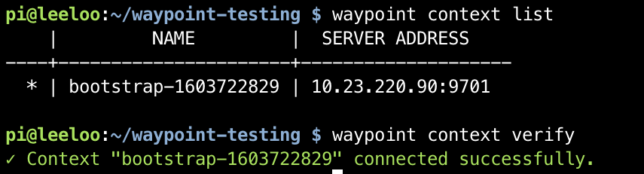
With connectivity verified using curl, I could now bootstrap the server with the waypoint bootstrap command, pointing to the LoadBalancer EXTERNAL-IP and port 9701.
waypoint server bootstrap -server-addr=10.23.220.90:9701 -server-tls-skip-verify
waypoint context list
waypoint context verify
This command gives back a token as a response and sets up a waypoint CLI context from the machine it ran from.
Waypoint context setup and verified from an internal kubernetes network connected machine.
Using Waypoint CLI from a machine external to the Cluster
I wanted to use Waypoint from a management or workstation machine outside of my Pi Cluster network. If you have a similar network setup, you could also do something similar.
As mentioned before, my Pi Router device has two interfaces. A wireless interface, and a phyiscal network interface. To get connectivity over ports 9701 and 9702 I used some iptables rules. Importantly, my Kubernetes facing network interface is on 10.0.0.1 in the example below:
These rules have the effect of sending traffic destined for port 9701 and 9702 hitting the wlan0 interface, to the MetalLB IP 10.23.220.90.
The source and destination network address translation will translate the ‘from’ address of the TCP reply packets to make them look like they’re coming from 10.0.0.1 instead of 10.23.220.90.
Now, I can simply setup a Waypoint CLI context on a machine on my ‘normal’ network. This network has visibility of my Raspberry Pi Router’s wlan0 interface. I used my previously generated token in the command below:
Hashicorp just announced a new open source product called Boundary. Hashicorp Boundary claims to provide secure access to hosts and other systems without needing to manage user credentials or expose wider networks.
I’ll be testing out the newly released open source version 0.1 in this post.
Installation
I’m on macOS so I used homebrew to get a precompiled binary installed and added to my system PATH for the quickest route to test. There are binaries available for other operating systems too.
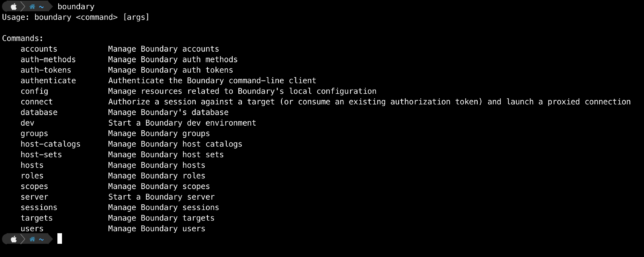
Running boundary reveals the various CLI commands.
Bootstrapping a Boundary Development Environment
Boundary should be deployed in a HA configuration using multiple controllers and workers for a production environment. However for local testing and development, you can spin up an ‘all-in-one’ environment with Docker.
The development or local environment will spin up the following:
Boundary controller server
Boundary worker server
Postgres database for Boundary
Data will not be persisted with this type of a local testing setup.
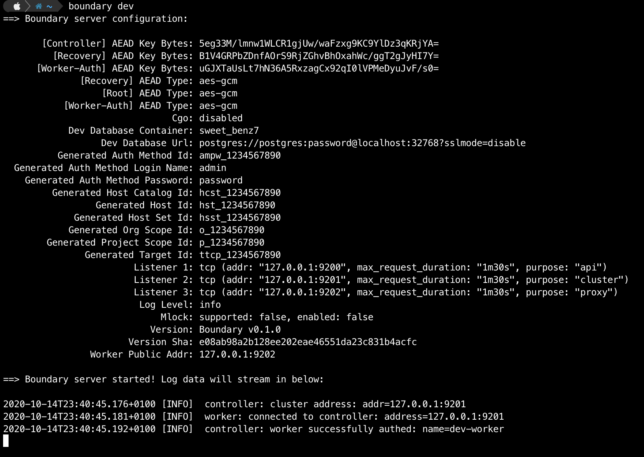
Start a boundary dev environment with default options using the boundary dev command.
boundary dev
You can change the default admin credentials by passing in some flags with the above command if you prefer. E.g.
boundary dev -login-name="johnconnor" -password="T3rmin4at3d"
After a minute or so you should get output providing details about your dev environment.
Login to the admin UI with your web browser using http://127.0.0.1:9200 along with the default admin/password credentials (or your chosen credentials).
Boundary Roles and Grants
Navigate to Roles -> Administration -> Grants.
The Administration Role has the grant:
id=*;type=*;actions=*
If you’re familiar with AWS IAM policies, this may look familiar. id represents resource IDs and actions represents the types of actions that can be performed. For this Administration role, a wildcard asterisk * means that users with this role can do anything with any resource.
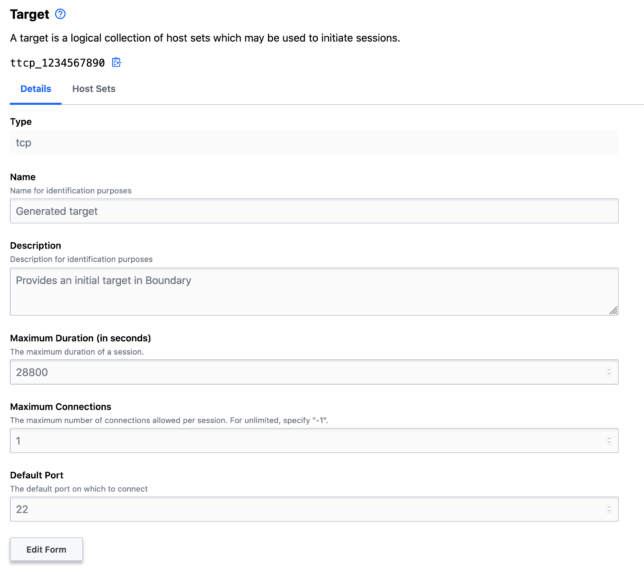
Host Sets, Hosts and Targets
Navigate to Projects▸Generated project scope. Then click Host Catalogs ▸Generated host catalog▸Host Sets▸Generated host set. On the Hosts tab click on Generated host. You can view the Type, ID and Address along with other details of this sample host.
Being a local environment, the address for this host is simply localhost.
To establish a session to a host, you need a Target. For example, to create an SSH session to a host using Hashicorp Boundary, you create a Target.
You do this with a host set. The host set provides host addressing information, along with the type of connection, e.g. TCP.
Explore the Targets page and note the default tcp target with default port 22.
Connecting to a Target
Using your shell (another shell session) and the boundary CLI, authenticate using your local dev auth-method-id and admin credentials.
Session details are available in the Sessions page. You can also cancel or terminate sessions here.
Thoughts
Hashicorp Boundary already looks like it provides a ton of value out of the box. To me it seems like it offers much of the functionality that proprietary cloud services such as AWS SSM Session Manager (along with it’s various AWS service integrations) provide.
If you’re looking to avoid cloud services lock-in when it comes to tooling like this, then Boundary already looks like a great option.
Of course Hashicorp will be looking to commercialise Boundary in the future. However, if you look at their past actions with tools like Terraform and Vault, I’m willing to bet they’ll keep the vast majority of valuable features in the open source version. They’ll most likely provide a convenient and useful commercial offering in the future that larger enterprises might want to pay for.
Sometimes it can be useful to be able to npm publish libraries or projects you’re working on to a local npm registry for use in other development projects.
This post is a quick how-to showing how you can get up and running with a private, local npm registry using Verdaccio and docker compose.
Verdaccio claims it is a zero config required NPM registry, and that is pretty much correct. You can have it up and running in under 5 minutes. Here’s how:
Local NPM Registry Quick Start
Clone verdaccio docker-examples and then change directory into the docker-examples/docker-local-storage-volume directory.
git clone https://github.com/verdaccio/docker-examples.git
cd docker-examples/docker-local-storage-volume
This particular sample docker-compose configuration gives you a locally run verdaccio instance along with persistence via local volume mount.
From here you can be up and running by simply issuing the following docker-compose command:
docker-compose up -d
However if you do want to make a few tweaks to the configuration, simply load up the conf/config.yaml file in your editor.
I wanted to change the max_body_size to a higher value to allow for larger npm packages to be published locally, so I added:
max_body_size: 500mb
If you haven’t yet started the local docker container, start it up with docker-compose up.
Usage
Now all you need to do is configure your local npm settings to use verdaccio on http://localhost:4873. This is default host and port that verdaccio is configured to listen on when running in docker locally).
Then add an npm user for local development:
npm adduser --registry http://localhost:4873
To use your new registry at a project level, you can create a .npmrc file in your local projects with the following content:
@shogan:registry=http://localhost:4873
Of course replace the scope of @shogan with the package scope of your choosing.
To publish a module / package locally:
npm publish --registry http://localhost:4873
Other Examples
There are lots more verdaccio samples and configurations that you can use in the docker-examples repository. Take a look to find these, including Kubernetes resources to deploy if you prefer running there for a local development setup.
Also refer to the verdaccio configuration page for more examples and documentation on the possible config options.