Saga Pattern with aws-cdk, Lambda, and Step Functions

steps

The saga pattern is useful when you have transactions that require a bunch of steps to complete successfully, with failure of steps requiring associated rollback processes to run. This post will cover the saga pattern with aws-cdk, leveraging AWS Step Functions and Lambda.

If you need an introduction to the saga pattern in an easy to understand format, I found this GOTO conference session by Caitie McCaffrey very informative.

Another useful resource with regard to the saga pattern and AWS Step Functions is this post over at theburningmonk.com.

Saga Pattern with aws-cdk

I’ll be taking things one step further by automating the setup and deployment of a sample app which uses the saga pattern with aws-cdk.

I’ve started using aws-cdk fairly frequently, but realise it has the issue of vendor lock-in. I found it nice to work with in the case of step functions particularly in the way you construct step chains.

Saga Pattern with Step Functions

So here is the step function state machine you’ll create using the fairly simple saga pattern aws-cdk app I’ve set up.

saga pattern with aws-cdk - a successful transaction run
A successful transaction run

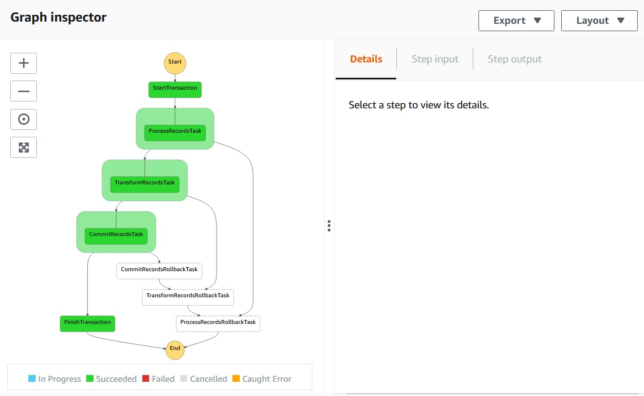
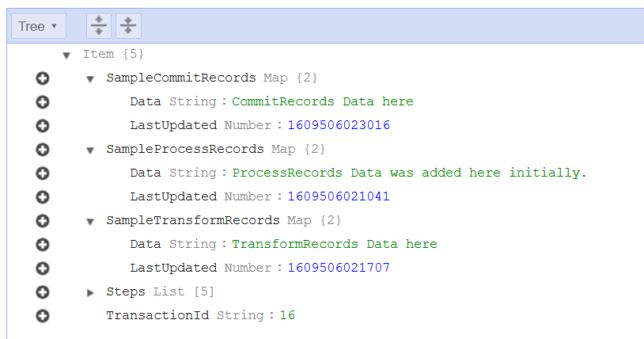
Above you see a successful transaction run, where all records are saved to a DynamoDB table entry.

dynamodb data from sample app using saga pattern with aws-cdk
The sample data written by a succesful transaction run. Each step has a ‘Sample’ map entry with ‘Data’ and a timestamp.

If one of those steps were to fail, you need to manage the rollback process of your transaction from that step backwards.

Illustrating Failure Rollback

As mentioned above, with the saga pattern you’ll want to rollback any steps that have run from the point of failure backward.

The example app has three steps:

  • Process Records
  • Transform Records
  • Commit Records

Each step is a simple lambda function that writes some data to a DynamoDB table with a primary partition key of TransactionId.

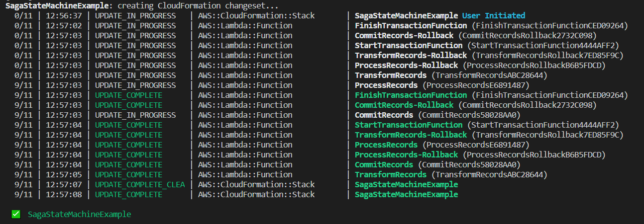
In the screenshot below, TransformRecords has a simulated failure, which causes the lambda function to throw an error.

A catch step is linked to each of the process steps to handle rollback for each of them. Above, TransformRecordsRollbackTask is run when TransformRecordsTask fails.

The rollback steps cascade backward to the first ‘business logic’ step ProcessRecordsTask. Any steps that have run up to that point will therefore have their associated rollback tasks run.

Here is what an entry looks like in DynamoDB if it failed:

A failed transaction has no written data, because the data written up to the point of failure was ‘rolled back’.

You’ll notice this one does not have the ‘Sample’ data that you see in the previously shown successful transaction. In reality, for a brief moment it does have that sample data. As each rollback step is run, the associated data for that step is removed from the table entry, resulting in the above entry for TransactionId 18.

Deploying the Sample Saga Pattern App with aws-cdk

Clone the source code for the saga pattern aws-cdk app here.

You’ll need to npm install and typescript compile first. From the root of the project:

npm install && npm run build

Now you can deploy using aws-cdk.

# Check what you'll deploy / modify first with a diff
cdk diff
# Deploy
cdk deploy

With the stack deployed, you’ll now have the following resources:

  • Step Function / State Machine
  • Various Lambda functions for transaction start, finish, the process steps, and each process rollback step.
  • A DynamoDB table for the data
  • IAM role(s) created for the above

Testing the Saga Pattern Sample App

To test, head over to the Step Functions AWS Console and navigate to the newly created SagaStateMachineExample state machine.

Click New Execution, and paste the following for the input:

{
    "Payload": {
      "TransactionDetails": {
        "TransactionId": "1"
      }
    }
}

Click Start Execution.

In a few short moments, you should have a successful execution and you should see your transaction and sample data in DynamoDB.

Moving on, to simulate a random failure, try executing again, but this time with the following payload:

{
    "Payload": {
      "TransactionDetails": {
        "TransactionId": "2",
        "simulateFail": true
      }
    }
}

The lambda functions check the payload input for the simulateFail flag, and if found will do a Math.random() check to give chance of failure in one of the process steps.

Taking it Further

To take this example further, you’ll want to more carefully manage step outputs using Step Function ResultPath configuration. This will ensure that your steps don’t overwrite data in the state machine and that steps further down the line have access to the data that they need.

You’ll probably also want a step at the end of the line for the case of failure (which runs after all rollback steps have completed). This can handle notifications or other tasks that should run if a transaction fails.

Hashicorp Waypoint Server on Raspberry Pi

waypoint server running on raspberry pi

This evening I finally got a little time to play around with Waypoint. This wasn’t a straightforward install of Waypoint on my desktop though. I wanted to run and test HashiCorp Waypoint Server on Raspberry Pi. Specifically on my Pi Kubernetes cluster.

Out of the box Waypoint is simple to setup locally, whether you’re on Windows, Linux, or Mac. The binary is written in the Go programming language, which is common across HashiCorp software.

There is even an ARM binary available which lets you run the CLI on Raspberry Pi straight out of the box.

Installing Hashicorp Waypoint Server on Raspberry Pi hosted Kubernetes

I ran into some issues initially when assuming that waypoint install --platform=kubernetes -accept-tos would ensure an ARM docker image was pulled down for my Pi based Kubernetes hosts though.

My Kubernetes cluster also has the nfs-client-provisioner setup, which fulfills PersistentVolumeClaim resources with storage from my home FreeNAS Server Build. I noticed that PVCs were not being honored because they did not have the specific storage-class of nfs-storage that my nfs-client-provisioner required.

Fixing the PVC Issue

Looking at the waypoint CLI command, it’s possible to generate the YAML for the Kubernetes resources it would deploy with a --platform=kubernetes flag. So I fetched a base YAML resource definition:

waypoint install --platform=kubernetes -accept-tos --show-yaml

I modified the volumeClaimTemplates section to include my required PVC storageClassName of nfs-storage.

volumeClaimTemplates:
  - metadata:
      name: data
    spec:
      accessModes: [ "ReadWriteOnce" ]
      storageClassName: nfs-storage
      resources:
        requests:
          storage: 1Gi

That sorted out the pending PVC issue in my cluster.

Fixing the ARM Docker Issue

Looking at the Docker image that the waypoint install command for Kubernetes gave me, I could see right away that it was not right for ARM architecture.

To get a basic Waypoint server deployment for development and testing purposes on my Raspberry Pi Kubernetes Cluster, I created a simple Dockerfile for armhf builds.

Basing it on the hypriot/rpi-alpine image, to get things moving quickly I did the following in my Dockerfile.

  • Added few tools, such as cURL.
  • Added a RUN command to download the waypoint ARM binary (currently 0.1.3) from Hashicorp releases and place in /usr/bin/waypoint.
  • Setup a /data volume mount point.
  • Created a waypoint user.
  • Created the entrypoint for /usr/bin/waypoint.

You can get my ARM Waypoint Server Dockerfile on Github, and find the built armhf Docker image on Docker Hub.

Now it is just a simple case of updating the image in the generated YAML StatefulSet to use the ARM image with the ARM waypoint binary embedded.

containers:
- name: server
  image: shoganator/waypoint:0.1.3.20201026-armhf
  imagePullPolicy: Always

With the YAML updated, I simply ran kubectl apply to deploy it to my Kubernetes Cluster. i.e.

kubectl apply -f ./waypoint-armhf.yaml

Now Waypoint Server was up and running on my Raspberry Pi cluster. It just needed bootstrapping, which is expected for a new installation.

Hashicorp Waypoint Server on Raspberry Pi - pod started.

Configuring Waypoint CLI to Connect to the Server

Next I needed to configure my internal jumpbox to connect to Waypoint Server to verify everything worked.

Things may differ for you here slightly, depending on how your cluster is setup.

Waypoint on Kubernetes creates a LoadBalancer resource. I’m using MetalLB in my cluster, so I get a virtual LoadBalancer, and the EXTERNAL-IP MetalLB assigned to the waypoint service for me was 10.23.220.90.

My cluster is running on it’s own dedicated network in my house. I use another Pi as a router / jumpbox. It has two network interfaces, and the internal interface is on the Kubernetes network.

By getting an SSH session to this Pi, I could verify the Waypoint Server connectivity via it’s LoadBalancer resource.

curl -i --insecure https://10.23.220.90:9702

HTTP/1.1 200 OK
Accept-Ranges: bytes
Content-Length: 3490
Content-Type: text/html; charset=utf-8
Last-Modified: Mon, 19 Oct 2020 21:11:45 GMT
Date: Mon, 26 Oct 2020 14:27:33 GMT

Bootstrapping Waypoint Server

On a first time run, you need to bootstrap Waypoint. This also sets up a new context for you on the machine you run the command from.

The Waypoint LoadBalancer has two ports exposed. 9702 for HTTPS, and 9701 for the Waypoint CLI to communicate with using TCP.

With connectivity verified using curl, I could now bootstrap the server with the waypoint bootstrap command, pointing to the LoadBalancer EXTERNAL-IP and port 9701.

waypoint server bootstrap -server-addr=10.23.220.90:9701 -server-tls-skip-verify
waypoint context list
waypoint context verify

This command gives back a token as a response and sets up a waypoint CLI context from the machine it ran from.

Waypoint context setup and verified from an internal kubernetes network connected machine.

Using Waypoint CLI from a machine external to the Cluster

I wanted to use Waypoint from a management or workstation machine outside of my Pi Cluster network. If you have a similar network setup, you could also do something similar.

As mentioned before, my Pi Router device has two interfaces. A wireless interface, and a phyiscal network interface. To get connectivity over ports 9701 and 9702 I used some iptables rules. Importantly, my Kubernetes facing network interface is on 10.0.0.1 in the example below:

sudo iptables -t nat -A PREROUTING -i wlan0 -p tcp --dport 9702 -j DNAT --to-destination 10.23.220.90:9702
sudo iptables -t nat -A POSTROUTING -p tcp -d 10.23.220.90 --dport 9702 -j SNAT --to-source 10.0.0.1
sudo iptables -t nat -A PREROUTING -i wlan0 -p tcp --dport 9701 -j DNAT --to-destination 10.23.220.90:9701
sudo iptables -t nat -A POSTROUTING -p tcp -d 10.23.220.90 --dport 9701 -j SNAT --to-source 10.0.0.1

These rules have the effect of sending traffic destined for port 9701 and 9702 hitting the wlan0 interface, to the MetalLB IP 10.23.220.90.

The source and destination network address translation will translate the ‘from’ address of the TCP reply packets to make them look like they’re coming from 10.0.0.1 instead of 10.23.220.90.

Now, I can simply setup a Waypoint CLI context on a machine on my ‘normal’ network. This network has visibility of my Raspberry Pi Router’s wlan0 interface. I used my previously generated token in the command below:

waypoint context create -server-addr=192.168.7.31:9701 -server-tls-skip-verify -server-auth-token={generated-token-here} rpi-cluster
waypoint context verify rpi-cluster
Connectivity verified from my macOS machine, external to my Raspberry Pi Cluster with Waypoint Server running there.

Concluding

Waypoint Server is super easy to get running locally if you’re on macOS, Linux or Windows.

With a little bit of extra work you can get HashiCorp Waypoint Server on Raspberry Pi working, thanks to the versatility of the Waypoint CLI!

Testing HashiCorp Boundary Locally

network switch

Hashicorp just announced a new open source product called Boundary. Hashicorp Boundary claims to provide secure access to hosts and other systems without needing to manage user credentials or expose wider networks.

I’ll be testing out the newly released open source version 0.1 in this post.

Installation

I’m on macOS so I used homebrew to get a precompiled binary installed and added to my system PATH for the quickest route to test. There are binaries available for other operating systems too.

brew install hashicorp/tap/boundary
brew upgrade hashicorp/tap/boundary

Running boundary reveals the various CLI commands.

the boundary CLI command options

Bootstrapping a Boundary Development Environment

Boundary should be deployed in a HA configuration using multiple controllers and workers for a production environment. However for local testing and development, you can spin up an ‘all-in-one’ environment with Docker.

The development or local environment will spin up the following:

  • Boundary controller server
  • Boundary worker server
  • Postgres database for Boundary

Data will not be persisted with this type of a local testing setup.

Start a boundary dev environment with default options using the boundary dev command.

boundary dev

You can change the default admin credentials by passing in some flags with the above command if you prefer. E.g.

boundary dev -login-name="johnconnor" -password="T3rmin4at3d"

After a minute or so you should get output providing details about your dev environment.

hashicorp boundary dev environment

Login to the admin UI with your web browser using http://127.0.0.1:9200 along with the default admin/password credentials (or your chosen credentials).

hashicorp boundary organizations screen in the admin UI

Boundary Roles and Grants

Navigate to Roles -> Administration -> Grants.

The Administration Role has the grant:

id=*;type=*;actions=*

If you’re familiar with AWS IAM policies, this may look familiar. id represents resource IDs and actions represents the types of actions that can be performed. For this Administration role, a wildcard asterisk * means that users with this role can do anything with any resource.

Host Sets, Hosts and Targets

Navigate to Projects Generated project scope. Then click Host Catalogs Generated host catalog Host Sets Generated host set. On the Hosts tab click on Generated host. You can view the Type, ID and Address along with other details of this sample host.

Being a local environment, the address for this host is simply localhost.

To establish a session to a host, you need a Target. For example, to create an SSH session to a host using Hashicorp Boundary, you create a Target.

You do this with a host set. The host set provides host addressing information, along with the type of connection, e.g. TCP.

Explore the Targets page and note the default tcp target with default port 22.

boundary target

Connecting to a Target

Using your shell (another shell session) and the boundary CLI, authenticate using your local dev auth-method-id and admin credentials.

boundary authenticate password -auth-method-id=ampw_1234567890 \
    -login-name=admin -password=password

Your logged in session should be valid for 1 week.

Now you can get details about the default Generated target using it’s ID:

boundary targets read -id ttcp_1234567890

To connect and establish an SSH session to this sample host simply run the boundary connect command, passing in the target ID.

boundary connect ssh -target-id ttcp_1234567890

Exec Command and Wrapping TCP Sessions With Other Clients

The -exec flag is used to wrap a Boundary TCP session with a designated client or tool, for example curl.

As a quick test, you can use the default Target to perform a request against another host using curl.

Update the default TCP target port from 22 to 443. Then use the boundary connect command and -exec flag to curl this blog 🙂

boundary targets update tcp -default-port 443 -id ttcp_1234567890
boundary connect -exec curl -target-id ttcp_1234567890 \
     -- -vvsL --output /dev/null www.shogan.co.uk

Viewing Sessions

Session details are available in the Sessions page. You can also cancel or terminate sessions here.

Thoughts

Hashicorp Boundary already looks like it provides a ton of value out of the box. To me it seems like it offers much of the functionality that proprietary cloud services such as AWS SSM Session Manager (along with it’s various AWS service integrations) provide.

If you’re looking to avoid cloud services lock-in when it comes to tooling like this, then Boundary already looks like a great option.

Of course Hashicorp will be looking to commercialise Boundary in the future. However, if you look at their past actions with tools like Terraform and Vault, I’m willing to bet they’ll keep the vast majority of valuable features in the open source version. They’ll most likely provide a convenient and useful commercial offering in the future that larger enterprises might want to pay for.

Quick and Easy Local NPM Registry With Verdaccio and Docker

container storage

Sometimes it can be useful to be able to npm publish libraries or projects you’re working on to a local npm registry for use in other development projects.

This post is a quick how-to showing how you can get up and running with a private, local npm registry using Verdaccio and docker compose.

Verdaccio claims it is a zero config required NPM registry, and that is pretty much correct. You can have it up and running in under 5 minutes. Here’s how:

Local NPM Registry Quick Start

Clone verdaccio docker-examples and then change directory into the docker-examples/docker-local-storage-volume directory.

git clone https://github.com/verdaccio/docker-examples.git
cd docker-examples/docker-local-storage-volume

This particular sample docker-compose configuration gives you a locally run verdaccio instance along with persistence via local volume mount.

From here you can be up and running by simply issuing the following docker-compose command:

docker-compose up -d

However if you do want to make a few tweaks to the configuration, simply load up the conf/config.yaml file in your editor.

I wanted to change the max_body_size to a higher value to allow for larger npm packages to be published locally, so I added:

max_body_size: 500mb

If you haven’t yet started the local docker container, start it up with docker-compose up.

Usage

Now all you need to do is configure your local npm settings to use verdaccio on http://localhost:4873. This is default host and port that verdaccio is configured to listen on when running in docker locally).

Then add an npm user for local development:

npm adduser --registry http://localhost:4873

To use your new registry at a project level, you can create a .npmrc file in your local projects with the following content:

@shogan:registry=http://localhost:4873

Of course replace the scope of @shogan with the package scope of your choosing.

To publish a module / package locally:

npm publish --registry http://localhost:4873

Other Examples

There are lots more verdaccio samples and configurations that you can use in the docker-examples repository. Take a look to find these, including Kubernetes resources to deploy if you prefer running there for a local development setup.

Also refer to the verdaccio configuration page for more examples and documentation on the possible config options.

Using Placeholder Templates With Xargs In The Pipeline

pipes running along a wall

Using placeholder templates with xargs gives you a lot more power than simply using xargs to append args onto the end of a command.

I previously blogged about how to use xargs to append arguments to another command in the pipeline. This post goes into a bit more detail and shows you a more powerful way of using xargs.

Basic Xargs Example

With a typical, simple xargs command, you might append one argument onto the end of an existing command in the pipeline like this:

echo "this is a basic xargs example" | xargs echo "you said:"

The above command results in the output:

you said: this is a basic xargs example

Placeholder Templates With Xargs Example

Now, here is a simple example of using a placeholder, or template in your command, and passing your argument into that.

echo "this is a basic xargs example" | xargs -I {} echo "you said: {}"

The output is exactly the same as with the basic example. However, you can now use the curly braces placeholder to move the argument placement to anywhere in your command.

You’re no longer constrained to it being on the end of the echo (or whichever command you’re using). You can also do multiple placements of the argument in your command.

For example:

echo "FOO" | xargs -I {} echo "you said: {}. Here is another usage of your sample argument: {}. And here is yet another: {}"

A Slightly More Practical Example

Enough of the simple echo examples though. How about using this for a more practical, real world example?

In the following example, we want to list a bunch of AWS S3 buckets, and then do a summary output of their total size in GiB. We cut out the bucket name using cut from the initial listing that is returned with aws s3 ls.

aws s3 ls | cut -d' ' -f3 | xargs -n1 aws s3 ls --summarize --human-readable --recursive s3://

Using xargs to append the bucket name from the pipeline looks like it would work, as we only need it right at the end of the aws s3 ls command. There is an issue though, xargs would add a space, and we want the bucket name appended to s3:// without a space.

Using The Template or Placeholder

This is where using a placeholder or template with xargs can come in handy.

aws s3 ls | cut -d' ' -f3 | xargs -n1 -I {} aws s3 ls --summarize --human-readable --recursive s3://{}

It’s also worth noting that you can change your template or placeholder token with the -I parameter. It doesn’t have to be {} as in the examples above.

In summary, your usage of xargs can be levelled up by using the -I parameter to leverage placeholder or template tokens.