Ingest CloudWatch Logs to a Splunk HEC with Lambda and Serverless

cloudwatch logs to splunk HEC via Lambda

I recently came across a scenario requiring CloudWatch log ingestion to a private Splunk HEC (HTTP Event Collector).

The first and preferred method of ingesting CloudWatch Logs into Splunk is by using AWS Firehose. The problem here though is that Firehose only seems to support an endpoint that is open to the public.

This is a problem if you have a Splunk HEC that is only available inside of a VPC and there is no option to proxy public connections back to it.

The next thing I looked at was the Splunk AWS Lambda function template to ingest CloudWatch logs from Log Group events. I had a quick look and it seems pretty out of date, with synchronous functions and libraries in use.

So, I decided to put together a small AWS Lambda Serverless project to improve on what is currently out there.

You can find the code over on Github.

The new version has:

  • async / await, and for promised that wrap the synchronous libraries like zlib.
  • A module that handles identification of Log Group names based on a custom regex pattern. If events come from log groups that don’t match the naming convention, then they get rejected. The idea is that you can write another small function that auto-subscribes Log Groups.
  • Secrets Manager integration for loading the Splunk HEC token from Secrets Manager. (Or fall back to a simple environment variable if you like).
  • Serverless framework wrapper. Pass in your Security Group ID, Subnet IDs and tags, and let serverless CLI deploy the function for you.
  • Lambda VPC support by default. You should deploy this Lambda function in a VPC. You could change that, but my idea here is that most enterprises would be running their own internal Splunk inside of their corporate / VPC network. Change it by removing the VPC section in serverless.yml if you do happen to have a public facing Splunk.

You deploy it using Serverless framework, passing in your VPC details and a few other options for customisation.

serverless deploy --stage test \
  --iamRole arn:aws:iam::123456789012:role/lambda-vpc-execution-role \
  --securityGroupId sg-12345 \
  --privateSubnetA subnet-123 \
  --privateSubnetB subnet-456 \
  --privateSubnetC subnet-789 \
  --splunkHecUrl https://your-splunk-hec:8088/services/collector \
  --secretManagerItemName your/secretmanager/entry/here

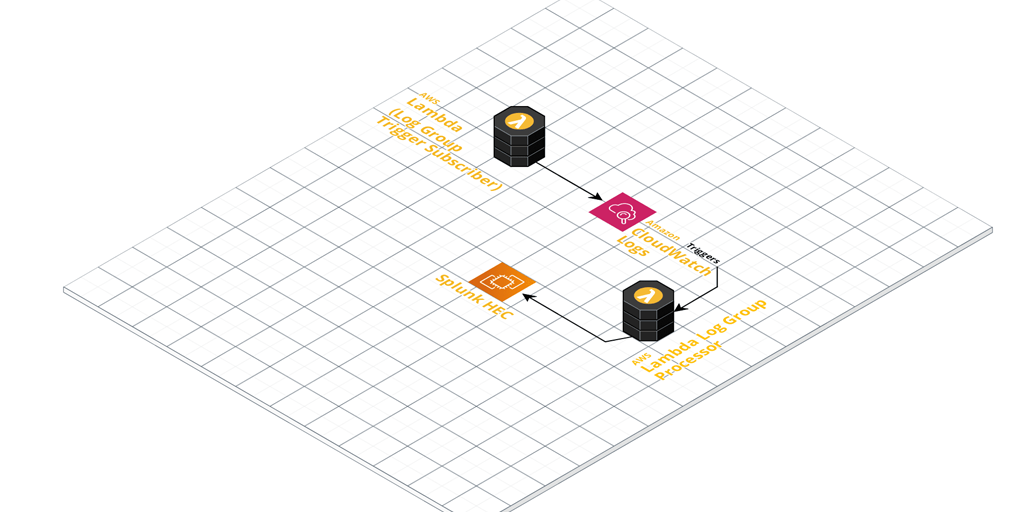
Once configured, it’ll pick up any log events coming in from Log Groups you’ve ‘subscribed’ it to (Lambda CloudWatch Logs Triggers).

add your lambda CloudWatch logs triggers and enabled them for automatic ingestion of these to Splunk

These events get enriched with extra metadata defined in the function. The metadata is derived by default from the naming convention used in the CloudWatch Log Groups. Take a close look at the included Regex pattern to ensure you name your Log Groups appropriately. Finally, they’re sent to your Splunk HEC for ingestion.

For an automated Log Group ingestion story, write another small helper function that:

  • Looks for Log Groups that are not yet subscribed as CloudWatch Logs Triggers.
  • Adds them to your CloudWatch to Splunk HEC function as a trigger and enables it.

In the future I might add this ‘automatic trigger adding function’ to the Github repository, so stay tuned!

An Operation View of Multiple Kubernetes Clusters

kubernetes operational view dashboard

Getting an operation view of multiple Kubernetes clusters is possible with many different tools.

I came across Kubernetes Operational View this evening and decided to try it out.

The tool’s object is simple: provide a common operational view for many clusters. You can also use it for a single cluster too, if you like.

Deployment

Installation is simple, you can run it in a docker container and use kubectl proxy to connect, or you can run inside your Kubernetes cluster.

I chose the latter for my test scenario and deployed it using the official stable helm chart.

helm install --name kubeopsview stable/kube-ops-view -f ./customvalues.yaml --set rbac.create=true --timeout 30 --namespace testing

If you would like to access it from outside of your cluster, and you use an Ingress Controller, set this up first.

Here is my sample values.yaml section for enabling an Ingress rule:

ingress:
  enabled: true
  path: /
  hostname: kube-ops-view.mycluster.xyz
  annotations: {}

The other option is to use the deployment manifest resources with the kubectl apply command.

There are environment variables that you can use to point it to multiple clusters and tweak other bits of the configuration.

The main variable you may wish to tweak is CLUSTERS. This allows you to specify a comma separated list of Kubernetes API server URLs. Use this to get the dashboard view populated with multiple clusters you have access to.

The tool only requires read-only access to the cluster, so keep this in mind if you’re deploying it manually.

If you’re using the Helm chart, specify rbac.create = true to create the read-only ClusterRole and ClusterRoleBinding automatically.

There are plenty of nifty features for a simple operational view. You can filter, move the cluster sections around, and change themes.

kubernetes operational view dashboard CRT effect animation

It’s even got an old school CRT style theme you can enable, though I’m not sure the flicker and scan line effect are my cup of tea!

Lastly, there is plenty of documentation in the official GitHub repository, which is always nice to see.

Install and configure Nextcloud plugin on FreeNAS with SSL

Install and configure Nextcloud plugin on FreeNAS with SSL

The FreeNAS Nextcloud plugin installation works great with automatic configuration thanks to a recent pull request. But, you don’t get SSL enabled by default. This is critical, especially for a system exposed to the internet.

In this post you’ll see how to:

  • Install the Nextcloud plugin in a FreeNAS BSD jail
  • Add an extra NAT port for SSL to the jail
  • Configure NGINX inside the jail by adding a customised configuration with SSL enabled
  • Apply a free SSL certificate using Lets Encrypt and DNS-01 challenge validation
  • Look at some options for setting up home networking for public access

Start off by Installing the Nextcloud Plugin in a jail. Choose NAT for networking mode. It defaults to port 8282:80 (http).

the Nextcloud jail in the FreeNAS UI

Stop the jail once it’s running and edit it. Add another NAT rule to point 8443 to 443 for SSL.

the extra port 8443 - 443 NAT rule to add

The reason for selecting port 8443 for Nextcloud is because the FreeNAS web UI listens on port 443 for SSL too.

An alternative could be to use DHCP instead of NAT for the jail. I chose NAT for my setup as I prefer using one internal IP address for everything I run on the FreeNAS server.

Shell into the Nextcloud jail, and rename the default nginx configuration.

mv /usr/local/etc/nginx/conf.d/nextcloud.conf /usr/local/etc/nginx/conf.d/nextcloud.conf.old

NGINX will load all .conf files in this directory. Hence the reason you’ll create a new configuration for your SSL setup here.

ee /usr/local/etc/nginx/conf.d/nextcloud-ssl.conf

Populate it with the contents of the gist below, but replace server_name, ssl_certificate, and ssl_certificate_key with your own hostname.

Generate a free SSL certificate with Lets Encrypt

To configure the Nextcloud plugin on FreeNAS with SSL you don’t need to break the bank on SSL certificate costs from traditional CAs. Lets Encrypt it free, but you’ll need to renew your certificate every three months.

DNS-01 challenge certificate generation for Lets Encrypt is a great way to get SSL certificates without a public web server.

It entails creating a TXT/SPF record on the domain you own, with a value set to a code that certbot gives you during the certbot request process.

Install certbot if you don’t already have it installed. On a debian based system:

sudo apt-get install certbot

Request a certificate for your desired hostname using certbot with dns as the preferred challenge.

sudo certbot -d yournextcloud.example.net --manual --preferred-challenges dns certonly

Follow the prompts until you receive a code to setup your own TXT record with. Go to your DNS provider control panel and create it with the code you’re given as the value.

After creating the record, finish the certificate request. Lets Encrypt will confirm the DNS TXT record and issue you a certificate. You’ll get a chain file called fullchain.pem, along with a private key file called privkey.pem.

Upload the SSL certificate files to Nextcloud

Upload both to your Nextcloud Jail. Use SCP to copy them up, renaming them as follows:

  • /etc/ssl/nginx/yournextcloud.example.net.crt (certificate chain file)
  • /etc/ssl/nginx/yournextcloud.example.net.key (private key file)

Rename them as per your chosen hostname to keep things organised, and so that they match your nextcloud-ssl.conf file entries.

Port forwarding / NAT setup

This is the part that comes down to your own network setup. I use a double NAT setup, so I NAT traffic from my external router interface, through to another internal router.

From my internal router, I port forward / NAT from the internal router interface through to my FreeNAS box on port 8443.

From there, the Nextcloud jail does NAT to take the TCP traffic from 8443 to 443 inside the jail (where NGINX is listening on 443).

This is how my NAT and port forwarding chain looks:

Public_IP:29123 (WAN interface) -> Internal_IP:29123 (Internal router LAN interface) -> Internal_IP:8443 (FreeNAS LAN interface) -> Internal_IP:443 (Nextcloud Jail)

If you’re lucky enough to have a static IP address then you can point your DNS host record to your static IP. Otherwise you’ll neee to use some form of dynamic DNS service.

At this point you should have everything in place.

Final steps

Using a shell in the Nextcloud jail, restart nginx with service nginx restart. If all goes well you’ll see nginx started in the output of that command.

If not, you’re likely to have an NGINX configuration syntax error.

The logs are usually good about pinpointing these, so read them to see where you might have missed something obvious in the nextcloud-ssl.conf file. Adjust any errors and restart again.

The default credentials that for Nextcloud are in the home directory of the jail (/root). To retrieve them:

cat /root/ncuser
cat /root/ncpassword

Test logging in, and get started with personalising your Nextcloud system and adding some users.

Now you can enjoy the Nextcloud plugin on FreeNAS with SSL enabled.